What It Takes To Make A Raspberry Pi Killer

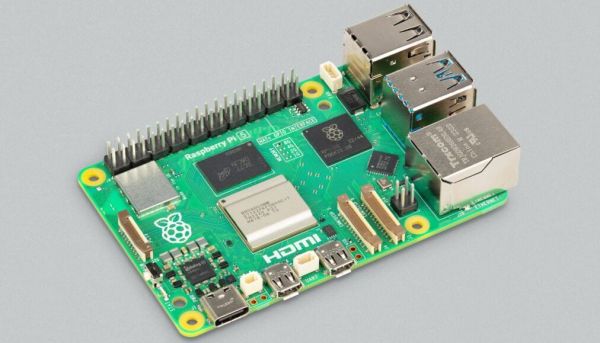
The folks at Raspberry Pi are riding on a bit of a wave at the moment, with the launch of the Pi 5 with its PCIe and RP1 peripheral chip, the huge success of the RP2040 microcontroller, and the supply chain issues that dogged the Pi 4 and Compute Module 4 during and after the pandemic finally working themselves out. But as always there are plenty of would-be competitors snapping at their heels, so [Jeff Geerling] has posed the question of what it takes to make a Raspberry Pi killer. He’s in a good position to do this, as he’s amassed an impressive collection of every competing Compute Module board.

It’s a well-observed analysis of the world of small Linux SBCs, on hardware, software, community, and price, and we find ourselves pretty much in agreement with it. The Pi hardware has quirks and is rarely the best on paper when compared to the competition, but they win hands-down on distribution support and community. In a sense what you really buy when you get a PI is this, because Raspberry Pi OS will run on it for the reasonable future. Rival makers would do well to read his piece, because we sense that if one of them tried to give the Pi a run for its money away from the hardware it would make for a much better SBC ecosystem. Take a look at his Compute Module comparison below the break.

We recently took a look at the strategic importance of the Pi 5 and in particular the RP1.

Continue reading “What It Takes To Make A Raspberry Pi Killer”

A black motion system with two stepper motors. A green circuit board is fixed in a rotating cage in the center, and the entire assembly is on a white base atop a green cutting mat. Wires wind through the assembly.

Pi-lomar Puts An Observatory In Your Hands

Humans have loved looking up at the night sky for time immemorial, and that hasn’t stopped today. [MattHh] has taken this love to the next level with the Pi-lomar Miniature Observatory.

Built with a Raspberry Pi 4, a RPi Hi Quality camera, and a Pimoroni Tiny2040, this tiny observatory does a solid job of letting you observe the night sky from the comfort of your sofa (some assembly required). The current version of Pi-lomar uses a 16mm ‘telephoto’ lens and the built-in camera libraries from Raspbian Buster. This gives a field of view of approximately 21 degrees of the sky.

While small for an observatory, there are still 4 spools of 3D printing filament in the five different assemblies: the Foundation, the Platform, the Tower, the Gearboxes and the Dome. Two NEMA 17 motors are directed by the Tiny2040 to keep the motion smoother than if the RPi 4 was running them directly. The observatory isn’t waterproof, so if you make your own, don’t leave it out in the rain.

If you’re curious how we might combat the growing spectre of light pollution to better our nighttime observations, check out how blinking can help. And if you want to build a (much) larger telescope, how about using the Sun as a gravitational lens?

Continue reading “Pi-lomar Puts An Observatory In Your Hands”

CinePi Project Promises Open Source Movie Making

Today, there’s open source options for pretty much anything mainstream, but that doesn’t mean there aren’t still some niches out there that could benefit from the libre treatment. The CinePi project is a perfect example — before today we didn’t even know that an open hardware and software cinema-quality camera was out there. But now that we do, we can’t wait to see what the community does with it.

Inside the 3D printed enclosure of the CinePi, there’s a Raspberry Pi 4 with HQ camera module, a four-inch touch screen, a Zero2Go power supply with four 18650 cells, and a Notcua fan to keep it all cool. The design intentionally favors modules that are easy to source from the usual online sources. You’ll need to be handy with a soldering iron to follow along with the beautifully photographed assembly guide, but there’s nothing that needs to be custom fabricated to complete the build.

The software was clearly developed with the user experience in mind, and in the video below, you can see how its touch interface makes it easy to change settings on the fly. While an amateur auteur might need to enlist the assistance of their geeky friend to build the CinePi, it doesn’t look like they’ll need them around to help operate it.

Of course, the big question with a project like this: what does the video actually look like? Well the technical answer is that, in terms of raw performance, the CinePi is able to capture 3840 x 2160 CinemaDNG video to an external device such as a NVME SSD or a CFExpress Card at 25 frames per second. But what that actually looks like is going to depend on what kind of post-processing you do to it. For the more practical answer, check out the short film TIMEKEEPER which was shot partially on a CinePi.

If this all looks a bit high-tech for your liking, don’t worry. You could always 3D print yourself a 35 mm movie camera instead.

Continue reading “CinePi Project Promises Open Source Movie Making”

Pineberry Pi HatDrive: Using NVMe SSDs With The Raspberry Pi 5

When the Raspberry Pi 5 launched, many were left chomping at the bit after seeing the PCIe FPC connector alongside the promise that an ‘NVMe SSD HAT would be forthcoming’. Although the official Raspberry Pi NVMe HAT is still a long while off, the Polish company Pineberry Pi is ramping up to release its Top & Bottom versions of its very wittily called HatDrive.

They sent a prototype to [Jeff Geerling], who has been putting his grubby mitts all over them before putting together a video showing off the HatDrive Top, which can accept 2230 and 2242 size NVMe drives.

The primary goal of adding an NVMe drive to the RPi is of course to get rid of those slow and fragile SD cards. Although the SD card standard supports near-NVMe-like speeds with UHS-III, the Raspberry Pi 5 bottoms out at UHS-I, around 100 MB/s. Despite this, using an NVMe drive for booting still takes some work, as [Jeff] lays out in a clear article. Most of this involves tweaking the /boot/config.txt file to enable external PCIe support, editing the onboard EEPROM to change the boot order (in lieu of having a PC-like BIOS screen) and getting the OS image flashed onto the NVMe drive you intend to boot from.

Although things seem to work fine during [Jeff]’s testing, some caveats remain, such as the RPi 5 officially supporting only PCIe Gen 2 x1, with Gen 3 possible, but with potential data integrity issues. There’s also the fundamental limit of having only a single lane of PCIe available. If that’s no problem, then Pineberry Pi offers the aforementioned HatDrive Top for traditional HAT-style mounting, and a Bottom version that can accept up to 2280 format NVMe SSDs. Including the provided ribbon cables, you can order the Top and Bottom for €20 and €25.99 respectively, with the first batch to ship in early December.

Continue reading “Pineberry Pi HatDrive: Using NVMe SSDs With The Raspberry Pi 5”

Stream Vinyl To Your Sonos Without The Financial Penalty

One of the unexpected success stories in the world of hi-fi over the past decade has been the resurgence of the vinyl LP as a musical format. What was once old hat is now cool again, but for freshy minted vinyl fans there’s a snag. Hi-fi itself has moved on from the analogue into the digital, so what can be done if your listening comes through a Sonos system. Sonos will sell you a box to do that of course, but it’s as overpriced as 2023-pressing vinyl. [Max Fischer] has a far better solution, in the form of a Raspberry Pi loaded with open source software.

At the vinyl end is a Behringer audio interface containing a pre-amp with the required RIAA response curve. This acts as the source for the DarkIce audio streamer and the IceCast2 media serer, all of which even with the cost of a Pi and the interface, is considerably less than the commercial device.

We’re guessing that a more humble interface coupled to an older RIAA pre-amp could cut the cost further, and we’d be hugely curious as to whether a simple mic pre-amp could be used alongside some DSP from the likes of Gnu Radio to give the RIAA response.

Either way, he’s made a handy device for any 21st-century vinyl fan. Meanwhile if you’re one of the streaming generation seduced by round plastic discs, we’ve gone into some detail about their audiophile credentials in the past. And if you have found yourself a turntable, of course you’ll need to know how to set it up properly.

Getting PCIe Working On The New Pi 5

After the Pi 4 released, a discovery was quickly made that the internals of the popular single-board computer use PCIe to communicate with each other. This wasn’t an accessible PCIe bus normally available in things like desktop computers for expansion cards, though; this seemed to be done entirely internally. But a few attempts were made to break out the PCIe capabilities and connect peripherals to it anyway, with varying levels of success. The new Pi 5 seems to have taken that idea to its logical conclusion and included a PCIe connector, and [George] is showing us a way to interface with this bus.

The bus requires the port to be enabled, but once that’s done it’s ready to be used. First, though, some support circuitry needs to be worked out which is why [George] is reverse engineering the system to see what’s going on under the hood. There are a few handshakes that happen before it will work with any peripherals, but with that out of the way a PCIe card can be connected. [George] removed the connector to solder wires to the board directly in order to connect a proper PCIe port allowing a variety of cards to be connected, in this case a wireless networking card and an old Firewire card. This specific build only allows Gen 1 speeds, but the bus itself supports faster connections in theory with better wiring and support circuitry.

While it might not be the prettiest solution, as [George] admits, it does a great job of showing the inner workings of this communication protocol and its use in the new, more powerful Raspberry Pi 5. This makes a lot of things more accessible, such as high-speed PCIe HATs allowing for a wide range of expansion for these popular single-board computers, which wouldn’t have been possible before. If you’re still stuck with a Pi 4, though, don’t despair. You can still access the PCIe bus on these older models but it’ll take a little bit more work.

Thanks to [CJay] for the tip!

Continue reading “Getting PCIe Working On The New Pi 5”

Reduce The Pi 5’s Power Consumption At A Stroke

The Raspberry Pi 5 is the new wunderkind single-board computer on the block, so new in fact that users are still finding out its quirks. One of those quirks is a surprisingly high power consumption when powered down, despite halting the SoC, it leaves the power on and consumes over a watt even in standby. [Jeff Geerling] has a solution, and it’s a simple config change.

It’s useful to know how to fix this, and we’re indebted to him for finding it, but it’s hardly the most complex of hacks. Where the interest lies is in why the board leaves the lights turned on when nobody’s at home in the first place. It seems that some HATs have an issue when the 3V3 rail shuts down, but the 5V rail doesn’t. The Raspberry Pi foundation took the most compatible route and kept the rails on all the time. Perhaps future OS releases will come up with something more elegant, but at least there *is* a fix.

If you’re new to the Pi 5, you can take a look at our review of a preview model, and see why it’s the closest yet to a usable everyday PC that they’ve produced.