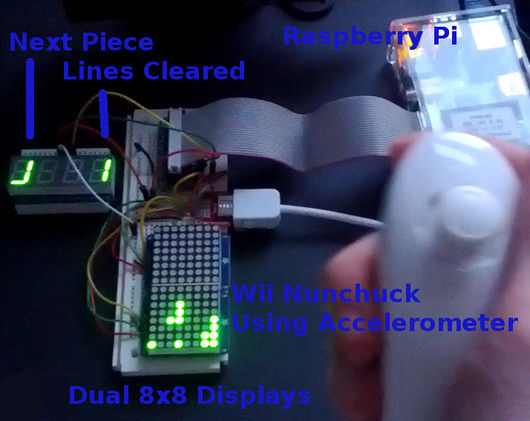
The Raspberry Pi Becomes A Form Factor

Despite the cries for updated hardware, the Raspberry Pi foundation has been playing it cool. They’re committed to getting the most out of their engineering investment, and the current board design for the Raspi doesn’t support more than 512Mb of memory, anyway.

What you see above isn’t a Raspberry Pi, though. It’s the Carrier-one from SolidRun. All loaded out, it has a system-on-module with a quad core ARM Cortex-A9, 2GB of RAM, 1000 Mbps Ethernet, USB host ports, eSATA, and LVDS display connector, a real time clock, and everything else you get with a Raspberry Pi, header pins included. It’s all the awesomesauce of the newer ARM boards that will still work with all your Raspberry Pi hardware.

If you’re thinking this is a product announcement, though, think again. The folks at SolidRun are merely using this Raspberry Pi form factor board as a prototyping and development platform for their CuBox-i device, In its lowest configuration, the CuBox-i1 is still no slouch and would be more than able to keep up with the most demanding Raspberry Pi applications.

Still, though, a hugely powerful board with lots of I/O is something we’d all love, and if SolidRun gets enough complaints praise, it seems like they might be willing to release the Carrier-one as an actual product.

Can An 8 Node Raspberry Pi Cluster Web Server Survive Hackaday?

Plenty of folks have used their Raspberry Pi as a web server. [Steve] however is the first 8 node load balanced pi cluster server we’ve run into.  While we have seen pi clusters before, they’ve never been pressed into service as a public facing web server. [Steve] has created a really nice informative website about the Raspberry Pi, and Linux in general. As his page views have increased, he’s had to add nodes to the server. Currently [Steve] sees about 45,000 page views per month.

At first glance it would seem that the load balance system would be the weak link in the chain. However, [Steve] did realize that he needed more than an Pi to handle this task. He built the load balancer using an old PC with 512MB of RAM and a 2.7GHz x86 CPU. The most important thing about the balancer is dual network interfaces, one side facing the internet, the other facing the Pi cluster. The balancer isn’t a router though. Only HTTP requests are forwarded. The Pi nodes themselves live on their own sub net. Steve has run some basic testing with siege, however nothing beats a real world test. We figured a couple of links in from Hackaday would be enough to acid test the system.

Raspberry Pi Becomes A Universal Translator

hola-me-nombre-david-conroy

We’re still about 150 years away from the invention of the universal translator by [Lt Cdr Sato] of the Enterprise NX-01, but [Dave] has something that’s almost as good: a speech recognition, translation, and text to speech setup for the Raspberry Pi that theoretically allows anyone to speak in sixty different languages.

After setting up all the Linux audio cruft, [Dave] digs in and starts on converting the guttural vocalizations of a meat speaker into something Google’s speech to text service can understand. From there, it’s off to Google again, this time converting text in one language into the writings of another.

[Dave]’s end result is a shell script that works reasonably well for something that won’t be invented for another 150 years. The video below shows the script successfully translating English to spanish, but it should work equally well with other languages such as dutch and latin, as well as less popular language such as esperanto and french.

Continue reading “Raspberry Pi Becomes A Universal Translator”

Class Up Your Haunted House With A Disney Mansion Prop

raspiDisneyPortrait

Die-hard Disney fan [Brandon Etto] must have one of the coolest houses in the block around this time of year, especially now that he’s built his own Master Gracey changing portrait. If you’re unfamiliar with the Disney Haunted Mansion attraction, there are a few different versions at theme parks around the world; the Orlando one features a portrait above the fireplace that miraculously ages into skeletal form.

[Brandon’s] recreation uses a Raspi loaded with a Video Looper SD image that cycles through a clip of the aging man image. He fabricated a box to hold a 19″ LCD monitor and mounted an inexpensive IKEA frame to the front. The magic is hidden with window film applied to turn the frame’s glass into a two-way mirror: a technique [Brandon] borrowed from this Halloween Instructable.

For a step-by-step tutorial, you’ll want to head over to [Brandon’s] writeup on MAKE, but stick around for a quick video demonstration after the break and check out another Haunted Mansion hack: the Singing Heads.

Continue reading “Class Up Your Haunted House With A Disney Mansion Prop”

A Twitter Connected Mechanical Calculator

The TwitALU

Two students at the University of Bristol wanted to create a computer to demonstrate how ALUs work. The result is the TwitALU, a Twitter connected mechanical calculator.

The device uses a custom 7400 series ALU based on the famous MOS 6502 processor. Instead of doing the calculations on a silicon die, the ALU drives mechanical relays. This produces a nice clicky-clacky sound as the calculation is computed.

To start a calculation, you tweet @twittithmetic with your input. A Raspberry Pi is used to load the instructions into the ALU. Once the computation is done, it’s tweeted back to you and displayed on the Nixie tube display. It’s not efficient, or fast, but it does the job of demonstrating the inner workings of the device while doing simple math.

The device’s schematics are all available on the website, and are helpful for understanding how a simple ALU works. After the break, check out a quick clip of the TwitALU in action.

Continue reading “A Twitter Connected Mechanical Calculator”

Alas, Poor Yorick! I Tweeted Him

yoreck the talking skull

You know Halloween is coming around when the tweet reading skulls start popping up. [Marc] wanted to bring the Halloween spirit into his workplace, so he built “Yorick”. In case you’re worried, no humans were harmed (or farmed for parts) in the creation of this hack. Yorick started life as an anatomical skull model, the type one might find in a school biology lab. Yorick’s skull provided a perfect enclosure for not one but two brains.

A Raspberry Pi handles his higher brain function. The Pi uses the Twitter API to scan for tweets to @wedurick. Once a tweet is found, it is sent to Google’s translate server. A somewhat well-known method of performing text to speech with Google translate is the next step. The procedure is simple: sending “http://translate.google.com/translate_tts?tl=en&q=hackaday” will return an MP3 file of the audio. To get a British accent, simply change to google.co.uk.

The Pi pipes the audio to a speaker, and to the analog input pin of an Arduino, which handles Yorick’s lower brain functions.  The Arduino polls the audio in a tight loop.  An average of the last 3 samples is computed and mapped to a servo position. This results in an amazingly realistic and automatic mouth movement. We think this is the best part of the hack.

It wouldn’t’ be fair for [Marc] to keep the fruits of his labors to himself, so Yorick now has his own Livestream channel. Click past the break to hear Yorick’s opinion on the Hack A Day comments section! Have we mentioned that we love pandering?

Continue reading “Alas, Poor Yorick! I Tweeted Him”

Raspi Z-Wave Automation Is Automated

raspiAutomationLocksnLights

Home automation keeps popping up here at Hackaday, so [Cristian Zatonyl] decided to share his Raspberry Pi-based system with us. This build takes a firm stance on the “automated” side of the automation vs. control debate we had last week: no user input necessary. Instead, [Cristian] relies on geofencing to detect whether he has driven outside the set radius and automatically turns off the lights and locks his door.

The build takes advantage of Z-Wave products, which are your typical wireless remote-control gadgets, but tacks on a third-party “RaZberry” board to a Raspi to give it control over off-the-shelf Z-wave devices. The final step is the integration of a custom iOS app that keeps tabs on the geofence boundaries and signals the Pi to control the lights and the front door lock.

[Cristian’s] tutorial covers the basics and admits that it’s a proof of concept without any security features. Judging by his other YouTube videos, however, we’re sure more developments are underway. Check out the video below for a demonstration of the system, then feel free to speculate on security concerns in the comments. Our article on Z-wave security from a few years ago might be a good starting point.

Continue reading “Raspi Z-Wave Automation Is Automated”