Raspi Internet Radio With Google Music

SAMSUNG

It’s not his first Internet radio, but [Matthias]’ modernization of a classic Bakelite radio is a real, functional piece of art. Not only does it retain the look of an old radio, it also has the capability to listen to streams and his entire MP3 collection through the Internet.

For the software, [Matthias] used jquery to pull down web radio streams and soon figured out how to play all his MP3s through Google Music. This, and a web-based remote for his mobile device, allows the new old-school Internet radio to play everything [Matthias] would ever want to listen to.

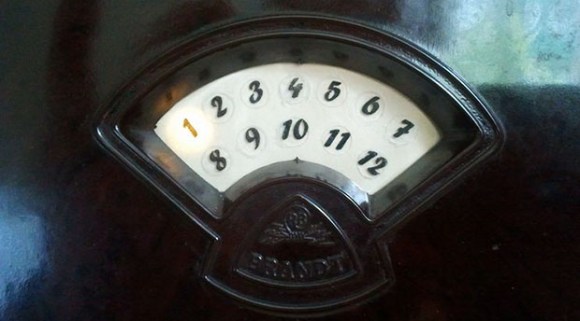
The controls for the radio are rotary encoders, with indication provided by a really fabulous numbered LED display (seen above) replacing the 70-year-old tuning dial. These numbers indicate both the current Google Music playlist or the currently playing Internet stream, depending on what mode the selector knob is at.

It’s a beautiful piece of work, and the knobs and dials look like something that could have come from a real 70-year-old radio. That’s a win in our book.

LED Mortar Board Battles Suns Brightness With 21W Of Power

[Jeremy Blum] aimed to be the brightest student at his Master’s graduation ceremony this spring. He designed an LED rig for his mortar board which should battle the sun’s intensity by using up to 21 watts of power. But he didn’t stop with eye-catching intensity. while he was at it he also included some interactive features so the guy behind him has a way to keep from going blind.

One thing that really caught our eye is the 3D printed parts he generated for the project. There’s a nice mounting plate for the LED side of things, and a wrist-mounted enclosure for the Raspberry Pi board. Wait, why does he need an RPi to drive some LEDs? We already mention interactivity which is facilitated by the Pi acting as a WiFi hotspot. Connect to the access point and choose a color. If you’re in the seat behind [Jeremy] you’ll want to choose black! All of this and is explained in his video presentation.

Continue reading “LED Mortar Board Battles Suns Brightness With 21W Of Power”

Raspberry Pi Helps With 2.4GHz Home Automation

Wanting to extend the capabilities of the radio frequency devices in his home [Kalle Löfgren] turned a Raspberry Pi into an RF control hub. We’ve seen some of his home automation work in the past. In his media room he built a universal remote base station which used the same RF board as in this project. The main difference is that before he went with an AVR microcontroller and this time he’s upgrade to a Raspberry Pi board.

The RPi brings a lot more to the table. Notably, the scripting (whose output is shown above) and networking features. His radio board is an nRF24L01 which he talks to via the SPI protocol. The Raspberry Pi has no problem talking to SPI devices through its GPIO header. [Kalle] just needed to do a bit of setup to configure the pin modes.

A Python script lets him sent commands using his keyboard, but this can also be automated. Combine that with the TCP server script he wrote and it opens up the a wide range of configurations to switch or talk to any device operating on the 2.4 GHz band.

Charlotte, The Hexapod With 3D Vision

spider

Charlotte’s chassis comes from as a kit, but the stock electronics are based on an Arduino – not something for a robot that needs to run computer vision apps. [Kevin] ended up using a Raspi for the controller and gave Charlotte eyes with an Asus XTION. Edit: or a PrimeSense sensor These sensors are structured light depth cameras just like the kinect, only about smaller, lighter, and have a better color output.

Hardware is only one half of the equation, so [Kevin] tossed the Arduino-based stock electronics and replaced them with a Raspberry Pi. This allowed him to hone his C++ skills and add one very cool peripheral – the XTION depth camera.

To the surprise of many, we’re sure, [Kevin] is running OpenNI on his Raspberry Pi, allowing Charlotte to take readings from her depth camera and keep from colliding into any objects. The Raspberry Pi is overclocked, of course, and the CPU usage is hovering around 90%, but if you’re looking for a project that uses a depth sensor with a Pi, there you go.

Continue reading “Charlotte, The Hexapod With 3D Vision”

Programming Microcontrollers With A Raspi

rasduino

The advent of the Arduino brought the world of microcontrollers to hobbyists, students, and artist the world over. Right now we’re in the midst of a new expansion in hobbyist electronics with the Raspberry Pi, but we can’t expect everyone to stay in the comfortable, complex, and power-hungry world of Linux forever, can we? Eventually all those tinkerers will want to program a microcontroller, and if they already have a Raspberry Pi, why not use that?

[Kevin] wanted to turn his Raspi into an AVR development workstation, without using any external programmers. He decided to use the Raspi’s SPI port to talk to an AVR microcontroller and was able to make the electrical connections with just a few bits of wire an a handful of resistors.

For the software, [Kevin] added support for SPI to avrdude, available on his git. Theoretically, this should work with any AVR microcontroller with the most popular ATMegas and ATtinys we’ve come to love. It doesn’t support the very weird chips that use TPI programming, but it’s still extremely useful.

An Overkill Network Adapter For Retrocomputers

amiga

If you want to get an old Apple, Commodore 64, Amiga, or any other retrocomputer up on the Internet, this is for you. [Stian] had an Amiga 500 lying around and wanted to put it on a network. The A500 isn’t expandable, so he needed to look at some sort of adapter to put it on a network. The solution came to him in the form of a Raspberry Pi, a null modem cable, and a few bits of software.

To connect his Amiga to his network, [Stian] made a small serial converter board for his Raspi that breaks out the Tx and Rx pins on the Pi to a 9-pin serial port. With the physical connection to the Pi made, the only thing left to do was to get some software for the Amiga, namely AmiTCP and PPP. It’s not exactly a fast network connection, but this build allows [Stian] to connect to WiFi networks with ancient hardware.

One interesting aspect of [Stian]’s build is the fact it’s completely transferable to other retrocomputers – everything from old S-100 bus computers to classic macs, apples, and pretty much anything else with a serial port that supports PPP. Even with the expense of a Raspberry Pi, it’s much cheaper than absurdly expensive second-hand SCSI to Ethernet controllers and other tomfoolery.

Adding Night Vision To The Raspberry Pi Camera

After months of promises, the Raspberry Pi camera is finally heading out to hackers and makers across the world. Of course the first build with the Pi cam to grace the pages of Hackaday would be removing the IR filter, and it just so happens [Gary] and his crew at the Reading hackerspace are the first to do just that.

As [Gary] shows in his video, the process of removing the Pi cam’s IR filter is extremely fiddly.  Getting the filter out of the camera involves removing the sensor, gently cutting it open with a scalpel, and finally gluing the whole thing back together with a tiny bit of superglue. Not for the faint of heart, and certainly not for anyone without a halfway decent bench microscope.

If you’re looking for a Raspberry Pi-powered security camera, game camera, or something for an astronomy application, this is the way to make it happen. You might want to be careful when removing the IR filter; [Gary] broke one camera on their first attempt. They got it to work, though, and the picture quality looks pretty good, as seen in the videos below.

Continue reading “Adding Night Vision To The Raspberry Pi Camera”