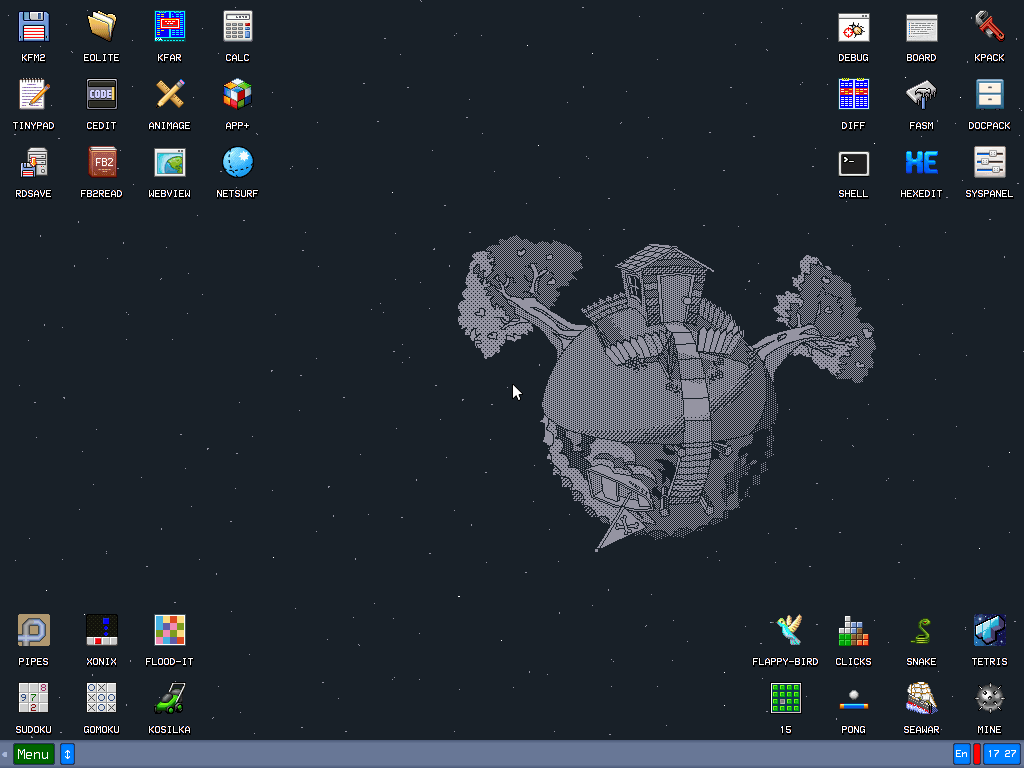
The Heinz Nixdorf Museumsforum building in Paderborn

Visit The World’s Largest Computer Museum: The Heinz Nixdorf

Most stories in the history of computing took place in one of a small number of places. The wartime code-breaking effort in Bletchley Park led to Colossus, the first programmable electronic computer. Various university campuses in Britain and the US were home to first-generation computers like ENIAC, EDVAC and the Manchester Baby in the late 1940s. Silicon Valley then stole the limelight with the home computer revolution in the 1970s. Naturally, all of these places have their museums celebrating their local achievements, but the world’s largest computer museum is not found in Silicon Valley or on the campus of a famous university. Instead, you have to travel to a small German town called Paderborn, which houses the Heinz Nixdorf Museumsforum, or HNF.

Heinz Nixdorf might not be a household name in America like Jack Tramiel or Steve Jobs, but he was one of Europe’s great computer pioneers. Starting with vacuum tube based machines in 1952, Nixdorf gradually expanded his company into one of the largest computer manufacturers of the 1970s. His products were especially popular among large businesses in the financial sector, such as banks and insurance companies. By the late 1980s however, sales went downhill and the company was eventually acquired by Siemens. Today, the Nixdorf name lives on as part of Diebold-Nixdorf, a major producer of ATMs and checkout machines, reflecting the original company’s focus on the financial industry.

The museum’s roots lie in Heinz Nixdorf’s personal collection of typewriters and other office equipment. Although he already envisioned starting a museum dedicated to computing, his sudden death in 1986 put a stop to that. A few of his employees kept the plan alive however, and in 1996 the HNF was opened in Paderborn. Today the museum is run by a non-profit foundation that aims to provide education in information and communication technology to a wide audience.

The collection is housed in the former worldwide headquarters of Nixdorf Computer AG, a rather imposing 1970s office building covered in gold-tinted windows. Inside,]] you’re reminded of its former life as an office building through its compact layout and low ceilings. It does give the museum a bit of a cosy feel, unlike, say, the cavernous halls of London’s Science Museum, but don’t let this fool you: at 6,000 m2, the main exhibition area is about twice as large as that of Silicon Valley’s Computer History Museum. Continue reading “Visit The World’s Largest Computer Museum: The Heinz Nixdorf”

Converting Your Bike To Electric: Why You Should, And When You Shouldn’t

A decade ago I was lucky enough to work for an employer that offered a bicycle loan scheme to its employees, and I took the opportunity to spend on a Brompton folding bike. This London-made machine is probably one of the more efficiently folding cycles on the market, and has the useful feature of being practical for longer journeys rather than just a quick run from the train. A 3-speed hub gearbox is fine for unhurried touring, but sadly my little folder has always been a bit of a pain on the hills. Thus around the start of the pandemic I splashed out again and bought a Swytch electric upgrade kit for it, and after a few logistical and life upheavals I’ve finally fitted it to the bike. I’ve ridden a few electric bikes but never had my own, so it’s time to sit down and analyse the experience. Is an electric bike something you should have, or not?

A Box Of Bits Becomes An Electric Bike

All the parts of a Swytch kit
All the parts of a Swytch kit. From the Swytch assembly manual.

Swytch sell their kits via crowdfunding rounds, so I’d been on a waiting list for a while and got an early-bird price on my kit. It took quite a while to arrive, much longer than the expected time in mid-2020 because of the pandemic, finally being delivered some time in February last year. It came in a modestly-sized cardboard carton which would be an easy carry on the Brompton’s luggage rack, containing neatly packed a new front wheel with motor, as well as the battery and all sundry parts.

Fitting the kit shouldn’t stretch the capabilities of a Hackaday reader, with probably the trickiest part being the positioning of a Hall-effect sensor near the crank. The kit works by providing a motor assist when you pedal, so part of it is a set of magnets on a plastic disk with various attachments for different cranks and pedal sets. The Brompton front wheel is removed and its tyre and tube transferred to the Swytch one, which is then put on the bike. Once the magnet disk and Hall sensor are attached, the cables follow the existing ones and emerge at the handlebars where a sturdy bracket for the battery box is fitted. Continue reading “Converting Your Bike To Electric: Why You Should, And When You Shouldn’t”

Cheap Spot Welder Teardown

It used to be hard to dump enough electricity through two pieces of metal to meld them together. But a lithium-ion battery can do it. The question is, should it? [The Signal Path] takes a cheap battery-based spot welder apart to see what’s inside and tries to answer that question. You can see the teardown in the video below.

The cheap welder has some obvious safety problems so the first thing was to trim down some wires and also retinning some of the PCB traces to ensure they are the lowest possible resistance. Of course, the less resistance in the wiring, the more current is available for welding.

Continue reading “Cheap Spot Welder Teardown”

Layer Line Removal Putty Reviewed

[Teaching Tech] is not alone in hating layer lines in 3D prints and also hates sanding. He recently tried Incredafill putty, a UV-curable putty that you can use to cover up lines in prints. Once covered and cured, you sand the putty smooth. You can see what he thought of the product in the video below.

As many people suggested in the video comments, you can pull the same trick with UV resin thickened with some other substance. We’ve even covered using diluted resin to get a similar effect. The putty has more of the appearance of hair cream or some kind of ointment, so it was easy to spread around with a gloved finger. A brush also worked. UV curing was done by a small flashlight or the handy sun. However, you’ll see later that he used a UV curing station and that works well if you have one.

Of course, even after applying the putty, you still have to sand. We are assuming the sanding is easier than trying to sand the actual layer lines smooth. On the other hand, the resin dust is probably pretty toxic, so there is a trade-off involved.

The results did look good. Of course, since there was still sanding involved, how good it looks will depend on your sanding tools, your technique, and — perhaps most importantly — your patience. Sanding can do a lot for 3D prints. We might not trust it completely with resin dust, but you could get rid of at least some of the dust with a downdraft table.

Continue reading “Layer Line Removal Putty Reviewed”

Mustool Scopemeter Review And Teardown

There was a time when calculators became so powerful it was hard to tell them from little computers. The same thing seems to be happening now with multimeters. They now often have large screens and basic oscilloscope functionality. The specs keep getting better. While early cheap scopemeters were often relatively low frequency, many are now claiming bandwidths that would have cost quite a bit a few decades ago. A case in point is the Mustool MDS8207 which [IMSAI Guy] reviews and does a teardown of in the videos you can see below. It claims a 40 MHz bandwidth with 200 megasamples per second on a single channel.

The only downside in the claimed specifications is that the sensitivity isn’t great given that the lowest setting is 500 mV per division. Then again for a meter that runs under $100, any scope function would seem to be a bonus. The meter does all the other things you expect a meter to do these days, such as reading voltage, frequency, capacitors, temperature, etc. The response time of the meter is relatively slow, but you can get used to that.

Continue reading “Mustool Scopemeter Review And Teardown”

Clock Testing Sans Oscilloscope?

Like many people who repair stuff, [Learn Electronics Repair] has an oscilloscope. But after using it to test a motherboard crystal oscillator, he started thinking about how people who don’t own a scope might do the same kind of test. He picked up a frequency counter/crystal tester kit that was quite inexpensive — under $10. He built it, and then tried it to see how well it would work in-circuit.

The kit has an unusual use of 7-segment displays to sort-of display words for menus. There is a socket to plug in a crystal for testing, but that won’t work for the intended application. He made a small extender to simplify connecting crystals even if they are surface mount. He eventually added a BNC socket to the counter input, but at first just wired some test leads directly in.

Continue reading “Clock Testing Sans Oscilloscope?”

Review: DevTerm Linux Handheld Has Retro-Future Vibe

It’s not every day that an open-source, portable Linux handheld computer gets announced, so I couldn’t resist placing an order for the DevTerm by ClockworkPi back when we first learned about the stylish little terminal, which includes a 1280 x 480 screen (double-wide VGA) and a modular little thermal printer.

Of course, the global semiconductor shortage combined with shipping slowdowns led to delays, but things did ultimately come together for the project. I’ve always been a sucker for small-format machines, especially ones that come as a well-designed kit, and that means I can tell you all about what it was like to put it together and turn it on. There’s a lot to look at, so let’s get started.

Continue reading “Review: DevTerm Linux Handheld Has Retro-Future Vibe”