Current measurements are not as handy as voltage measurements. You typically need to either measure the voltage across something and do some math or break the circuit so a known resistor in your instrument develops a voltage your meter measures and converts for you. However, it is possible to get non-contact current probes. They are generally pricey, but [Kerry Wong] shows us one under $200 and, thus, budget compared to similar probes. Check out the review in the video below.
The OWON unit has three ranges: 4 A, 40 A, and 400 A. It claims a resolution of 10 mA and a bandwidth of 200 kHz. It requires a 9 V battery, which [Kerry] suspects won’t last very long given the rated power consumption number, although the measured draw was not as high as claimed. The specs aren’t great — this seems to be little more than a current probe meter with a connector for an oscilloscope, but if it meets your needs, that could be acceptable.
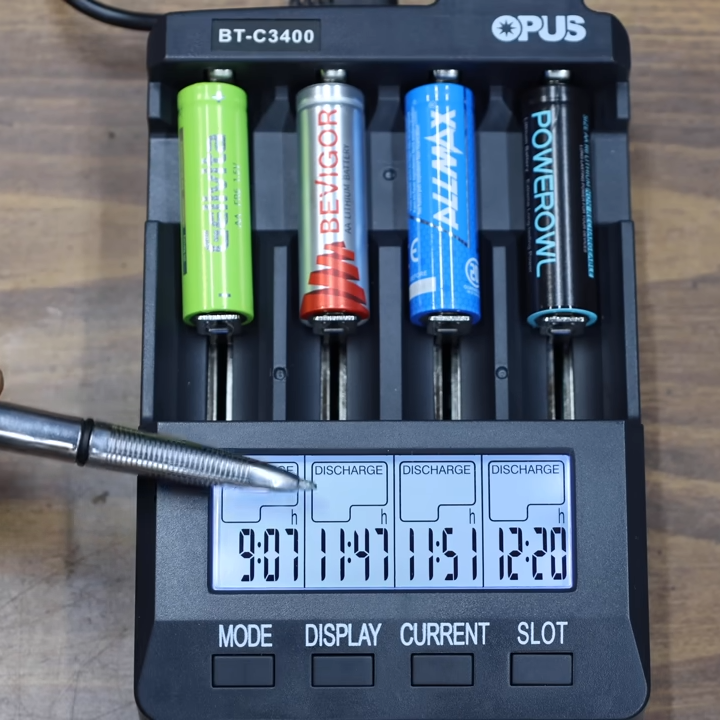
[Project Farm] has a video in which a wide variety of AA cells are analyzed and compared in terms of capacity, internal resistance, ability to deliver voltage under load, and ability to perform in sub-freezing temperatures. Alkaline, lithium, and even some mature rechargeable cells with a couple thousand cycles under their belt were all compared. There are a few interesting results that will can help you get the most from your money the next time you’re battery shopping.
The video embedded below demonstrates a set of tests that we recommend you check out, but the short version is that more expensive (non-rechargeable) lithium cells outperform their alkaline peers, especially when it comes to overall longevity, ability to perform under high-drain conditions, and low temperatures. Lithium cells also cost more, but they’re the right choice for some applications.
Some brands performed better and others worse, but outside of a couple stinkers most were more or less comparable. Price however, was not.
As for how different brands stack up against one another, many of them are more or less in the same ballpark when it comes to performance. Certainly there are better and worse performers, but outside of a couple of stinkers the rest measure up reasonably well. Another interesting finding was that among rechargeable cells that were all several years (and roughly 2,200 charge-discharge cycles) old, a good number of them still performed like new.
Probably the single most striking difference among the different cells is cost — and we’re not just talking about whether lithium versus alkaline AAs are more cost-effective in the long run. Some brands simply cost twice as much (or more!) than others with comparable performance. If you’re in a hurry, jump to [Project Farm] presenting the final ranked results at 19:45 in.
Relying on brand recognition may save you from buying complete junk, but it’s clearly not the most cost-effective way to go about buying batteries. These findings are similar to an earlier effort at wide-scale battery testing which also determined that factoring in price-per-cell was too significant to ignore.
There aren’t many people who could do an hour-long video reviewing an oscilloscope, but [Kerry Wong] is definitely one of them. This time, he’s looking at a UNI-T MSO2304X 300 MHz scope. The review might be a little long, but the scope — like many modern scopes — has a lot of features for measuring power, accommodating digital signals with an add-on pod, and protocol decoding.
The scope has a touchscreen and four normal inputs, plus two frequency generator outputs. You can also use a mouse or an external display. But, of course, what you really want to know is how the scope performs when reading signals.
[Maker’s Fun Duck] has a recent video review of a cheap thermal camera from a company called Kaiweets, which you can see below. It checked all of his boxes: It was standalone, handheld, cheap, and not too cheap. The question is: does it work well for the kinds of things we would do with such a camera?
That’s a tricky question, of course, because everyone’s uses are different. Considering a soldering iron. A tiny one is great for working on PCBs, but lousy for soldering large coax connectors. A soldering gun works well for that purpose, but is too much for the PCB. The same goes for thermal cameras. Some are great for, for example, finding leaky parts of houses, but might not be so great at locating defective components on a PCB.
Over the last few decades, electronic devices have drastically changed. Radios that once had point-to-point wiring gave way to printed circuit boards with through-hole parts, and now microscopic surface mount devices are the norm. But most of us still use probes that would have been just fine for a 1940s receiver. There are other options, of course. Among other things, you can now buy meters that have built-in tweezer probes. While not the first, the FNIRSI LCR-ST1 are affordable, and [TheHWcave] puts them to the test in the video below.
The tweezers come with two different pointy ends. It is more or less one of those testers that can identify and measure various components. Instead of the customary socket, this one has tweezer ends and, perhaps, a few extra functions.
The good folks at Turing Pi sent me a trio of RK1 modules to put through their paces, to go along with the single unit I bought myself. And the TLDR, if you need some real ARM processing power, and don’t want to spend an enterprise budget, a Turing Pi 2 filled with RK1s is a pretty compelling solution. And the catch? It’s sporting the Rockchip RK3588 processor, which means there are challenges with kernel support.
For those in the audience that haven’t been following the Turing Pi project, let’s recap. The Turing Pi 1 was a mini ITX carrier board for the original Raspberry Pi compute module, boasting 7 nodes connected with onboard Gigabit.
That obviously wasn’t enough power, and once Raspberry Pi released the CM4, the Turing Pi 2 was conceived, boasting 4 slots compatible with the Nvidia Jetson compute units, as well as the Raspberry Pi CM4 with a minimal adapter. We even covered it shortly after the Kickstarter. And now we have the RK1, which is an 8-core RK3588 slapped on a minimal board, pin compatible with the Nvidia Jetson boards. Continue reading “Finally Putting The RK1 Through Its Paces”→
A thermal camera is a very handy tool to have, and [Learn Electronics Repair] wanted to try out the Thermal Master P2 for electronic repair, especially since it claims to have a 15 X digital zoom and 1.5 degree accuracy. The package proudly states the device is the “World 2nd Smallest Thermal Camera” — when only the second best will do.
The camera is tiny and connects to a PC or directly to a tablet or phone via USB C. However, it did look easier to use on the end of a cable for probing things like a PC motherboard. The focus was fairly long, so you couldn’t get extremely close to components with the camera. The zoom somewhat makes up for that, but of course, as you might expect, zooming in doesn’t give you any additional resolution.
He also compares the output with that of a multimeter he uses that includes an IR camera (added to our holiday gift list). That multimeter/camera combo focuses quite closely, which is handy when picking out a specific component. It also has a macro lens, which can zoom up even more.
We’ve looked at — or, more accurately, through — IR cameras in the past. If you are on a tight budget and you have a 3D printer, you might try this method for thermal imaging, but it doesn’t use the printer the way you probably think.