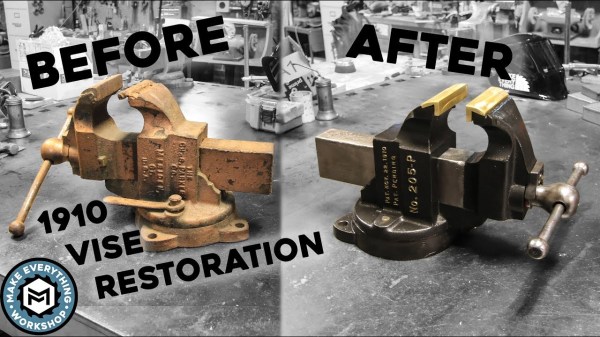
A Resistor Cutting Robot You Can Build

If you’re populating kits, it can get tiring and time consuming. Like all good repetitive processes, it should be automated. As far as cutting resistors goes, this is one way to do it, thanks to [Pablo].

The build is actually cribbed from earlier work by a gang called [oomlout]. Parts for these cutters are made with either lasercut or CNC milled sheet stock. A stepper motor is used to transport the resistor tape, and the cutting blades are moved by standard hobby servos. The use of servos for the blades allows the action to be controlled precisely without having to go to the effort of implementing extra limit switches and circuitry.

Control is by an Arduino Uno, with an A4988 driver controlling the stepper. Servo control is achieved with the Uno’s onboard peripherals. There’s a video below of the machine in operation, which shows it to be a simple and efficient tool for the job.

This build turns an otherwise maddeningly basic chore into a set-and-forget operation. We’ve seen other work in this area before from the [oomlout] team, too. Video after the break.

Continue reading “A Resistor Cutting Robot You Can Build”

Drill Bit Gauge Is Interdenominational Black Magic

Oh, sure – when you buy a new set of drill bits from the store, they come in a handy holder that demarcates all the different sizes neatly. But after a few years when they’ve ended up scattered in the bottom of your toolbox for a while, it becomes useful to have some sort of gauge to measure them. [Caspar] has the solution, and all you need is an old steel rule.

The trick is to get a ruler with gradations for inches and tenths of inches. After cutting the ruler off just after the 6″ point, the two halves are glued together with some steel offcuts and epoxy. By assembling the two halves in a V shape with a 1 mm drill bit at the 1″ position, and a 5 mm drill bit at the 5″ marker, a linear slope is created that can be used to measure any drill bits and rod of the appropriate size inserted between the two.

It’s a handy tool to have around the shop when you’ve amassed a collection of bits over the years, and need to drill your holes accurately. Additionally, it’s more versatile than the usual method of inserting bits in appropriately sized holes, and can be more accurate.

Now that you’ve organised your drill bits, perhaps you’d like to sharpen them?

Handy Continuity Tester Packs Multiple Modes Into A Tiny Package

From Leatherman multitools to oscilloscopes with built-in signal generators and protocol analyzers, there seems no end to tools with multiple personalities. Everybody loves multitaskers because they make it feel like you’re getting more bang for your buck, and in most cases that’s true. But a jack of all trades is seldom master of any, and there are times when even the humble multimeter isn’t the best tool for the job.

With that in mind, [sidsingh] has developed what we think is a very nice dedicated continuity tester. With a goal of using only parts on hand, he had to think small to fit everything into the case he had. So he started with a PIC10LF322 to support all the flavors of continuity testing he wanted to support. In addition to straight continuity, the tester can handle diode testing, detecting shorted or open diodes and even differentiating between regular and Schottky diodes. It also has an LED test mode and an interesting “discontinuity” testing mode — it only sounds its buzzer when continuity is broken. The video below shows that mode in action for finding intermittent cable faults, along with all the other modes.

For an ostensibly single-purpose tool, this tester still manages to pack a lot of tests into one very compact package. Simpler continuity testers are good, too — check out this cheap dollar store build, or this slightly more complicated unit based on an ATtiny85.

Continue reading “Handy Continuity Tester Packs Multiple Modes Into A Tiny Package”

Arbor Press Modded For Applying Specific Force

Arbor presses are simple and effective tools made for a particular task: exerting force in a specific spot. A 1-ton arbor press fits on a desktop and is very affordable, but doesn’t offer a lot of particularly fine control over the ram beyond lowering and raising it. [concreted0g] got to thinking about ways to gain more control and knowledge about the amount of force being applied, and made a simple modification to combine his press with a torque wrench.

He removed the spindle which raises and lowers the ram, and drilled and tapped it to fit a bolt. Now, by attaching a torque wrench to the bolt and using the wrench as the handle for lowering the ram, he can take advantage of the wrench’s ability to break at set amounts of force. As a result, he has a repeatable way to accurately apply specific amounts of force with a tool that usually lacks this ability. It looks like this mod is limited to lower forces only (too much could shear off the bolt head, after all) but it combines two tools in an unusual way to gain an ability that didn’t exist before, which is great to see. Mods and presses seem to go very well together; don’t miss this DIY thermal insert add-on for an arbor press, and 3D printed dies for a press brake turned out to be remarkably durable and versatile, not to mention economical.

Cordless Tool Battery Pack Turned Into Portable Bench Supply

Say what you want about the current crop of mass-marketed consumer-grade cordless tools, but they’ve got one thing going for them — they’re cheap. Cheap enough, in fact, that they offer a lot of hacking opportunities, like this portable bench power supply that rides atop a Ryobi battery.

Like many of the more common bench supply builds we’ve seen,  [Pat K]’s more portable project relies on the ubiquitous DPS5005 power supply module, obtained from the usual sources. [Pat K] doesn’t get into specifics on performance, but supplied with 18 volts from a Ryobi One+ battery, the DC-DC programmable module should be able to do up to about 16 volts. Mating the battery to the supply is easy with the 3D-printed case, which has a socket for the battery that mimics the sockets on tools from the Ryobi line. It’s simple and effective, as well as neatly executed. The files for the case are on Thingiverse; sadly, only an STL file is included, so if you want to support another brand’s batteries, you’ll have to roll your own.

Check out some of the other power supplies we’ve featured that use the DPS5005 and its cousins, like this nice bench unit. We’ve also covered some of the more hackable aspects of this module, such as an open-source firmware replacement.

Business On The Outside, Electronics Workstation On The Inside

As an electrical engineering student, [Brandon Rice] had the full suite of electronics tools you’d expect. Cramming them all into a dorm room was doable — but cramped — a labour to square everything away from his desk’s top when he had to work on something else. To make it easier on himself, he built himself a portable electronics workstation inside the dimensions of a briefcase.

Built from scratch, the workstation includes a list of features that should have you salivating by the end. Instead of messing with a bunch of cables, on-board power is supplied by a dismantled 24V, 6A power brick, using a buck converter and ATmega to regulate and display the voltage, with power running directly to  12V and 5V lines of a breadboard in the middle of the workstation. A wealth of components are stored in two dozen 3d printed 1″ capsules setting them in loops pinned to the lid.

If all this was not already enough, there’s more!

Continue reading “Business On The Outside, Electronics Workstation On The Inside”

An Introduction To Storm Detector Modules

Lightning storm detectors have been around for a surprisingly long time. The early designs consisted of a pair of metal bells and a pendulum. When there was a charge applied, for example by connecting one bell to the ground and the other to a lightning rod, the bells would ring when a lightning storm was close by. In the mid 18th century, these devices were only practical for demonstration and research purposes, but very likely represent the earliest devices that convert electrostatic charge to mechanical force. A bit over a hundred years later, the first lightning detector was considered by some as the first radio receiver as well.

As soon as I found out about storm detector chips, I knew I would have to get one working. For about $25, I ordered an AMS AS3935 module from China. This chip has been featured before in a number of excellent projects such as Twittering lightning detectors, and networks of Sub-Saharan weather stations. While there’s an Arduino library for interfacing with this IC, I’m going to be connecting it up to an ESP8266 running the NodeMCU firware, which means digging into the datasheet and writing some SPI code. If any of the above tickles your fancy, read on! Continue reading “An Introduction To Storm Detector Modules”