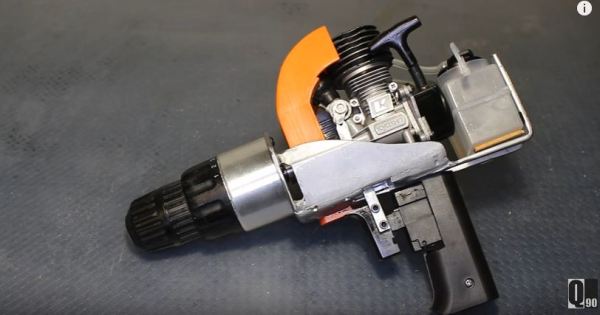
Ugly DIY Portable Soldering Iron

If you’ve ever wanted a battery-operated soldering iron and you just can’t stand the thought of buying one, you might check out the video below from [Just5mins]. In it, he takes a candy tube, some scrap materials, a lithium ion battery, a nichrome wire, a USB charger, and a switch and turns it into an apparently practical soldering iron.

Paradoxically, [Just5mins] used a soldering iron to build this one, so it probably can’t be your only soldering iron, although we suppose you could figure something out in a pinch. Maybe in rep-rap style, make a poor quality one with no soldering and use it to solder up the next one.

Continue reading “Ugly DIY Portable Soldering Iron”

[Alan Wolke]’s How To Use An Oscilloscope

If you were to create a Venn diagram of Hackaday readers and oscilloscope owners the chances are the there would be a very significant intersection of the two sets. Whether the instrument in question is a decades-old CRT workhorse or a shiny modern digital ‘scope, it’s probably something you’ll use pretty often and you’ll be very familiar with its operation.

An oscilloscope is a very complex instrument containing a huge number of features. Modern ‘scopes in particular bring capabilities through software unimaginable only a few years ago. So when you look at your ‘scope, do you really know how to use its every feature? Are you getting the best from it, or are you only scratching the surface of what it can do?

[Alan Wolke, W2AEW] is an application engineer at Tektronix, so as you might expect when it comes to oscilloscopes he knows a thing or two about them. He’s spoken on the subject in the past with his “Scopes for Dopes” lecture, and his latest video is a presentation to the NJ Antique Radio Club which is a very thorough exploration of using an oscilloscope. The video is below the break and at an hour and twenty minutes it’s a long one. We make no apologies for that, for it should be fascinating in its entirety for any oscilloscope owner. Even if you find yourself nodding along to most of what he’s saying there are sure to be pearls of ‘scope wisdom in there you weren’t aware of.

Continue reading “[Alan Wolke]’s How To Use An Oscilloscope”

By Christian Taube - Own work, CC BY-SA 2.5, https://commons.wikimedia.org/w/index.php?curid=1503038

Tools Of The Trade – Through Hole Assembly

In our last installment of Tools of the Trade, we had just finished doing the inspection of the surface mount part of the PCB. Next in the process is the through hole components. Depending on the PCB, the order may change slightly, but generally it makes more sense to get all the SMT work done before moving to the through hole work.

Through hole used to be the standard, but as the need for size reduction and automation increased, SMT gained favor. However, there are still a lot of reasons to use through hole components, so they aren’t going away entirely (at least not any time soon). One of the biggest advantages of THT is mechanical strength, which makes it better suited for connectors than SMT. If you’ve ever popped a microusb connector off a PCB by breathing on it heavily, you’ll understand. So, how do we most efficiently get through hole components on a PCB, and how do the big boys do it?

Continue reading “Tools Of The Trade – Through Hole Assembly”

Simple Beetle Robot Uses Smoking Soldering Iron

As robot projects go, [creative ideas km]’s isn’t going to impress many Hackaday readers. Still, as an art project or something to do with the kids, it might be fun. But the reason it caught our interest wasn’t the actual robot, but the improvised soldering iron used in its construction.

The robot itself isn’t really autonomous. It is just a battery, a motor, and a switch. The motor vibrations make the robot scoot around on its bent copper wire legs. Some hot glue holds it all together, but the electrical wiring is soldered.

If you look at the video below, you’ll see the soldering is done with an unusual method. A disposable lighter generates a flame that hits an attached copper wire with a coil wound in it. The coil acts as a heat exchanger, and the wire becomes a soldering iron tip.

Continue reading “Simple Beetle Robot Uses Smoking Soldering Iron”

3D Printed Diffuser Lights Up This Magnifier

If you are working with surface mount electronics and don’t have the handy heritage of a pulp-comic superhero to give you super-high-resolution eyesight, then you will quickly find yourself needing a magnifying glass. And since you’ll be using both hands doing the soldering, you’ll need some way to hold it.

There are multiple solutions to this problem on the market, from headband magnifiers and inspection magnifiers on arms to cheap “Helping hands”. They all have their strengths and weaknesses, but none of them appealed to our reader [Anil], who wanted an illuminated magnifier to fit the Hobby Creek arm on his Pana-Vise.

His solution was to 3D print a surround for a lens from a set of helping hands. This is no simple print though, it’s made of three layers. There is a translucent diffuser, a layer that holds a set of LEDs and attaches to the arm, and a cover to hold the lens in place. Power for the LEDs comes via USB.

The print itself was a bit tricky, his diffuser used T-glase translucent filament, and was fused to the PLA LED ring in a single print from his dual-extruder printer. He takes us through the various steps he needed to get it right, and shows us a few of his failed prototypes. The resulting magnifier looks to be a useful addition to his bench, he’s made the STL files available towards the bottom of his post so you can have a go at making one for yourself.

This is the kind of simple hack that can make life so much easier for the SMD constructor. We’ve had  another set of augmented helping hands featured here in the past, and of course there’s the ultimate portable SMT station. If SMD soldering is new to you, please also read our SMD guide for the nervous.

Mechanized One-Man Sawmill

The title of ‘maker’ is conventionally applied to the young-adult age group. In the case of 84 year-old Ralph Affleck, a lifelong sawmiller, ‘maker’ perhaps undersells the accomplishment of building a fully functioning sawmill that can be operated by a single individual.

Starting in the trade at the age of 16 under his father’s tutelage, fifty years of working in sawmills saw him still loving what he did as retirement loomed. So, with pen, paper, and a simple school ruler he designed the entire shop from scratch. Decades of expertise working with wood allowed him to design the machines to account for warping and abnormalities in the timber resulting in incredibly accurate cuts.

With no other examples to guide his design — aside from perhaps old style steam-powered sawmills, and newer portable ones that he feels are inadequate for the job — much of the shop is built from scratch with scavenged parts. And, that list is impressive: four hydraulic cylinders from a Canberra bomber, levers from an old locomotive, differentials and gearboxes from a MAC and 1912 Republic trucks, a Leyland engine that operated for 13 years without the need for maintenance, and an assortment of old military and air force vehicle parts. This is complimented by his log skidder — also custom — that would look at home in a post-apocalyptic wasteland. Built from two tractors, it combines three gearboxes for 12 forward and 8 reverse gears(what!?), and can hit 42mph in reverse!

Continue reading “Mechanized One-Man Sawmill”

How To Measure The Extremely Small: Atomic Mass

How does one go about measuring the mass of an object? Mass is defined as the amount of matter an object contains. This is very different from weight, of course, as the mass of our object would remain the same despite the presence or size of a gravitational field. It is safe to say, however,  that most laboratory measurement systems are here on Earth, and we can use the Earth’s gravity to aid in our mass measurement. One way is to use a balance and a known amount of mass. Simply place our object on one side of the balance, and keep adding known amounts of mass to the other side until the balance is balanced.

But what if our object is very small…too small to see and too light to measure with gravity? How does one measure the mass of single atom? Furthermore, how does one determine how much of an object consists of a particular type of atom? There are two commonly used tools just for this purpose. Chances are you’ve heard of one of these but not the other. These tools used to measure substances on the atomic level is the focus of today’s article.

Continue reading “How To Measure The Extremely Small: Atomic Mass”