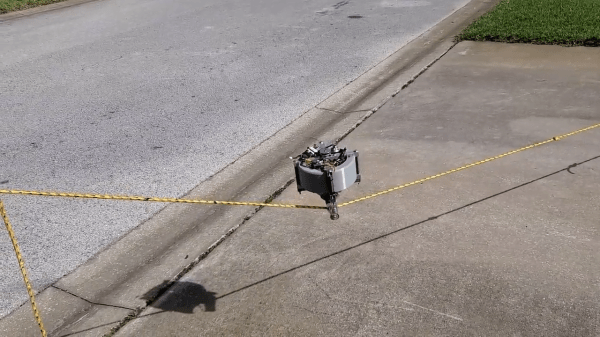
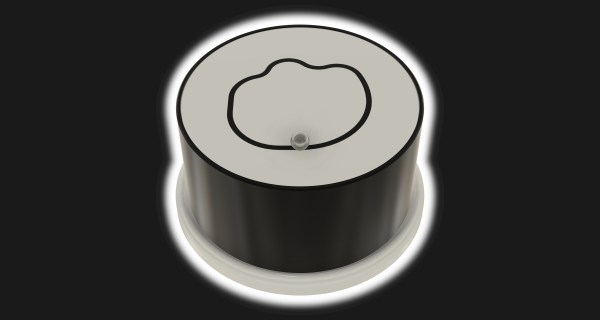
A Toy Jeep For After The Apocalypse

When your friends are off to the post-apocalyptic Wasteland Festival and present you with a defunct Power Wheels clone toy Jeep to make ready for the festivities, what are you to do? If you happen to be [Victor Frost], soup it up with new electrics and uprated steering, and send it forth into the hideous no-mans land.

These toys usually have one or two 12V high-speed motors driving plastic gear trains for the rear wheels. This one is a two-motor model and unexpectedly comes with a steering motor for parental remote control. All its electronics were dead, so rather than do a complete motor upgrade he instead doubled the voltage and installed decent motor controllers with an Arduino sending them instructions. Otherwise it received an upgrade and stiffening of its chassis and steering components, and the kids plastic steering wheel was replaced with a wooden one.

The result is not quite Mad Max as while it’s faster than the original there’s still something of the pedestrian about it. But it seems to be a load of fun, and we can’t help admitting we’d like a go in it. If you’re hungry for more, this isn’t the first such story we’ve covered.

Documentation Is Hard, Let The SkunkWorks Project Show You How To Do It Well

Documentation can be a bit of a nasty word, but it’s certainly one aspect of our own design process that we all wish we could improve upon. As an award-winning designer, working with some of the best toy companies around, [Jude] knows a thing or two about showing your work. In his SkunkWorks Project, he takes a maker’s approach to Bo Peep’s Skunkmobile and gives us a master class on engineering design in the process.

As with any good project brief, [Jude] first lays out his motivation for his work. He was very surprised that Pixar hadn’t commercialized Bo Peep’s Skunkmobile and hoped his DIY efforts could inspire more inclusive toy options from the Toy Story franchise. He does admit that the Skunkmobile presents a more unique design challenge than your standard, plastic, toy action figure. Combining both the textile element to create the illusion of fur and the RC components to give the toy its mobility requires careful thought. You definitely don’t want the wheels ripping into the fabric as you wheel around the backyard or for the fur to snag every object you pass by in the house.

Given the design challenges of making the Skunkmobile from scratch, [Jude] decided the best way forward was to retrofit a custom-designed skunk-shaped body onto a standard RC car chassis. The difficulty here lies in finding a chassis that can support the weight of the retrofitted body as well as one big enough to hold a 9-inch Bo Peep doll inside the driver’s compartment. Before spending endless hours 3D printing (and re-printing) his designs, [Jude] first modeled the Skunkmobile in card (using cardboard), a practice we’ve seen before, and are always in love with. He continually emphasized the form of his device was probably even more important than its function as capturing the essence as well as the “look and feel” of the Skunkmobile were critical design criteria. You can even see the skunk wagging its tail in all his demo videos. Prototyping in card gave [Jude] a good feel for his Skunkmobile and the designs translated pretty well to the 3D printed versions.

What really impressed us about [Jude’s] project is the incredible detail he provides for his entire design process from his backstory, to the initial prototypes, to the user testing, and, finally, to the realization of the final product. Remember, “We want the gory details!”

Continue reading “Documentation Is Hard, Let The SkunkWorks Project Show You How To Do It Well”

You Can 3D Print Your Own RC Motorbikes

Radio control cars have been a popular toy for decades, but their motorcycle counterparts have always lagged behind due to balance issues and compromised agility. At the same time, a little toy motorbike can be mesmerizing in action. [brettt3] built a few of his own design that look remarkably fun to play with.

Modeled after the Ducati Draxter and Suzuki GSX-RR, the 3D printed bodies do a great job of aping their full-size counterparts. With a lick of paint and some finer touches, these could be absolutely exquisite, but they look awesome in the bare plastic nonetheless. The bikes use a belt drive to deliver power from a motor in the body to the rear wheel. To keep them upright, a weighted front wheel is used as a passive gyroscope for stabilization.

But the finest touch is arguably the rider which sits atop each motorcycle. Articulated and with hands resting on the handlebars, the rider moves with the steering of the bike, creating an eerie realism that we can’t get enough of. There’s even a tiny micro-servo in the head which allows the rider to swivel and look in the direction of motion as you’d expect.

Files are available for those wishing to recreate these designs at home. Alternatively, dive deeper into gyro-stabilised designs to learn more about how it all works. Video after the break.

Continue reading “You Can 3D Print Your Own RC Motorbikes”

Spooky USB Baby Types Out Messages From Beyond

You might think it’s a bit early for us to be running Halloween hacks, but don’t worry. While this microcontroller-equipped doll that mimics a USB keyboard to type out messages in the creepiest way possible might seem like a gag gift you’d get after attending somebody’s bone-chilling holiday bash, creator [Jonathan] actually put it together for a friend’s wedding. So not only is it an interesting piece of hacked together hardware, but it’s also a great reminder about the importance of having a wedding registry.

Even if this seems like a rather unusual wedding gift from an outsider’s perspective (for the record, pranks involving this “haunted doll” have been a running gag between them since their school days), we can’t help but be impressed with the way [Jonathan] implemented it. An ATtiny85-powered Digispark is hidden inside the doll, along with a simple USB 2.0 hub that supposedly eases some teething issues the diminutive development board has with newer USB 3.0 ports. Through the use of V-USB, this lets the baby type out messages once plugged into the recipient’s computer.

Soldering the Digispark to a cheap USB hub keeps newer computers happy.

Now he could have just stopped there, but [Jonathan] wanted this to be an interactive experience. Specifically, he wanted the baby to present the newlyweds with a personally test of sorts, and that meant taking user input. He came up with the clever user interface demonstrated in the video below, which responds to changes in the system’s “Caps Lock” state.

This platform-agnostic solution lets the user navigate the doll’s menu system by tapping a single key, although the Chromebook users out there will have to break out the Alt key to play along. It’s a neat trick for getting two-way communication going between a MCU and a computer without any client-side software, and worth filing away mentally for future non-haunted projects. It’s also worth checking out the effort [Jonathan] put into optimizing everything to fit into the chip’s paltry 6012 bytes of flash.

Incidentally, this is a good a time as any to remind readers that our Halloween Hackfest contest is live right now and taking entries until October 11th. If you’ve got any cursed bar mitzvah gifts you’ve been putting the finishing touches on, we’d love to see them.

Continue reading “Spooky USB Baby Types Out Messages From Beyond”

One Man’s Quest To Build A Baby Book With Brains

Regular readers will know that Hackaday generally steers clear of active crowdfunding campaigns. But occasionally we do run across a project that’s unique enough that we feel compelled to dust off our stamp of approval. Especially if the campaign has already blasted past its funding goal, and we don’t have to feel bad about getting you fine folks excited over vaporware.

It’s with these caveats in mind that we present to you Computer Engineering for Babies, by [Chase Roberts]. The product of five years of research and development, this board book utilizes an internal microcontroller to help illustrate the functions of boolean logic operations like AND, OR, and XOR in an engaging way. Intended for toddlers but suitable for curious minds of all ages, the book has already surpassed 500% of its funding goal on Kickstarter at the time of this writing with no signs of slowing down.

The electronics as seen from the rear of the book.

Technical details are light on the Kickstarter page to keep things simple, but [Chase] was happy to talk specifics when we reached out to him. He explained that the original plan was to use discreet components, with early prototypes simply routing the button through the gates specified on the given page. This worked, but wasn’t quite as robust a solution as he’d like. So eventually the decision was made to move the book over to the low-power ATmega328PB microcontroller and leverage the MiniCore project so the books could be programmed with the Arduino IDE.

Obviously battery life was a major concern with the project, as a book that would go dead after sitting on the shelf for a couple weeks simply wouldn’t do. To that end, [Chase] says his code makes extensive use of the Arduino LowPower library. Essentially the firmware wakes up the ATmega every 15 ms to see if a button has been pressed or the page turned, and updates the LED state accordingly. If no changes have been observed after roughly two minutes, the chip will go into a deep sleep and won’t wake up again until an interrupt has been fired by the yellow button being pressed. He says there are some edge cases where this setup might misbehave, but in general, the book should be able to run for about a year on a coin cell.

[Chase] tells us the biggest problem was finding a reliable way to determine which page the book was currently turned to. In fact, he expects to keep tinkering with this aspect of the design until the books actually ship. The current solution uses five phototransistors attached to the the MCU’s ADC pins, which receive progressively more light as fewer pages are laying on top of them. The first sensor is exposed when the second page of the book is opened, so for example, if three of the sensors are seeing elevated light levels the code would assume the user is on page four.

Opening to the last page exposes all five light sensors.

The books and PCBs are being manufactured separately, since as you might expect, finding a single company that had experience with both proved difficult. [Chase] plans on doing the final assembly and programming of each copy in-house with the help of family members; given how many have already been sold this early in the campaign, we hope he’s got a lot of cousins.

So what do you do with an Arduino-compatible book when Junior gets tired of it? That’s what we’re particularly interested in finding out. [Chase] says he’s open to releasing the firmware as an open source project after the dust settles from the Kickstarter campaign, which would give owners a base to build from should they want to roll their own custom firmware. Obviously the peripheral hardware of the book is fairly limited, but nothing is stopping you from hanging some sensors on the I2C bus or hijacking the unused GPIO pins.

If you end up teaching your copy of Computer Engineering for Babies some new tricks, we’ve love to hear about it.

Continue reading “One Man’s Quest To Build A Baby Book With Brains”

Small Scale Mad Max: Danny Huynh’s Dystopian Animatronics

The hacker spirit is always alive and well in post-apocalyptic fiction, as characters throw together contraptions from whatever junk they can find. While these might not always be practical or possible in reality, their primary purpose is usually to look the part. This is definitely the case for [Danny Huynh]’s post-apocalyptic animatronic creations, which look like they can slot straight into Mad Max or Fallout.

[Danny] is an avid RC enthusiast, so many of the models are highly customized off-the-shelf RC cars. However, it’s the lifelike moving characters in these models that really catch the eye. Their hands and feet move with the steering and throttle, and in the motorcycle builds they will often lean with the turns. Other notable builds include a hexapedal taxi and a couple of animatronic bands.

All the vehicle builds are electric, but it looks like [Danny] often includes an audio module to simulate a roaring engine. He makes extensive use of servos and linkages for character movement, with wiring and electronics carefully hidden by paint or bodywork.

With all the CGI technology available today, great animatronic builds like an eerily lifelike heart, or a talking Nikola Tesla are all the more impressive to see.

Continue reading “Small Scale Mad Max: Danny Huynh’s Dystopian Animatronics”

Three-Stage Thrust Vectoring Model Rocket With Tiny Flight Computers

Flying a thrust-vectoring rocket can be a challenge, and even more so if you stack multiple stages and a minimalist flight computer on top of it all. But [Joe Barnard] is not one to shy away from such a challenge, so he built a three stage actively guided rocket named Shreeek.

[Joe] is well known for his thrust-vectoring rockets, some of which have came within a hair’s breadth of making a perfect powered landing. Previous rockets have used larger, more complex flight computers, but for this round, he wanted to go as small and minimalist as possible. Each stage of the rocket has its own tiny 16 x 17 mm flight computer and battery. The main components are a SAM21 microcontroller running Arduino firmware, an IMU for altitude and orientation sensing, and a FET to trigger the rocket motor igniter. It also has servo outputs for thrust vector control (TVC), and motor control output for the reaction wheel on the third stage for roll control. To keep it simple he omitted a way to log flight data, a decision he later regretted. Shreeek did not have a dedicated recovery system on any of the stages, instead relying on its light weight and high drag to land intact

None of the four launch attempts went as planned, with only the first two stages functioning correctly in the test with the best results. Thanks to the lack of recorded flight data, [Joe] had to rely on video footage alone to diagnose the problems after each launch. Even so, his experience diagnosing problems certainly proved its worth, with definitive improvements. However, we suspect that all his future flight computers will have data logging features included.

Continue reading “Three-Stage Thrust Vectoring Model Rocket With Tiny Flight Computers”