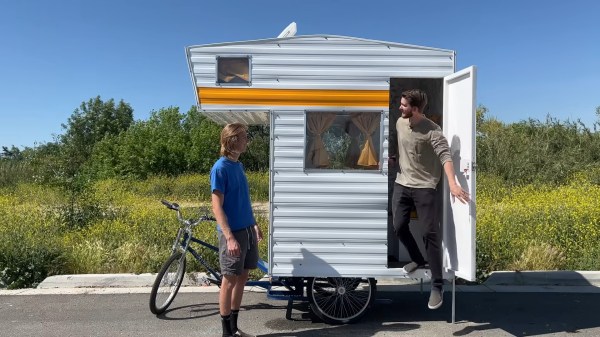
Ski lift in at a European ski resort

Ski Lift Design Does The Impossible

Tis The Season, for those who are so inclined, to loft themselves to the top of a steep snow-covered hill and then go downhill, really fast. And if something gets in their way, turn. Whether they be on skis, a snowboard, or some other means, getting down usually involves using gravity. Getting up, on the other hand, usually involves a ski lift. And in the video by [kalsan15] after the break, we learn how technology has stepped in to make even the most inaccessible slopes just a lift ride away.

Ski lift in at a European ski resort
A ski lift that can only turn left.

In its most simple form, a ski lift is two pulleys connected by a steel cable. The pulley at the bottom of the hill is powered, and the pulley at the top of the hill serves as an idler. Attached to the steel cable are some means for a person to either sit down or grab a handle and be hoisted to the top of the hill.

Such a simple arrangement works fine if the geography allows for it, but what if there are turns, or there need to be multiple idlers to keep the wire taut but also close to the ground? Again, the most basic ski lifts have limitations. If the cable turns left around the idler, then the attachment for the handle or chairĀ has to be on the right, making a right turn around the idler an impossibility.

How then can this problem be solved? We won’t spoil the outcome, but we recommend checking out [kalsan15]’s video for an excellent description of the problem and the solution that’ll leave you wondering “Why didn’t I think of that!?”

If you don’t find this hacky enough, then take a moment to learn how you too can not just make a gas-powered ski lift for your cabin in the woods, but then ride your slope down on your DIY Ski Bike!

Continue reading “Ski Lift Design Does The Impossible”

Hub-powered bike computer

Battery-less Bike Computer Gets Power And Data From The Wheels

Bicycle generator technology has advanced far beyond the bottle dynamos of years past, which as often as not would introduce enough drag when engaged to stall the bike. Granted, it’s not as much of a current draw as a big old incandescent headlight, but this wheel-powered cyclocomputer is a great example of harvesting both power and data from the rotation of a bike’s wheel.

While there are plenty of cyclocomputers available commercially, [Lukas] was looking for some specific features. His main goal was something usable at night, which means a backlit display, ruling out the usually coin-cell power sources. His bike’s hub dynamo offered interesting possibilities — not only does it provide AC power, but its output frequency is proportional to the bike’s speed. This allows him to derive speed, distance, RPM, time-in-motion, and other parameters to display on the 1×8 character LCD display. There’s some clever circuitry needed to condition the output of the hub dynamo, and a 1.5 farad supercapacitor keeps the unit powered for about four days when the bike isn’t in motion.

As for measuring the frequency of the dynamo’s output, [Lukas] simply used a digital input on the MSP430 microcontroller, with a little signal conditioning of course. He also added a barometer chip for altitude data, plus an ambient light sensor to control the LCD backlight. Everything lives in a clever 3D-printed case with a minimalist but thoughtful design that docks and undocks from the bike easily; [Lukas] assures us that a waterproof version of the case is in the works.

We really appreciate the elegance of this design, and the way it uses the data that’s embedded in the power supply. While [Lukas] appears to have used a commercially available generator, we’ve seen other examples of home-brew hub dynamos before — even one that offers regenerative braking.

a home depot surfboard

Foam Surfboard From Scratch

Have you ever wanted to make your own surfboard, but felt held back by a lack of tools, materials, or the cost of it? Drawing almost entirely from what can be found at a well-known home improvement retailer, [AndrewW1997] details the steps needed to craft your board.

In his guide, he details the difference between XPS (expanded polystyrene) and EPS (extruded polystyrene) and how each product’s closed cell and open cell nature affects the final board. Starting with two pink sheets of XPS, he laminated them together with glue to form his blank. A stringer is a long piece of wood in the middle of the surfboard that provides additional flex and strength. Some flooring plywood curved with a jigsaw provides the shape needed. Unfortunately, the blank needs to be split in half to install the stringer. However, he has a trick for gluing the blank back together without it buckling, and that trick is ratchet straps.

He cuts the foam into roughly the right shape with a hot wire. Clean up is done with sanding blocks, a plane, and a level. The next step is laminating the board with epoxy and fiberglass. Next, [Andrew] details a few considerations around the process and gets to glassing. Sanding up to 2000 grit and some polishing compound make the board gorgeous. After a bit of final curing time, you’re ready to ride some waves.

There’s a handy playlist on YouTube detailing the process so you can follow along. Once you’ve finished your surfboard, perhaps your next project will be to power it up with a jet drive. Video after the break.

Continue reading “Foam Surfboard From Scratch”

When Does Car Hacking Become “Tampering”? The British Government Seeks Guidance

When a government decides to take a look at your particular field of experimentation, it’s never necessarily a cause for rejoicing, as British motor vehicle enthusiasts are finding out through a UK Government consultation. Titled “Future of transport regulatory review: modernising vehicle standards“, the document explains that it is part of the process of re-adopting under UK law areas which have previously been governed by the European Union. Of particular interest is the section “Tackling tampering”, which promises a new set of offences for “tampering with a system, part or component of a vehicle intended or adapted to be used on a road“.

They go into detail as to the nature of the offences, which seem to relate to the production of devices designed to negate the safety or environmental features of the car. They’re at pains to say that they have no wish to target the legitimate car modification world, for example in motorsport or restoration, but it’s easy to see how a car hacker might inadvertently fall foul of any new rules. It’s worried the enthusiasts enough that a petition has been launched on the UK parliamentary petition site, making the point that the existing yearly MOT roadworthiness test should fulfill the function of taking any illegal vehicles off the road.

We’re always wary when governments wander into our purview, and given where this is being written it’s fair to say that British governments have had their fair share of ill-considered laws in their time. But before we call doom upon the future of car hacking for Brits, it’s worth remarking that they don’t always make a mess in this arena. The rules for the Individual Vehicle Approval test for putting a home-built car on the road are far from a bureaucratic nightmare for example, instead being a relatively sensible primer in building a safe motor vehicle.

So we’d suggest not to panic just yet, but perhaps any British readers might like to respond appropriately to the consultation and the petition in the interests of nudging them in the right direction.

Thanks [Adam Quantrill] for the tip.

Showing off the jet powered tesla

Tesla Model S Gets Boost With Jet Engine Upgrade

Tesla is well known for making cars that can accelerate quickly, but there’s always room for improvement. [Warped Perception] decided that his Tesla Model S P85D needed that little bit of extra oomph (despite the 0-60 MPH or 0-97 km/h time of 3.1 seconds), so he did what any sensible person would: add three jet turbines to the back of his car.

The best part of this particular build is the engineering and fabrication that made this happen. With over 200 pieces and almost all personally fabricated, this is a whirlwind of a build. The control panel is first, and there’s a particularly clever technique of 3D printing the lettering directly onto the control panel for the flat stuff. Then for the pieces with angles that would prevent the head from moving freely, he printed onto a plastic sheet in reverse, applied glue, then stuck the letters to the plate as a sheet. A top layer of clear coat ensures the letters won’t come off later.

Using a 3D printer to apply lettering on the control panel.

He installed the control electronics in the trunk with wiring strung from the car’s front to the rear. Three Arduinos serve as controllers for the jets. Afterward, came the bracket to hold the engines and attach it to the car’s underside. Unfortunately, supplies were a little hard to come by, so he had to make do with what was on hand. As a result it didn’t come out as strong as he would have hoped, but it’s still pretty impressive.

[Warped Perception] does a few tests before taking it out on the road. Then, he shifted the car into neutral and could drive the car solely on jet power, which was one of his goals. While we don’t love the idea of testing a jet engine on public roads, it certainly would discourage tailgaters.

Next, he finds a quieter road and does some speed tests. Unfortunately, it was drizzling, and the pavement was damp, putting a damper on his 0-60 standing times. Electric-only he gets 4.38 seconds, and turning on the jets plus electric shaves that down to 3.32 seconds. Overall, an incredible build that’s sure to draw a few curious glances whenever you’re out on the town.

If you’re looking to upgrade your Tesla, perhaps instead of jet engines, you might opt for a robot to plug it in for you?

Continue reading “Tesla Model S Gets Boost With Jet Engine Upgrade”

We All Live In A PVC Submarine

We doubt you could really live in [Pena’s] PVC submarine, but now the song’s stuck in our head anyway. Although the post is in Portuguese, you can get a pretty good idea of how it works, and translation software is better than ever. Transcending the language barrier, there are videos of just about every step of the construction. We didn’t, however, find a video of the vehicle in the water.

The plumber’s delight has modified motors for thrusters, and a camera as well. Epoxy potting keeps things waterproof. We’ve seen candle wax used for the same purpose in other builds.

Continue reading “We All Live In A PVC Submarine”

Build Your Own Submarine

If you are tried of building things that fly, why not try a submarine like [DIYPerks] did? As you can see in the video below, the key is to control buoyancy, and the mechanism used is impressive. The sub has two giant syringes fore and aft to compress or decompress water. The plungers are now 3D-printed actuators that travel on a lead screw. Two high-torque motors and some batteries sandwiched in acrylic disks make up the rest. This is a big vessel — you won’t be trying this in your bathtub and maybe not even your pool unless it is a big one.

Of course, everything needs to be watertight. Instead of trying to waterproof a power switch, this sub uses a reed switch so that a nearby magnet can turn it on. Not an original idea, but we always think it is more elegant than seals and potting compounds.

Continue reading “Build Your Own Submarine”