The idea behind the PixMob wristband is simple — at a concert, organizers hand these out to the concertgoers, and during the show, infrared projectors are used to transmit commands so they all light up in sync. Sometimes, attendees would be allowed to take these bracelets home after the event, and a few hackers have taken a shot at reusing them.
The protocol is proprietary, however, and we haven’t yet seen anyone reuse these wristbands without tearing them apart or reflashing the microcontroller. [Dani Weidman] tells us, how with [Zach Resmer], they have laid the groundwork for reverse-engineering the protocol of these wristbands.
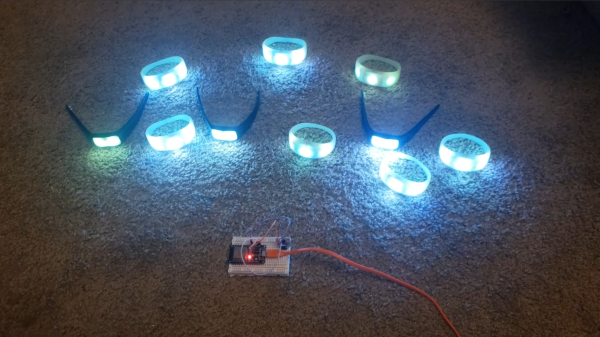
Our pair of hackers started by obtaining a number of recordings from a helpful stranger online, and went onto replaying these IR recordings to their wristbands. Most of them caused no reaction – presumably, being configuration packets, but three of them caused the wristbands to flash in different colors. They translated these recordings into binary packets, and Dani went through different possible combinations, tweaking bits here and there, transmitting the packets and seeing which ones got accepted as valid. In the end, they had about 100 valid packets, and even figured out some protocol peculiarities like color animation bytes and motion sensitivity mode enable packets.
The GitHub repository provides some decent documentation and even a video, example code you can run on an Arduino with an IR transmitter, and even some packets you can send out with a Flipper Zero. If you’re interested in learning more about the internals of this device, check out the teardown we featured back in 2019.