Injection Molding Silicone Parts For Under $50

You’ve likely seen many tutorials on making silicone parts using 3D printed molds online. The vast majority of these methods use a simple pour method to fill the mold. This relies on careful degassing and gentle pouring to reduce the presence of bubbles in the final result. [Jan Mrázek] has been working on an alternative method however, that allows for injection molding at low cost in the home shop.

The process relies on the use of printed resin molds. [Jan] notes that this generally necessitates the use of condensation-cure silicones, as additive types don’t cure well in resin molds. The condensation silicone is mixed up, degassed, and poured into a standard cartridge. From there, it’s installed in a silicone delivery air gun, which uses compressed air to force the silicone out of the nozzle and into the waiting mold.

It’s basically using a bunch of home DIY gear to create a cheap injection molding solution for silicone parts. [Jan] notes that there are a few mods needed to mold design to suit the process, and that 400-800 kPa is a good pressure to inject the silicone at.

Having the silicone injected under pressure is great for complex mold designs, as it forces the material into all the little difficult nooks and crannies. Of course, we’ve seen other methods for making silicone parts before, too. Be sure to sound off in the comments with your own favored techniques for producing quality silicone parts. Video after the break.

Continue reading “Injection Molding Silicone Parts For Under $50”

Word clock in the style of the Christmas lights from Stranger Things. If you know, you know.

Stranger Things Message Board Passes The Time By Spelling It Out

Will Netflix’s nostalgic hit Stranger Things be back for a fourth series anytime soon? We could pull out a Ouija board and ask the spirits, but we’d much rather ask closer to the source, i.e. a spirit in the upside down. And you know that the best way to do that is with LEDs — one for each letter of the alphabet so the spirit can spell out their messages.

Arduino, ESP01, and real-time clock powering this Stranger Things word clockAlthough contact with the Demogorgon’s world isn’t likely with [danjovic]’s open-source Stranger Things board, you are guaranteed to get the time spelled out for you every minute, as in, ‘it’s twenty-five (or six) to four’. And if you want to freak out your unwitting friends, you can covertly send messages to it from your phone.

There are two versions now — the original desktop version, and one that hangs on the wall and uses a high-quality photo print for the background. Both use an ESP-01 and an Arduino to help drive the 26 RGB LEDs, and use a DS2321 real-time clock for timing. We love the enameled wiring job on the wall-mount version, but the coolest part has to be dual language support for English and Brazilian Portuguese. You can check out demos of both after the break.

We’ve seen many a word clock around here, but this is probably one of the few that’s dripping with pop culture. If it’s stunning modernism you want, take a look at this painstakingly-constructed beauty.

Continue reading Stranger Things Message Board Passes The Time By Spelling It Out”

Hackaday Links Column Banner

Hackaday Links: September 5, 2021

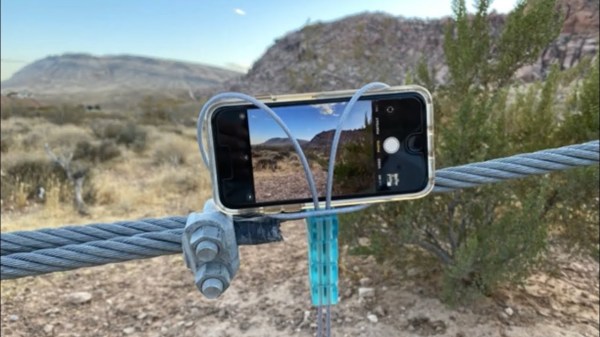
Good news from Jezero crater as the Mars rover Perseverance manages to accomplish for the first time what it was sent to do: collect and cache core samples from rocks. Space buffs will no doubt recall that Perseverance’s first attempt at core sampling didn’t go as planned — the rock that planetary scientists selected ended up being too soft, and the percussive coring bit just turned the core sample into powder. The latest attempt went exactly as planned: the cylindrical coring bit made a perfect cut, the core slipped into the sample tube nested inside the coring bit, and the core broke off cleanly inside the sample tube when it was cammed off-axis. Operators were able to provide visible proof that the core sample was retained this time using the Mastcam-Z instrument, which clearly shows the core in the sample tube. What’s neat is that they then performed a “percuss to ingest” maneuver, where the coring bit and sample tube are vibrated briefly, so that the core sample and any dust grains left around the sealing rim slide down into the sample tube. The next step is to transfer the sample tube to the belly of the rover where it’ll be hermetically sealed after some basic analysis.

Did any Android users perhaps oversleep this week? If you did, you’re not alone — lots of users of the Google Clock app reported that their preset alarms didn’t go off. Whether it was an actual issue caused by an update or some kind of glitch is unclear, but it clearly didn’t affect everyone; my phone mercilessly reminded me when 6:00 AM came around every day last week. But it apparently tripped up some users, to the point where one reported losing his job because of being late for work. Not to be judgmental, but it seems to me that if your job is so sensitive to you being late, it might make sense to have a backup alarm clock of some sort. We all seem to be a little too trusting that our phones are going to “just work,” and when they don’t, we’re surprised and appalled.

There seem to be two kinds of people in the world — those who hate roller coasters, and those who love them. I’m firmly in the latter camp, and will gladly give any coaster, no matter how extreme, a try. There have been a few that I later regretted, of course, but by and large, the feeling of being right on the edge of bodily harm is pretty cool. Crossing over the edge, though, is far less enjoyable, as the owners of an extreme coaster in Japan are learning. The Dodon-pa coaster at the Fuji-Q Highland amusement park is capable of hitting 112 miles (180 km) per hour and has racked up a sizable collection of injuries over the last ten months, including cervical and thoracic spine fractures. The ride is currently closed for a safety overhaul; one has to wonder what they’re doing to assess what the problem areas of the ride are. Perhaps they’re sending crash test dummies on endless rides to gather data, a sight we’d like to see.

And finally, you may have thought that phone phreaking was a thing of the past; in a lot of ways, you’d be right. But there’s still a lot to be learned about how POTS networks were put together, and this phone switch identification guide should be a big help to any phone geeks out there. Be ready to roll old school here — nothing but a plain text file that describes how to probe the switch that a phone is connected just by listening to things like dial tones and ring sounds. What’s nice is that it describes why the switches sound the way they do, so you get a lot of juicy technical insights into how switches work.

Building A Levitating Turbine Desk Toy

Magnetic levitation is a beautiful thing to watch. Seeing small objects wobble about while seemingly hovering in thin air never gets old. If you want something suitably distracting in this vein for your own desk, consider building this levitating turbine from [JGJMatt].

The build uses a combination of 3D printed parts and metal rods to form a basic frame.  The turbine is also 3D printed, making it easy to create the complex geometry for the curved fins. Rare earth magnets are then slotted into the parts in order to create the levitation effect. Two magnets are fitted to each frame piece, and one magnet is inserted into each end of the turbine. When aligned properly, the turbine will hover over the frame and can spin freely with almost no friction.

One concession made to functionality is a sewing needle inserted into the turbine. This presses against one part of the frame in order to keep the turbine from being pushed out of the magnetic field entirely. It’s possible that with very careful attention to detail in alignment, the pin could be eliminated, but it makes the system far more robust and reliable to have it there.

Floating in the magnetic field, a simple puff of air is enough to set the turbine spinning for quite some time. It makes for a captivating desk ornament, and one that can be tinkered with by changing the turbine blades for different performance. It may be frivolous, but at the larger scale, magnetic levitation is put to more serious uses like high-speed transport. Video after the break.

Continue reading “Building A Levitating Turbine Desk Toy”

Three-Stage Thrust Vectoring Model Rocket With Tiny Flight Computers

Flying a thrust-vectoring rocket can be a challenge, and even more so if you stack multiple stages and a minimalist flight computer on top of it all. But [Joe Barnard] is not one to shy away from such a challenge, so he built a three stage actively guided rocket named Shreeek.

[Joe] is well known for his thrust-vectoring rockets, some of which have came within a hair’s breadth of making a perfect powered landing. Previous rockets have used larger, more complex flight computers, but for this round, he wanted to go as small and minimalist as possible. Each stage of the rocket has its own tiny 16 x 17 mm flight computer and battery. The main components are a SAM21 microcontroller running Arduino firmware, an IMU for altitude and orientation sensing, and a FET to trigger the rocket motor igniter. It also has servo outputs for thrust vector control (TVC), and motor control output for the reaction wheel on the third stage for roll control. To keep it simple he omitted a way to log flight data, a decision he later regretted. Shreeek did not have a dedicated recovery system on any of the stages, instead relying on its light weight and high drag to land intact

None of the four launch attempts went as planned, with only the first two stages functioning correctly in the test with the best results. Thanks to the lack of recorded flight data, [Joe] had to rely on video footage alone to diagnose the problems after each launch. Even so, his experience diagnosing problems certainly proved its worth, with definitive improvements. However, we suspect that all his future flight computers will have data logging features included.

Continue reading “Three-Stage Thrust Vectoring Model Rocket With Tiny Flight Computers”

Build Yourself A Nifty Cable Smartphone Mount

Smartphones have supplanted cameras in day to day use for the vast majority of purposes. However, unlike cameras, they don’t come with tripod mounts or any real good way of holding them in a set position. [Mrballeng] has built an excellent mount, however, that uses cable to hold a smartphone in all manner of positions, for photography or other purposes.

The mount relies on vinyl-coated steel cable. Upon this cable are slotted four blocks that are 3D printed out of resin. The blocks are also fitted with strong magnets. This allows them to be positioned along the vinyl cable while sticking themselves in place thanks to the magnetic attraction to the steel core. The blocks can also be used to attach the cable to magnetic objects like drywall screws or light fittings.

Using the mount is simple. The cable is wrapped around the phone and the blocks cinched up to hold it in place. Then, the magnets in the blocks can be used to hold the phone to walls or other surfaces.

It’s a tidy build, and one we can imagine using regularly if we had one. Of course, there’s no reason you couldn’t produce the parts on a more common filament-based printer, either. We’ve seen some other great smartphone photography hacks too, like this mod that lets you use your phone as a microscope for under $10. Video after the break.

Continue reading “Build Yourself A Nifty Cable Smartphone Mount”

Building An Aluminum RC Truck From Scratch

These days you can get just about any kind of radio controlled vehicle as a ready-to-run model. Cars, trucks, excavators, you name it. Open the box, charge the batteries, and you’re ready to roll. Even with all these modern conveniences, there is still a special breed of modelers who create their own models using only a few off-the-shelf parts.

[Rini Anita] is exactly that rare breed, creating this aluminum RC truck from scratch. The truck itself is a cab-over — short for Cab Over Engine (COE), a style seen making local deliveries worldwide. He starts with the ladder frame chassis, which is constructed using an extruded aluminum channel. This is the same material you’d normally use for the door tracks in retail store display cases. The electronics and standard RC fare: a receiver, electronic speed control, and a servo for steering. Batteries are recycled lithium cells. The main gearbox and drive axle look to be sourced from another RC vehicle, while leaf springs and suspension components are all custom built.

The truck’s body is a great example hand forming metal. First, a wooden form was created. Sections for the windows and door panels were carved out. Sheet aluminum was then bent over the wood form. Carefully placed hammer blows bend the metal into the carved sections – leaving the imprints of doors, windows, and other panel lines.

Throughout this build, we’re amazed by [Rini]’s skills, and the fact that the entire job was done with basic tools. A grinder, an old drill press, and a rivet gun are the go-to tools; no welder or 3D printer to be found. This puts a project like this well within the means of just about any hacker — though it may take some time to hone your skills! For his next truck, maybe [Rini] can add a self driving option!

Continue reading “Building An Aluminum RC Truck From Scratch”