One Arduino Handheld To Rule Them All

There’s nothing quite as annoying as duplicated effort. Having to jump through the same hoops over and over again is a perfect way to burn yourself out, and might even keep you from tackling the project that’s been floating around in the back of your mind. [Alain Mauer] found that he’d build enough Arduino gadgets that were similar enough he could save himself some time by creating a standardized piece of hardware that he can load his code du jour on.

He’s come to call this device the Arduino Nano QP (which stands for Quick Project), and now it’s part of the 2019 Hackaday Prize. [Alain] doesn’t promise that it’s the perfect fit for everything, but estimates around 85% of the simple Arduino projects that he’s come up with could be realized on QP. This is thanks to the screw terminals on the bottom of the device which let you easily hook up any hardware that’s not already on the board.

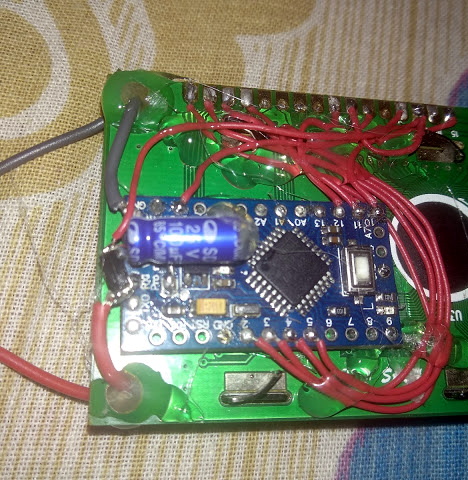
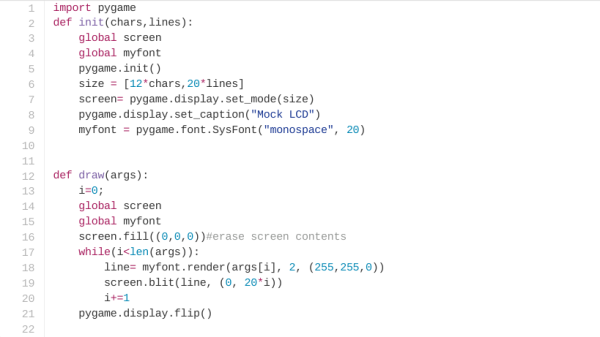
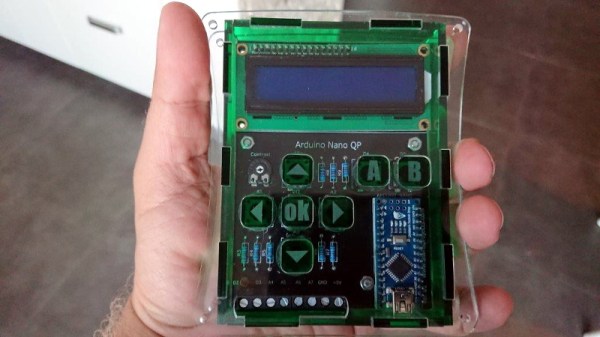
The QP board itself has the ubiquitous 16×2 character LCD display (complete with contrast control trimmer), seven tactile buttons arranged in a vaguely Game Boy style layout, and of course a spot to solder on your Arduino Nano. All of which is protected by a very slick laser cut acrylic case, complete with retained buttons and etched labels.

We’ve seen no shortage of handheld Arduino devices, but we have to admit, something about the utilitarian nature of this one has us intrigued. We wouldn’t mind having one of these laying around the lab next time we want to do a quick test.

Continue reading “One Arduino Handheld To Rule Them All”

Driving A 16×2 LCD With Voltage Modulation

The basic 16×2 LCD is an extremely popular component that we’ve seen used in more projects than we could possibly count. Part of that is because modern microcontrollers make it so easy to work with; if you’ve got an I2C variant of the display, it only takes four wires to drive it. That puts printing a line of text on one of these LCDs a step or two above blinking an LED on a digital pin on the hierarchy of beginner’s electronics projects.

What’s that? Even four wires is too many? In that case, you might be interested in this hack from [Vinod] which shows how you can drive the classic 16×2 with data and power on the same pair of wires. You’ll still need a microcontroller “backpack” for the LCD to interpret the modulated voltage, but if you’ve got an application for a simple remote display, this is definitely worth checking out.

The basic idea is to “blink” the 5 V line so quick that a capacitor on the LCD side can float the electronics over the dips in voltage. As long as one of the pins of the microcontroller is connected to the 5 V line before the capacitor, it will be able to pick up when the line goes low. With a high enough data rate and a large enough capacitor as a buffer, you’re well on the way to encoding your data to be displayed.

For the transmitting side, [Vinod] is using a Python script on his computer that’s sending out the text for the LCD over a standard USB to UART converter. That’s fed into a small circuit put together on a scrap of perfboard that triggers a MOSFET off of the UART TX line.

We actually covered the theory behind this technique years ago, but it’s always interesting to see somebody put together a real-world example. There might not be too many practical uses for this trick in the era of dirt-cheap microcontrollers bristling with I/O, but it might make a fun gag at your hackerspace.

Continue reading “Driving A 16×2 LCD With Voltage Modulation”

A Nearly Practical 6502 Breadboard Computer

Over the years we’ve seen a number of homebrew 6502 computers assembled with little more than a breadboard, a sack full of jumper wires, and an otherworldly patience that would make a Buddhist Monk jealous. Anyone who takes the time to assemble a fully functional computer on a half-dozen breadboards lined up on their workbench will always be a superstar in our book.

While we’re still too lazy to attempt one of these builds ourselves, we have to admit that the Vectron 64 by [Nick Bild] looks dangerously close to something you might be able to pull off within a reasonable amount of time. It’s still an incredible amount of work, but compared to some of the other projects we’ve seen, this one manages to keep the part count relatively low thanks to the use of a simple 16×2 LCD for output and user input provided by a PS/2 keyboard. You won’t be playing Prince of Persia on it, but at least you might be able to finish it in a weekend.

The computer is clocked at 1 MHz, and features 32KB RAM
along with 32KB EEPROM. That should be enough for anyone. [Nick] also points out he tried to use era-appropriate 7400 series ICs wherever possible, so no worries about historical revisionism here. If you’re looking for a design that somebody could have potentially knocked together back in the 1970s, this one would get you fairly close.

The astute reader might notice there’s no removable media in this build, and may be wondering how one loads programs. For that, [Nick] allowed himself a bit of modern convenience and came up with a scheme that allows an Arduino (or similar microcontroller) to connect up to the computer’s 28C256-15 EEPROM. With a Python script running on your “real” computer, you can write a new ROM image directly to the chip. He’s included the source code for a simple program which will write whatever you type on the keyboard out on the LCD, which should give you a good framework for writing additional software.

If you’re looking for a bigger challenge, don’t worry. We’ve covered 6502 breadboard computers that will make your eyes water. Incidentally, this isn’t the first time we’ve seen a similar LCD used for one of these computers, so looks like there’s no shame in sneaking in modern parts where it makes sense.

Count Your Zombies! A Left4Dead 2 Stat Tracker

Sure, you’re getting further and further into the game and finishing missions, but the true progress for a zombie shooter is how many zombies you’ve killed, right? [Evan Juras] agreed, so he set off to build a hardware stat tracker for Left4Dead 2!

Left4Dead 2 tracks a bunch of stats and at the end of each level, those stats are updated on your Steam page. [Evan] used a Python script running on a Raspberry Pi to connect to the internet and grab four different stats from your Steam profile. Those stats are displayed on an RGB 16×2 display. To house the project, a case for it was designed and [Evan] had it 3D printed. There are two buttons on the case: one to update the stats and another to cycle through them. If no buttons are pressed then the display cycles through the stats every minute and updates the stats every 24 hours.

The video below shows a summary of the build process and describes the hardware and software used. [Evan] has plans for tracking stats from other games through Steam and his python code is available on Github. Python is becoming the go-to tool for interacting with video game bots and now, stats — see this list of Pokemon Go bots. Also, check out this feature about running MicroPython on an ESP8266 if you wanted to build something similar to this without the Raspberry Pi.

Continue reading “Count Your Zombies! A Left4Dead 2 Stat Tracker”

Virtual LCD Using Python

[Prashant Mohta] got hold of a Raspberry Pi, a 16×2 LCD display and got down to writing a simple game in Python. Pretty soon, he realized that it was cumbersome to have the Ras-Pi and LCD connected when all he wanted to do was write the code. So he wrote a simple Python module which renders the LCD on his computer display. A simple, quick, useful hack.

[Prashant]’s code relies on the use of Pygame, a set of Python modules designed for writing games. His code uses just two functions – one to define the LCD (characters and number of lines) while the other draws the characters on the screen by looking up an array. The code is just under 20 lines and available from his Github repo. It will be useful to those who are getting started on Python to help them understand some basics. Python is awesome and writing Python code is pretty simple.

This might draw some flak from the naysayers so if you’re commenting below on the merits, or not, of Python, just keep your comments civil and healthy. In the video below, unrelated to this hack, [Raymond Hettinger] talks about “What makes Python so Awesome”!

Continue reading “Virtual LCD Using Python”