Roll Your Own Rotary Tool

Rotary tools are great little handheld powerhouses that fill the void between manual tools and larger shop machines. They’re also kind of expensive for what they are, which is essentially a power circuit, a switch, and a high-RPM motor with a tool coupling on the shaft. If your tooling needs are few and you have the resources, why not make your own?

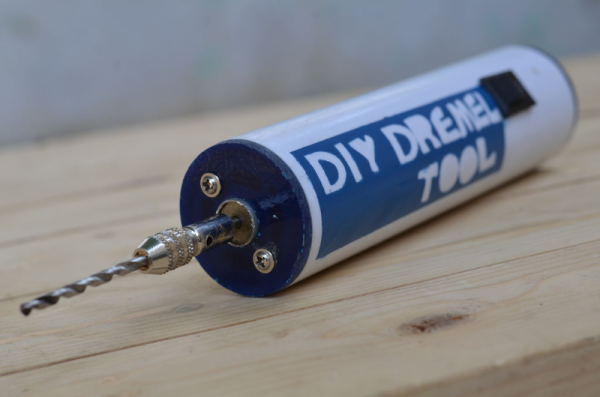
[DIY King 00] built himself a cordless rotary tool for less than $10 out of commonly-available parts. It doesn’t run nearly as fast as commercial rotary tools, but that’s not necessarily a bad thing. He made the body out of 2″ diameter PVC and mounted a 12 V, 400 RPM DC motor directly to one of the fiberglass end caps. Tools are chucked into a collet that screws into a coupler on the motor shaft.

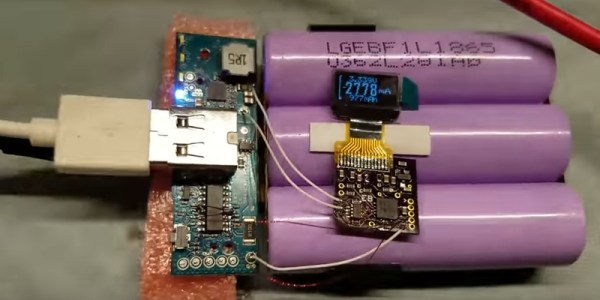
For power, [DIY King 00] built a 7.4 V battery pack by wiring two 18650 cells from an old laptop battery in series. It isn’t the full 12 V, but it’s enough power for light-duty work. These 2200 mAh cells should last a while and are rechargeable through the port mounted in the other end cap.

Drill down past the break to see the build video and watch the tool power through plywood, fiberglass, and inch-thick lumber. Once you’ve made your own rotary tool, try your hand at a DIY cordless soldering iron.

Continue reading “Roll Your Own Rotary Tool”

Hoverboard Reborn For Electric Rollerblading

Rollerblading is fun, but who needs all that pesky exercise? Wouldn’t strapping on the blades be so much more tempting if you had an electric pusher motor to propel you along your way?

We have to admit that we raised a wary eyebrow as we first watched [MakerMan]’s video below. We thought it was going to be just another hoverboard hack at first, but as we watched, there were some pretty impressive fabrication skills on display. Yes, the project does start with tearing into a defunct hoverboard for parts, primarily one wheel motor and the battery pack. But after that, [MakerMan] took off on a metalworking tear. Parts of the hoverboard chassis were attached to a frame built from solid bar stock — we’ll admit never having seen curves fabricated in quite that way before. The dead 18650 in the battery pack was identified and replaced, and a controller from an e-bike was wired up. Fitted with a thumb throttle and with a bit of padding on the crossbar, it’s almost a ride-upon but not quite. It seems to move along at quite a clip, even making allowances for the time-compression on the video.

We’ve seen lots of transportation hacks before, from collapsible longboards to steam-powered bicycles, but this one is pretty unique.

Continue reading “Hoverboard Reborn For Electric Rollerblading”

OLED Hacked Power Bank

In a feat of over-engineering, [Everett Bradford] hacked his power bank to add power monitor via an OLED display to show live current, voltage, temperature, and capacity information. The idea came when he learned about the INA219 chip. The INA219 is a current shunt and power monitor IC with an I²C or SMBUS compatible interface. The device is able to monitor both shunt voltage drop and bus supply voltage, with programmable conversion times and filtering. A programmable calibration value, combined with an internal multiplier, enables direct readouts of current in amperes. An additional multiplying register calculates power in watts.

With impressive miniaturization skills, [Everett] dissembles the Xiaomi Mi power bank and manages to add a custom power monitoring module and an OLED display. Not only that, he replaced the 4 LEDs that were the battery level indicators and actually consume more amps than his board plus the display. While active, the board consumes about 8mA. In sleep mode, it consumes less than 30µA.

The 32×64 OLED display and the custom-made circuit was assembled and tightly fitted into the original case. The power bank now gives readings of the battery charge level in a small graph, numeric current input/output, voltage and temperature. The seamless integration of the display into the power bank makes it look like something that could perfectly have come from a store. This is not your typical DIY power bank nor a gigantic 64 cells power bank. It is a precise and careful modification of an existing product, adding value, functionality, and dare I say it, style: an awesome hack!

We can see [Everett] process in the following video:

Continue reading “OLED Hacked Power Bank”

Monstrous USB Power Bank

At some point, cleaning out the spare parts bin — or cabinet, or garage — becomes a necessity. This is dangerous because it can induce many more project ideas and completely negate the original purpose. [Chaotic Mind], considering the pile of  batteries he’s collected over the past decade, decided that instead of throwing them out, he would recycle them into a grotesque USB power bank.

Inside the bulk of this power bank are an eye-popping 64 18650 Lithium Ion cells, mostly collected from laptop batteries, and wired in a parallel 8×8 pattern with an estimated capacity of over 100,000mAh(!!).  The gatekeeper to all this stored energy is a two-USB power bank charger board from Tindie.

Ah — but how to package all this power? The handy man’s secret weapon: duct-tape!

Continue reading “Monstrous USB Power Bank”

DIY LiPo Protectors

Spiderman’s Uncle Ben was known to say, “With great power comes great responsibility.” The same holds true for battery power. [Andreas] wanted to use protected 18650 cells, but didn’t want to buy them off the shelf. He found a forty cent solution. Not only can you see it in the video, below, but he also explains and demonstrates what the circuit is doing and why.

Protection is important with LiPo technology. Sure, LiPo cells have changed the way we use portable electronics, but they can be dangerous. If you overcharge them or allow them to go completely dead and then charge them, they can catch fire. Because they have a low source resistance — something that is usually desirable — short-circuiting them can also create a fire hazard. We’ve covered the chemistry in depth, but to prevent all the badness you’ll want a charger circuit.

Continue reading “DIY LiPo Protectors”

DIY USB Power Bank

USB power banks give your phone some extra juice on the go. You can find them in all shapes and sizes from various retailers, but why not build your own?

[Kim] has a walkthrough on how to do just that. This DIY USB Power Bank packs 18650 battery cells and a power management board into a 3D printed case. The four cells provide 16,000 mAh, which should give you a few charges. The end product looks pretty good, and comes in a bit cheaper than buying a power bank of similar capacity.

The power management hardware being used here appears to be a generic part used in many power bank designs. It performs the necessary voltage conversions and manages charge and discharge to avoid damaging the cells. A small display shows the state of the battery pack.

You might prefer to buy a power bank off the shelf, but this design could be perfect solution for adding batteries to other projects. With a few cells and this management board, you have a stable 5 V output with USB charging. The 2.1 A output should be enough to power most boards, including Raspberry Pis. While we’ve seen other DIY Raspberry Pi power banks in the past, this board gets the job done for $3.


Another Electric Longboard Goes The Distance

Looks like electric longboards are becoming a thing, with increasingly complex electronics going into them to squeeze as much performance as possible out of them. When an electric longboard lasts for 35 miles, can longboard hypermiling be far behind?

If endurance longboarding sounds familiar, it’s because we just covered a 25-mile electric that outlasted its rider. To get the extra 10 miles, [Andrew] cheated a little, with a backpack full of extra batteries powering his modified Boosted Board, a commercially available electric longboard. But the backpack battery was only a prototype, and now [Andrew] is well on his way to moving those batteries to a custom underslung enclosure on his new “Voyager” board. Eschewing balancing and monitoring circuitry in favor of getting as many batteries on board as possible, [Andrew] managed sixty 18650s in a 10S6P configuration for 37 volts at 21 Ah. He didn’t scrimp on tools, though – a commercial terminal welder connects all the battery contacts. We really like the overall fit and finish and the attention to detail; an O-ring seal on the 3D-printed enclosure is a smart choice.

Voyager isn’t quite roadworthy yet, so we hope we’ll get an update and perhaps a video when [Andrew] goes for another record.