For how crucial whales have been for humanity, from their harvest for meat and oil to their future use of saving the world from a space probe, humans knew very little about them until surprisingly recently. Most people, even in Herman Melville’s time, considered whales to be fish, and it wasn’t until humans went looking for submarines in the mid-1900s that we started to understand the complexities of their songs. And you don’t have to be a submarine pilot to listen now, either; all you need is something like these homemade hydraphones.
3.5mm25 Articles
Film, As You Have Never Had It Explained Before
For all the advances in digital photography, there remains a mystique for photographers and filmmakers about chemical film. Using it presents an artistic and technical challenge, and it lends an aesthetic to your work which is difficult to find in other ways. But particularly when it comes to moving pictures, how many of us have ever ventured beyond the Super 8 cartridge? If you’re not lucky enough to have a Spielberg budget, [Stand-Up Maths] is here with a video taking the viewer through the various movie film formats. He claims it’s the first video shot for YouTube in 35mm, and given that his first point is about the costs involved, we can see why.
In particular it serves as an introduction to the various film terms and aspect ratios. We all know what full frame and IMAX are, but do many of us know what they really mean in camera terms. A particularly neat demonstration comes when he has two cameras side by side with the same stock as a split screen, one 35mm and the other 16mm. The cheaper smaller framed format is good quality, but using a profession resolution chart you can see some of the differences clearly. The full film is below the break, and we’d suggest you watch it in the full 4K resolution if you are able to.
Meanwhile, some of us have been known to dabble in 8mm film, and even sometimes shoot footage with it.
Continue reading “Film, As You Have Never Had It Explained Before”
Darkroom Robot Automates Away The Tedium Of Film Developing
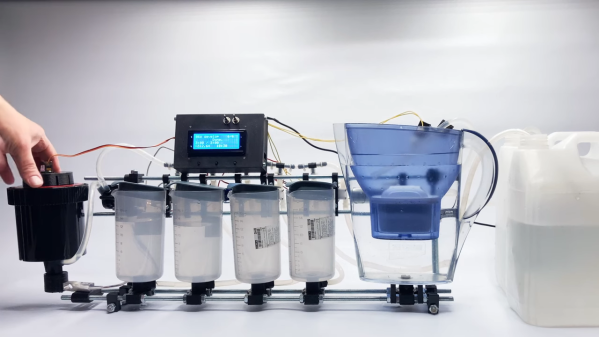
Anyone who has ever processed real analog film in a darkroom probably remembers two things: the awkward fumbling in absolute darkness while trying to get the film loaded into the developing reel, and the tedium of getting the timing for each solution just right. This automatic film-developing machine can’t help much with the former, but it more than makes up for that by taking care of the latter.
For those who haven’t experienced the pleasures of the darkroom — and we mean that sincerely; watching images appear before your eyes is straight magic — film processing is divided into two phases: developing the exposed film from the camera, and making prints from the film. [kauzerei]’s machine automates development and centers around a modified developing tank and a set of vessels for the various solutions needed for different film processes. Pumps and solenoid valves control the flow of solutions in and out of the developing tank, while a servo mounted on the tank’s cover gently rotates the reel to keep the film exposed to fresh solutions; proper agitation is the secret sauce of film developing.
The developing machine has a lot of other nice features that really should help with getting consistent results. The developing tank sits on a strain gauge, to ensure the proper amount of each solution is added. To avoid splotches that can come from using plain tap water, rinse water is filtered using a household drinking water pitcher. The entire rig can be submerged in a heated water bath for a consistent temperature during processing. And, with four solution reservoirs, the machine is adaptable to multiple processes. [kauzerei] lists black and white and C41 color negative processes, but we’d imagine it would be easy to support a color slide process like E6 too.
This looks like a great build, and while it’s not the first darkroom bot we’ve seen — we even featured one made from Lego Technics once upon a time — this one has us itching to get back into the darkroom again.
Continue reading “Darkroom Robot Automates Away The Tedium Of Film Developing”
Use Your Old SLR As A Digital Camera?
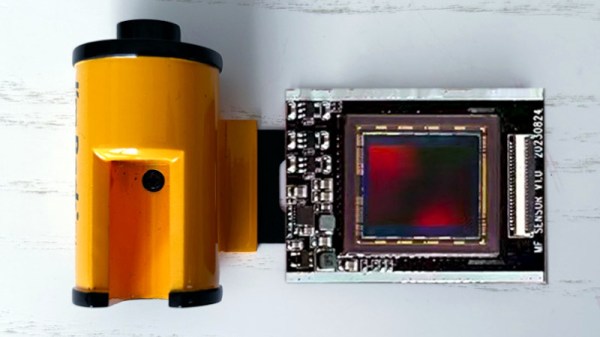
Back in the late 1990s as the digital revolution overtook photography there were abortive attempts to develop a digital upgrade for 35mm film cameras. Imagine a film cartridge with attached sensor, the idea went, which you could just drop into your trusty SLR and continue shooting digital. As it happened they never materialised and most film SLRs were consigned to the shelf. So here in 2023 it’s a surprise to find an outfit called I’m Back Film promising something very like a 35mm cartridge with an attached sensor.
The engineering challenges are non-trivial, not least that there’s no standard for distance between reel and exposure window, and there’s next-to-no space at the focal plane in a camera designed for film. They’ve solved it with a 20 megapixel Micro Four Thirds sensor which gives a somewhat cropped image, and what appears to be a ribbon cable that slips between the camera back and the body to a box which screws to the bottom of the camera. It’s not entirely clear how they solve the reel-to-window distance problem, but we’re guessing the sensor can slide from side to side somehow.
It’s an impressive project and those of us who shot film back in the day can’t resist a bit of nostalgia for our old rigs, but we hope it hasn’t arrived too late. Digital SLRs are ubiquitous enough that anyone who wants one can have one, and meanwhile the revival in film use has given many photographers a fresh excuse to use their old camera the way it was originally intended. We’ll soon see whether it catches on though — the crowdsourcing campaign for the project will be starting in a few days.
Oddly this isn’t the first such project we’ve seen, though it is the first with a usable-size sensor.
Wooden Wide-Angle Wonder Wows World
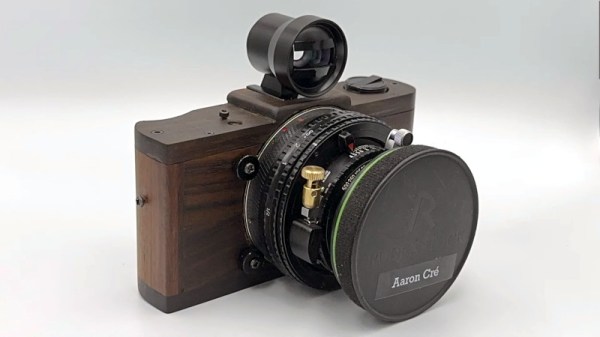
An old-fashioned film camera can be an extremely simple device to make, in that as little as a cardboard box with a pin hole in it will suffice. But that simplicity at heart leaves endless scope for further work, and a home-made camera can be every bit as much a highly-engineered object of beauty as its commercial stablemate. A great example comes from [Aaron Cré], whose desire for something close to a Hasselblad XPan panoramic camera led him to build his own equivalent out of wood.
The video below the break shows in detail how the wooden case is crafted, and how a lens mount ring sawn from a lens adapter is mounted on the front of it. He’s skipped making all the tiresome parts of the camera associated with winding and film transport and instead taken them from a cheap plastic snapshot camera. The original aspect ratio is stretched by cutting the guts of the snapshot camera apart, and extended to make a 75 mm long negative which also exposes over the sprocket holes.
The final camera is carefully finished to the point at which it really looks the part as well as taking those striking wide-angle photographs. We’re not photography buffs enough to identify the lens and shutter combination he’s using, but we can’t help envying him the results. Fancy making your own 35 mm camera too? Here’s another, in case you need inspiration.
Squeeze Over A Minute Of Movie Filming Onto A 35mm Still Cartridge
There’s an allure to shooting film in the digital age which isn’t quite satisfied by digital filters for your smartphone camera. Aside from the technical challenge of working with a medium limited in sensitivity compared to its electronic replacement there are aesthetic reasons for wanting to shoot with particular lenses not found on any modern cameras. Sadly though, movie film in formats such as Super 8 is expensive to buy and even more expensive to develop.
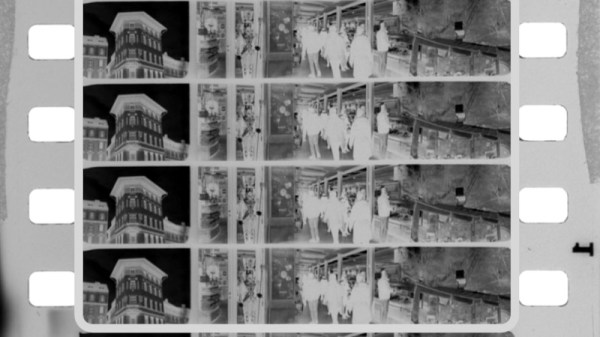
It’s a problem [Blaž Semprimožnik] addressed with his Okto 35 camera, a unique design that fits a minute and 7 seconds of 8mm-like movie filming onto a much cheaper roll of 35mm still camera film. How does it achieve this feat? By splitting the width of the film into four parallel tracks of 8mm-sized frames.
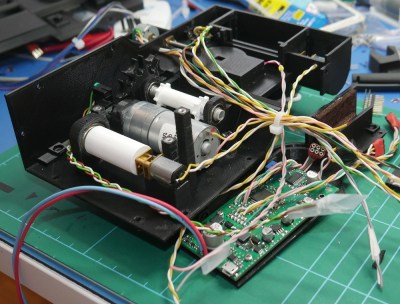
The camera is a 3D printed design, with all mechanical functions performed by stepper motors to avoid the complex gear trains that would have been found in cameras from the home movie heyday. Each frame advance is a single sprocket hole on the 35mm film, and the track selection is performed automatically by moving the C-mount lens assembly sideways.
 The result is a camera which is definitely unconventional, but which delivers something very close to that 8mm experience at a much lower cost per frame. There’s no reflex viewfinder or through-the-lens light metering, but since this is a camera likely to be used by enthusiasts rather than by 1970s consumers we’re guessing this won’t be a problem for most users.
There doesn’t appear to be anything in the way of downloadable STL files or other resources, probably because there’s a possibility he might put the camera into limited production. For the amount of work that he’s evidently put in we wish him luck, and given that the bench on which this is being written has more than one 8mm camera on it, we’re even slightly tempted by one. You might be too, after you’ve watched the video below the break.
This is a novel approach to a 35mm movie camera for still film cartridges, but it’s by no means the first. Previous ones we’ve seen have been full-frame designs though, capturing only a few seconds per roll.
Continue reading “Squeeze Over A Minute Of Movie Filming Onto A 35mm Still Cartridge”
This 3.5mm Cable Distorts Signals, Hides Audio-Filtering Circuit
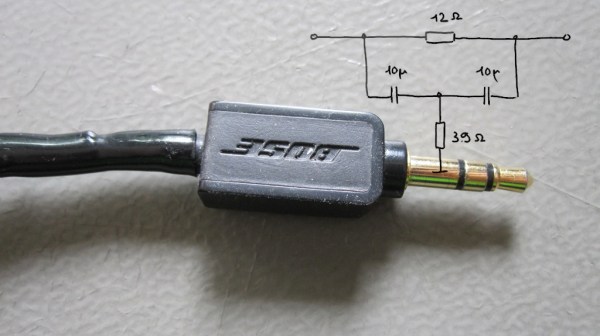
[Avian]’s dad got a new ham radio transceiver with a 3.5 mm jack, and his pile-of-cables got him a headphone cable from Bose headphones. He built a DB9 to 3.5 mm adapter with that one – and it failed to let data through, outputting distorted garbage of a waveform instead. With a function generator and an oscilloscope, [Avian] plotted the frequency response of the cable, which turned out to be quite far from a straight line. What was up?
Taking the connector apart was a tricky job. A combination of blunt force and a nail polish remover soak didn’t quite get them all the way, so [Avian] continued to apply blunt force and took the jack apart with minimal casualties. Turned out that there was more to the 3.5 mm plug indeed — a whole PCB with a few resistors and capacitors, reverse-engineered into the schematic seen above.
Looks like Bose decided to tweak the audio characteristics of a specific pair of headphones, and an in-plug filter was, somehow, the most efficient solution. We probably shouldn’t expect to see this often, but it bears keeping in mind: next time your repurposed 3.5 mm cable doesn’t behave as expected, it would be prudent to do a capacitance test with your trusty meter or oscilloscope.
With how small MCUs have gotten, you can easily hide more than just a few capacitors! We don’t often see circuits built into cables, but when we do, it’s for malicious purposes.


