Coin Acceptors Are Higher-Tech Than You Think

Coin-operated machines have a longer history than you might think. Ancient temples used them to dispense, for example, holy water to the faithful in return for their coins. Old payphones rang a bell when you inserted a coin so the operator knew you paid. Old pinball machines had a wire to catch things with holes in the middle so you couldn’t play with washers. But like everything else, coin acceptors have advanced quite a bit. [Electronoobs] shows a unit that can accept coins from different countries and it is surprisingly complex inside. He used what he learned from the teardown to build his own Arduino-based version.

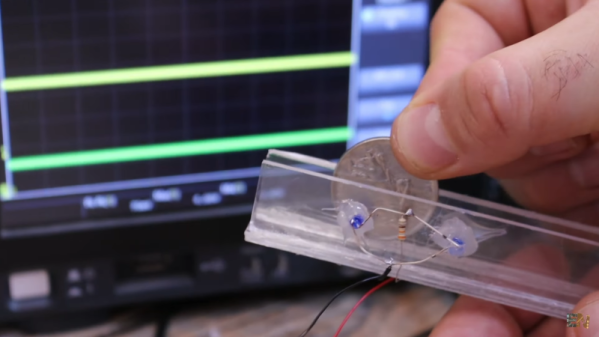
For scale, there is the obligatory banana. Inside the box there are several induction coils and some photo electronics. In particular, there are two optical sensors that watch the coin roll down a ramp. This produces two pulses. The width of the pulse indicates the diameter of the coin, and the time between the pulses tells its speed.

Continue reading “Coin Acceptors Are Higher-Tech Than You Think”

Two pairs of boards described in the article, with toggle switches and RCA jacks, shown interconnected, LEDs on all four boards lit up.

Boards For Playful Exploration Of Digital Protocols

Teaching people efficiently isn’t limited to transmitting material from one head to another — it’s also about conveying the principles that got us there. [Mara Bos] shows us a toolkit (Twitter,
nitter link
) that you can arm your students with, creating a small playground where, given a set of constraints, they can invent and figure communication protocols out on their own.

This tool is aimed to teach digital communication protocols from a different direction. We all know that UART, I2C, SPI and such have different use cases, but why? Why are baud rates important? When are clock or chip select lines useful? What’s the deal with the start bit? We kinda sorta figure out the answers to these on our own by mental reverse-engineering, but these things can be taught better, and [Mara] shows us how.

Gently guided by your observations and insights, your students will go through defining new and old communication standards from the ground up, rediscovering concepts like acknowledge bits, bus contention, or even DDR. And, as you point out that the tricks they just discovered have real-world counterparts, you will see the light bulb go on in their head — realizing that they, too, could be part of the next generation of engineers that design the technologies of tomorrow.

Continue reading “Boards For Playful Exploration Of Digital Protocols”

Hackaday Links Column Banner

Hackaday Links: April 10, 2022

A funny thing happened on the way to the delta. The one on Jezero crater on Mars, that is, as the Perseverance rover may have captured a glimpse of the parachute that helped deliver it to the Red Planet a little over a year ago. Getting the rover safely onto the Martian surface was an incredibly complex undertaking, made all the more impressive by the fact that it was completely autonomous. The parachute, which slowed the descent vehicle holding the rover, was jettisoned well before the “Sky Crane” deployed to lower the rover to the surface. The parachute wafted to the surface a bit over a kilometer from the landing zone. NASA hasn’t confirmed that what’s seen in the raw images is the chute; in fact, they haven’t even acknowledged the big white thing that’s obviously not a rock in the picture at all. Perhaps they’re reserving final judgment until they get an overflight by the Ingenuity helicopter, which is currently landed not too far from where the descent stage crashed. We’d love to see pictures of that wreckage.

Continue reading “Hackaday Links: April 10, 2022”

Robotic Boat Rides High On PVC Pipe Pontoons

If you want to build your own rover, there’s plenty of cheap RC trucks out there that will provide a serviceable chassis to work with. Looking to go airborne with a custom drone? Thanks to the immense popularity of first-person view (FPV) flying, you’ll find a nearly infinite variety of affordable fixed wing and quadcopter platforms out there to chose from. But when it comes to robotic watercraft, the turn-key options aren’t nearly as plentiful; the toys are all too small, and the commercial options are priced for entities that have an R&D budget to burn. For amateur aquatic explorers, creativity is the name of the game.

Take for example this impressive vessel built by [wesgood]. With a 3D printed electronics enclosure mounted to a pair of pontoons made of cheap 4-inch PVC pipe available from the hardware store, it provides a stable platform without breaking the bank. Commercial jet drive units built into the printed tail caps for the pipes provide propulsion, and allow the craft to be steered through differential thrust. Without rudders or exposed propellers, this design is particularly well-suited for operating in shallow waters.

A removable electronics tray allows for easy access.

Perched high above the water, the electronics box contains a Raspberry Pi 2, BU353 USB GPS receiver, and a Arduino Mega 2560 paired with a custom PCB that offers up convenient ports to connect a dual-channel Cytron 3 amp motor driver and Adafruit BNO055 9-DOF IMU. Power is provided by two 6,000 mAh LiPo batteries mounted low in the pontoons, and a matching pair of Adafruit current/voltage sensors are used to keep track of the energy budget. A small USB WiFi dongle with an external antenna plugged into the Pi offers up a WiFi network that [wesgood] can connect to with an iPad for control.

If the control software for the craft looks particularly well-polished, it’s probably because [wesgood] just so happens to be a professional developer with a focus on mobile applications. While we’re a bit skeptical of using WiFi for a critical long-distance link, we can’t deny that the iPad allows for a very slick interface. In addition to showing the status of the craft’s various systems, it lets the user either take manual control or place waypoints for autonomous navigation — although it sounds like that last feature is only partially implemented right now.

We love this design, and are eager to see more as the project develops. Recently [wesgood] experimented with payloads that can be suspended from the bottom of the electronics box, specifically a sonar module for performing bathymetric observations. There’s considerable interest in crowd sourced depth maps for inland waterways, and a robotic craft that can reliably chart these areas autonomously is certainly a step up from having to collect the data manually.

A Super Simple DIY Ozone Generator

[Advanced Tinkering] needed a source of fresh ozone for some future chemistry related projects, and since buying an off-the-shelf unit would be, well, just plain boring, it was obvious what to do (Video, embedded below).

Wire mesh discharge surfaces separated with a glass tube

The concept of the corona-discharge ozone generator is pretty straightforward — a high-voltage AC potential is presented over a large surface area, such that any O2 in the vicinity has the chance to get a decent dose of electrons ripping it apart and enabling the formation of the desired O3.

The construction is quite simple, just a pair of cylindrical metal wire mesh electrodes, separated by a glass tube, with a second glass tube surrounding the whole assembly. The use of high voltage AC allows the discharge to form by capacitive coupling across the central tube, giving a very simple construction. A pair of 3D-printed PLA end caps complete the reaction vessel, although it is noted in the video that the PLA is not terribly resistant to the corrosive effects of ozone, and time will tell whether these go the whole mileage.

Feed oxygen from an external generator is pumped into one end cap, at the bottom, with ozone-enriched gas passing out the other end, at the top, giving the gas a more complex path through the assembly and maximizing the contact with discharge. It will be interesting to see what the produced ozone will be used for in these future projects.

We’ve not seen a vast number of ozone hacks, but we’re no strangers to high voltage applications, like this interesting hand disinfection device, and this simple hack that generates a six-figure voltage with little more than some glasses of water, well not much more anyway.

Continue reading “A Super Simple DIY Ozone Generator”

The Bose headphone plug in question, with reverse-engineered schematic of the filter overlaid.

This 3.5mm Cable Distorts Signals, Hides Audio-Filtering Circuit

[Avian]’s dad got a new ham radio transceiver with a 3.5 mm jack, and his pile-of-cables got him a headphone cable from Bose headphones. He built a DB9 to 3.5 mm adapter with that one – and it failed to let data through, outputting distorted garbage of a waveform instead. With a function generator and an oscilloscope, [Avian] plotted the frequency response of the cable, which turned out to be quite far from a straight line. What was up?

Taking the connector apart was a tricky job. A combination of blunt force and a nail polish remover soak didn’t quite get them all the way, so [Avian] continued to apply blunt force and took the jack apart with minimal casualties. Turned out that there was more to the 3.5 mm plug indeed — a whole PCB with a few resistors and capacitors, reverse-engineered into the schematic seen above.

Looks like Bose decided to tweak the audio characteristics of a specific pair of headphones, and an in-plug filter was, somehow, the most efficient solution. We probably shouldn’t expect to see this often, but it bears keeping in mind: next time your repurposed 3.5 mm cable doesn’t behave as expected, it would be prudent to do a capacitance test with your trusty meter or oscilloscope.

With how small MCUs have gotten, you can easily hide more than just a few capacitors! We don’t often see circuits built into cables, but when we do, it’s for malicious purposes.

A robot mop on a wooden floor

A Turbocharged Robot Mop To Save Your Date

Cleaning robots are great and all, but they don’t really excel when it comes to speed. If your room looks like a pigsty and your Tinder date is arriving in twenty minutes, you’ll need more than a Roomba to make a good impression. [Luis Marx] ran into this exact problem and decided to solve it by building the world’s fastest cleaning robot (video, embedded below).

[Luis] built his ‘bot from the ground up, inspired by the design of your average robot vacuum: round, with two driven wheels and some sensors to avoid obstacles. A sturdy aluminium plate forms the chassis, onto which two powerful motors are placed to drive a pair of large-diameter wheels. The robot’s body is made from 3D-printed components and sports a huge LED display on top that functions as a speedometer of sorts.

Building a vacuum system turned out to be rather difficult, and since [Luis] already had a robot vacuum anyway, he decided to make this a robot mop instead. A little tank stores water and soap, which is pumped onto a microfibre cloth that’s attached using a magnetic strip. Obstacle avoidance is implemented through three ultrasonic distance sensors: when the robot is about to run into something it will brake and turn in the direction where it senses the most empty space.

All of that sounds great, but what about the speed? According to [Luis]’s calculations, it should be able to reach 60 km/h, although his living room is too small to put that into practice. Whether it will provide much in the way of cleaning at that speed is debatable too, but who cares: having your own ultra-high-speed robot mop will definitely impress your date more than any amount of cleaning.

We’ve featured a home-made robot mop before, but it looks excruciatingly slow compared to this one. If you’re planning to build zippy indoor robots, you might want to look into fast navigation systems like tracking ceiling lights.

Continue reading “A Turbocharged Robot Mop To Save Your Date”