Mommy, Where Do Ideas Come From?

We wrote up an astounding old use of technology – François Willème’s 3D scanning and modeling apparatus from 1861, over 150 years ago. What’s amazing about this technique is that it used absolutely cutting-edge technology for the time, photography, and the essence of a technique still used today in laser-line 3D scanners, or maybe even more closely related to the “bullet time” effect.

This got me thinking of how Willème could have possibly come up with the idea of taking 24 simultaneous photographs, tracing the outline in wood, and then re-assembling them radially into a 3D model. And all of this in photography’s very infancy.

But Willème was already a sculptor, and had probably seen how he could use photos to replace still models in the studio, at least to solidify proportions. And he was probably also familiar with making cameos, where the profile was often illuminated from behind and carved, often by tracing shadows. From these two, you could certainly imagine his procedure, but there’s still an admirable spark of genius at work.

Could you have had that spark without the existence of photography? Not really. Tracing shadows in the round is impractical unless you can fix them. The existence of photography enabled this idea, and countless others, to come into existence.

That’s what I think is neat about technology, and the sharing of new technological ideas. Oftentimes they are fantastic in and of themselves, like photography indubitably was. But just as often, the new idea is a seed for more new ideas that radiate outward like ripples in a pond.

In A Way, 3D Scanning Is Over A Century Old

In France during the mid-to-late 1800s, one could go into François Willème’s studio, sit for a photo session consisting of 24 cameras arranged in a circle around the subject, and in a matter of days obtain a photosculpture. A photosculpture was essentially a sculpture representing, with a high degree of exactitude, the photographed subject. The kicker was that it was both much faster and far cheaper than traditional sculpting, and the process was remarkably similar in principle to 3D scanning. Not bad for well over a century ago.

This article takes a look at François’ method for using the technology and materials of the time to create 3D reproductions of photographed subjects. The article draws a connection between photosculpture and 3D printing, but we think the commonality with 3D scanning is much clearer.

Continue reading “In A Way, 3D Scanning Is Over A Century Old”

3D Scanning Trouble? This Guide Has You Covered

When it comes to 3D scanning, a perfect surface looks a lot like the image above: thousands of distinct and random features, high contrast, no blurry areas, and no shiny spots. While most objects don’t look quite that good, it’s possible to get usable results anyway, and that’s what [Thomas] aims to help people do with his tips on how to create a perfect, accurate 3D scan with photogrammetry.

3D scanning in general is pretty far from being as simple as “point box, press button”, but there are tools available to make things easier. Good lighting is critical, polarizers can help, and products like chalk spray can temporarily add matte features to otherwise troublesome, shiny, or featureless objects. [Thomas] provides visuals of each of these, so one can get an idea of exactly what each of those elements brings to the table. There’s even a handy flowchart table to help troubleshoot and improve tricky scan situations.

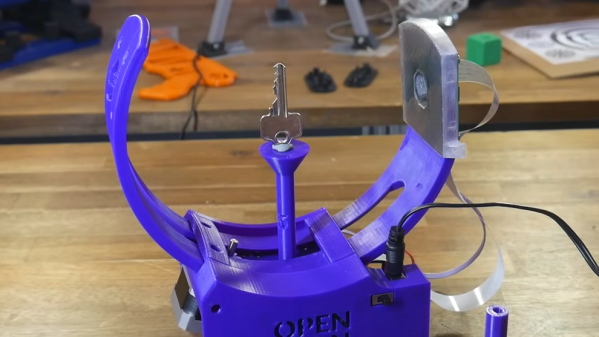
[Thomas] knows his stuff when it comes to 3D scanning, seeing as he’s behind the OpenScan project. The last time we featured OpenScan was back in 2020, and things have clearly moved forward since then with a new design, the OpenScan Mini. Interesting in an open-sourced scanning solution? Be sure to give it a look.

NeRF: Shoot Photos, Not Foam Darts, To See Around Corners

Readers are likely familiar with photogrammetry, a method of creating 3D geometry from a series of 2D photos taken of an object or scene. To pull it off you need a lot of pictures, hundreds or even thousands, all taken from slightly different perspectives. Unfortunately the technique suffers where there are significant occlusions caused by overlapping elements, and shiny or reflective surfaces that appear to be different colors in each photo can also cause problems.

But new research from NVIDIA marries photogrammetry with artificial intelligence to create what the developers are calling an Instant Neural Radiance Field (NeRF). Not only does their method require far fewer images, as little as a few dozen according to NVIDIA, but the AI is able to better cope with the pain points of traditional photogrammetry; filling in the gaps of the occluded areas and leveraging reflections to create more realistic 3D scenes that reconstruct how shiny materials looked in their original environment.

NVIDIA-Instant-NeRF-3D-Mesh

If you’ve got a CUDA-compatible NVIDIA graphics card in your machine, you can give the technique a shot right now. The tutorial video after the break will walk you through setup and some of the basics, showing how the 3D reconstruction is progressively refined over just a couple of minutes and then can be explored like a scene in a game engine. The Instant-NeRF tools include camera-path keyframing for exporting animations with higher quality results than the real-time previews. The technique seems better suited for outputting views and animations than models for 3D printing, though both are possible.

Don’t have the latest and greatest NVIDIA silicon? Don’t worry, you can still create some impressive 3D scans using “old school” photogrammetry — all you really need is a camera and a motorized turntable.

Continue reading “NeRF: Shoot Photos, Not Foam Darts, To See Around Corners”

3D Objects Without Scanning

There are many scanners — both commercial and homemade — that can take a variety of scans or images of a 3D object and convert it into something like a 3D printable file. When the process works, it works well, but the results can be finicky at best and will require a lot of manual tuning. According to [Samuel Garbett], you might as well just draw your own model using Blender. He shows you how using a Red Bull can which, granted, isn’t exactly the most complicated thing ever, but it isn’t the simplest either.

He does take one photo of the can, so there is a camera involved at some point. He also takes measurements using calipers, something you probably already have laying around.

Since it is just a can, there aren’t many required pictures or measurements as, say, a starship model. Once you have the measurements, of course, you could use the tool of your choice and since we aren’t very adept with Blender, we might have used something we think is easier like FreeCAD or OpenSCAD. However, Blender has a lot of power, so we suspect making the jump from can to the USS Enterprise might be more realistic for a Blender user.

Besides, it is good to see how other tools work and we were surprised that Blender could be relatively simple to use. Every time we see [Jared’s] channel, we think we should learn more about Blender. But if you have your heart set on a real scanner, there are plenty of open source designs you can print.

Better 3D Scans Through A Slowed Down Turntable

3D scanners aren’t cheap, and the last thing you want to see after purchasing one is bad data. But that’s what [Dave Does] and others were getting from their Revopoint POP scanners until some communal brainstorming uncovered the reason: the motorized turntable that came with the Kickstarter edition of the product was spinning too fast for the software to accurately keep track of the object. So he decided to replace the stepper motor controller in his turntable and document the process for anyone else who’s scanner might be struggling.

Plenty of room for expansion.

In the video below, [Dave] pops open the plastic case of the turntable and reveals a pretty sparse interior. There’s an incredible amount of empty space inside, and even some mounting studs to screw down new components, should you want to get into some hardcore upgrades. But for his purposes, a generic stepper motor controller that featured a potentiometer to adjust the speed was enough. He found a suitable board online for around $5 USD, and got to designing a 3D printed bracket that mates up to the existing screw holes on the turntable.

But it’s not exactly a drop-in replacement. For one thing, you’ve got to pop a hole in the side of the enclosure for the potentiometer knob to stick out of. You’ve also got to solder wires coming from the original DC jack and power switch to the new board to get it hooked up, but at least the motor plugs right in. In the video below, you can see [Dave] demonstrate the impressively deep throttle capability of the new driver.

If you’d rather build than buy, we’ve covered some impressive DIY turntables in the past that could fit the bill nicely, from automatic models that handle camera control to fully 3D printed versions that you’ve got to crank yourself.

Continue reading “Better 3D Scans Through A Slowed Down Turntable”

Sub-mm Mechanical 3D Scanner With Encoders And String

[Scott Rumschlag] wanted a way to precisely map interior spaces for remodeling projects, but did not want to deal with the massive datasets created by optical 3D scanning, and found the precision of the cost-effective optical tools lacking. Instead, he built a 3D cable measuring device that can be used to map by using a manual probe attached to a cable.

The cable is wound on a retractable spool, and passes over a pulley and through a carbon fiber tube mounted on a two-axis gimbal. There are a few commercial machines that use this mechanical approach, but [Scott] decided to build one himself after seeing the prices. The angle of rotation of each axis of the gimbal and the length of extended cable is measured with encoders, and in theory the relative coordinates of the probe can be calculated with simple geometry. However, for the level of precision [Scott] wanted, the devil is in the details. To determine the position of a point within 0.5 mm at a distance of 3 m, an angular resolution of less than 0.001° is required on the encoders. Mechanical encoders could add unnecessary drag, and magnetic encoders are not perfectly linear, so optical encoders were used. Many other factors can also introduce errors, like stretch and droop in the cable, stickiness of the bearings, perpendicularity of the gimbals axis and even the spring force created by the encoder wires. Each of these errors had to accounted for in the calculations. At first, [Scott] was using an Arduino Mega for the geometry calculations, but moved it to his laptop after he discovered the floating point precision of the Mega was not good.

[Scott] spend around 500 hours building and tuning the device, but the end result is really impressive. There are surprisingly few optical machines that can achieve this level of precision and accuracy, and they can be affected by factors like the reflectivity of an object.

If you do want to get into real 3D scanning, definitely take the time to read [Donal Papp]’s excellent guide to the practical aspects of the various technologies. Most of us already have a 3D scanner in our pocket in the form of a smartphone, which can be used for photogrammetry.

Continue reading “Sub-mm Mechanical 3D Scanner With Encoders And String”