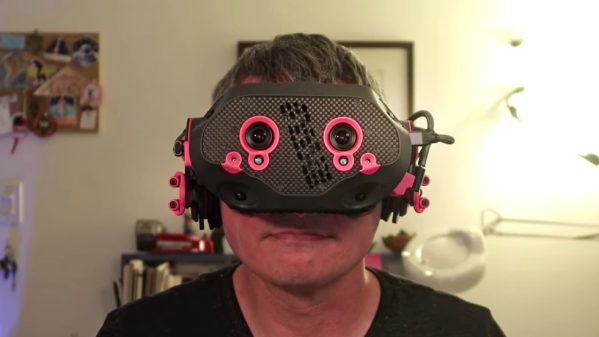
Hackaday Links Column Banner

Hackaday Links: November 8, 2020

Saturday, November 7, 2020 – NOT PASADENA. Remoticon, the virtual version of the annual Hackaday Superconference forced upon us by 2020, the year that keeps on giving, is in full swing. As I write this, Kipp Bradford is giving one of the two keynote addresses, and last night was the Bring a Hack virtual session, which I was unable to attend but seems to have been very popular, at least from the response to it. In about an hour, I’m going to participate in the SMD Soldering Challenge on the Hackaday writing crew team, and later on, I’ll be emceeing a couple of workshops. And I’ll be doing all of it while sitting in my workshop/office here in North Idaho.

Would I rather be in Pasadena? Yeah, probably — last year, Supercon was a great experience, and it would have been fun to get together again and see everyone. But here we are, and I think we’ve all got to tip our hacker hats to the Remoticon organizers, for figuring out how to translate the in-person conference experience to the virtual space as well as they have.

The impact of going to a museum and standing in the presence of a piece of art or a historic artifact is hard to overstate. I once went to an exhibit of artifacts from Pompeii, and was absolutely floored to gaze upon a 2,000-year-old loaf of bread that was preserved by the volcanic eruption of 79 AD. But not everyone can get to see such treasures, which is why Scan the World was started. The project aims to collect 3D scans of all kinds of art and artifacts so that people can potentially print them for study. Their collection is huge and seems to concentrate on classic sculptures — Michelangelo’s David is there, as are the Venus de Milo, the Pieta, and Rodin’s Thinker. But there are examples from architecture, anatomy, and history. The collection seems worth browsing through and worth contributing to if you’re so inclined.

For all the turmoil COVID-19 has caused, it has opened up some interesting educational opportunities that probably wouldn’t ever have been available in the Before Time. One such opportunity is an undergraduate-level course in radio communications being offered on the SDRPlay YouTube channel. The content was created in partnership with the Sapienza University of Rome. It’s not entirely clear who this course is open to, but the course was originally designed for third-year undergrads, and the SDRPlay Educators Program is open to anyone in academia, so we’d imagine you’d need some kind of academic affiliation to qualify. The best bet might be to check out the intro video on the SDRPlay Educator channel and plan to attend the webinar scheduled for November 19 at 1300 UTC. You could also plan to drop into the Learning SDR and DSP Hack Chat on Wednesday at noon Pacific, too — that’s open to everyone, just like every Hack Chat is.

And finally, as if bald men didn’t suffer enough disrespect already, now artificial intelligence is having a go at them. At a recent soccer match in Scotland, an AI-powered automatic camera system consistently interpreted an official’s glabrous pate as the soccer ball. The system is supposed to keep the camera trained on the action by recognizing the ball as it’s being moved around the field. Sadly, the linesman in this game drew the attention of the system quite frequently, causing viewers to miss some of the real action. Not that what officials do during sporting events isn’t important, of course, but it’s generally not what viewers want to see. The company, an outfit called Pixellot, knows about the problem and is working on a solution. Here’s hoping the same problem doesn’t crop up on American football.

OpenScan 3D Scans All Of The (Small) Things

The OpenScan project has been updated quite a bit since its inception. OpenScan is an open source, Arduino or Raspberry Pi-based 3D scanner for small objects that uses 3D printed hardware and some common electronic components to create 3D scans using photogrammetry; a process by which a series of still images from different angles are used to create a 3D point cloud of an object, which can then be used to generate a 3D model.

Feature visualization overlays detected features onto the camera preview to help judge quality. Broadly speaking, green is good.

Photogrammetry is a somewhat involved process that relies on consistent conditions, so going through the whole process only to find out the results aren’t up to snuff can be tiresome. Happily, OpenScan offers some interesting new functions such as feature visualization via the web interface, which helps a user judge scan quality and make changes to optimize results without having to blindly cross their fingers quite so much. OpenScan remains a one-person project by [Thomas], who is clearly motivated to improve his design and we’re delighted to see it getting updates.

Embedded below is a video that walks through the installation and web interface. It’s a fairly long and comprehensive, but if you like you can skip directly to [Thomas] demonstrating the interface around the 8:22 mark, or watch it below. Interested in your own unit? [Thomas] has an e-shop for parts and the GitHub repository is right here; the project also has its own subreddit.

Continue reading “OpenScan 3D Scans All Of The (Small) Things”

Handheld 3D Scanning, Using Raspberry Pi 4 And Intel RealSense Camera

Raspberry Pi 4 (with USB 3.0) and Intel RealSense D415 depth sensing camera.

When the Raspberry Pi 4 came out, [Frank Zhao] saw the potential to make a realtime 3D scanner that was completely handheld and self-contained. The device has an Intel RealSense D415 depth-sensing camera as the main sensor, which uses two IR cameras and an RGB camera along with the Raspberry Pi 4. The Pi uses a piece of software called RTAB-Map — intended for robotic applications — to take care of using the data from the camera to map the environment in 3D and localize itself within that 3D space. Everything gets recorded in realtime.

This handheld device can act as a 3D scanner because the data gathered by RTAB-Map consists of a point cloud of an area as well as depth information. When combined with the origin of the sensing unit (i.e. the location of the camera within that area) it can export a point cloud into a mesh and even apply a texture derived from the camera footage. An example is shown below the break.
Continue reading “Handheld 3D Scanning, Using Raspberry Pi 4 And Intel RealSense Camera”

Custom Control Panels With Photogrammetry

One of the best applications for desktop 3D printing is the creation of one-off bespoke components. Most of the time a halfway decent pair of calipers and some patience is all it takes to model up whatever part you’re after, but occasionally things get complex enough that you might need a little help. If you ever find yourself in such a situation, salvation might be just a few marker scribbles away.

As [Mangy_Dog] explains in a recent video, he wanted to model a control panel for a laser cutter he’s been working on, but thought the shapes involved were a bit more than he wanted to figure out manually. So he decided to give photogrammetry a try. For the uninitiated, this process involves taking as many high-resolution images as possible of a given object from multiple angles, and letting the computer stitch that into a three dimensional model. He reasoned that if he had a 3D model of the laser’s existing front panel, it would be easy enough to 3D print some replacement parts for it.

That would be a neat enough trick on its own, but what we especially liked about this video was the tip that [Mangy_Dog] passed along about increasing visual complexity to improve the final results. Basically, the software is looking for identifiable surface details to piece together, so you can make things a bit easier for it by taking a few different colored markers and drawing all over the surface like a toddler. It might look crazy, but all those lines give the software some anchor points that help it sort out the nuances of the shape.

Unfortunately the markers ended up being a little more permanent than [Mangy_Dog] had hoped, and he eventually had to use acetone to get the stains off. Certainly something to keep in mind. But in the end, the 3D model generated was accurate enough that (after a bit of scaling) he was able to design a new panel that pops right on as if it was a factory component.

Hackaday readers may recall that when we last heard from [Mangy_Dog] he was putting the finishing touches on his incredible “Playdog Blackbone” handheld gaming system, which itself is a triumph of mating 3D printed components with existing hardware.

Continue reading “Custom Control Panels With Photogrammetry”

How To 3D Print Your Identical Twin

It’s possible to have an enjoyable weekend touring a city with a stolen cardboard cutout from some advertising display or other. However, it’s 2019, and 3D printing means you can go so much further. [Simon] of RCLifeOn went so far as to print a lifesized body double of himself, and it’s only slightly creepy! (Video, embedded below.)

The model was sourced from a 3D scan [Simon] had done with commercial hardware. An Optimus P1 industrial-grade 3D printer was used to print the parts, with total printing time being around 200 hours. Adhesive was used to join the various segments together, and the assembly was then sanded and primed, ready for paint.

Unwilling to tackle the task alone, [Simon] enlisted a professional painter to help put the finishing touches on the piece. The end result is impressive, particularly from a distance. [Simon 2.0] was then sent out to the city centre, aiming to raise money from bewildered passers by.

We suspect the market for custom body doubles will only increase as the technology to create them becomes more widespread. If you’ve tackled a similar project, be sure to let us know. Video after the break.

Continue reading “How To 3D Print Your Identical Twin”

This 3D Scanner Is Your Ticket To Photogrammetry

It seems 3D printers have been around for ages and still we don’t have a good solution for turning physical 3D objects into digital ones. Yes, 3D scanners exist, but the OpenScan is the best 3D scanner we’ve seen. It’s a 3D printed device meant to take pictures of an object that can then be used by photogrammetry software to construct a point cloud. From there, it’s just a matter of messing with meshes to create a 3D printed copy of anything you want.

The latest version of the scanner is an improvement over the previous version that kind of, sort of looked like the Machine from Contact. This was a gigantic hubless ring, with a smartphone attached to the rim. Put an object in the center, and the phone would rotate around the object in every axis, snapping pictures the entire time. Needless to say, a simpler design prevailed. That doesn’t mean the old version didn’t look awesome. The electronics are simply an Arduino clone, two stepper drivers, a character display for control and some headers for connections and power supplies. This is pretty normal stuff for the RepRap crew.

Running this machine is as simple as putting an object in the device and taking a few pictures. There is some support for remotely controlling some cameras, but everything is universal if you have a remote shutter release. This can be plugged into the electronics, and once everything is done you have a few dozen pictures of an object with optimal lighting conditions that can be thrown into your photogrammetry software of choice. (Ed note: at least one that doesn’t rely on the object remaining stationary with respect to the background to estimate camera position.)

Get Great 3D Scans With Open Photogrammetry

Not long ago, photogrammetry — the process of stitching multiple photographs taken from different angles into a 3D whole — was hard stuff. Nowadays, it’s easy. [Mikolas Zuza] over at Prusa Printers, has a guide showing off cutting edge open-source software that’s not only more powerful, but also easier to use. They’ve also produced a video, which we’ve embedded below.

Basically, this is a guide to using Meshroom, which is based on the AliceVision photogrammetry framework. AliceVision is a research platform, so it’s got tremendous capability but doesn’t necessarily focus on the user experience. Enter Meshroom, which makes that power accessible.

Meshroom does all sorts of cool tricks, like showing you how the 3D reconstruction looks as you add more images to the dataset, so that you’ll know where to take the next photo to fill in incomplete patches. It can also reconstruct from video, say if you just walked around the object with a camera running.

The final render is computationally intensive, but AliceVision makes good use of a CUDA on Nvidia graphics cards, so you can cut your overnight renders down to a few hours if you’ve got the right hardware. But even if you have to wait for the results, they’re truly impressive. And best of all, you can get started building up your 3D model library using nothing more than that phone in your pocket.

If you want to know how to use the models that come out of photogrammetry, check out [Eric Strebel]’s video. And if all of this high-tech software foolery is too much for you, try a milk-based 3D scanner.

Continue reading “Get Great 3D Scans With Open Photogrammetry”