Results Of 3D-Printed Cylinder Head Testing Fail To Surprise

It’s the suburbanista’s weekend nightmare: you’re almost done with the weekly chores, taking the last few passes with the lawn mower, when you hear a pop and bang. The cylinder head on your mower just blew, and you’re out of commission. Or are you? You’ve got a 3D printer – couldn’t it save the day?

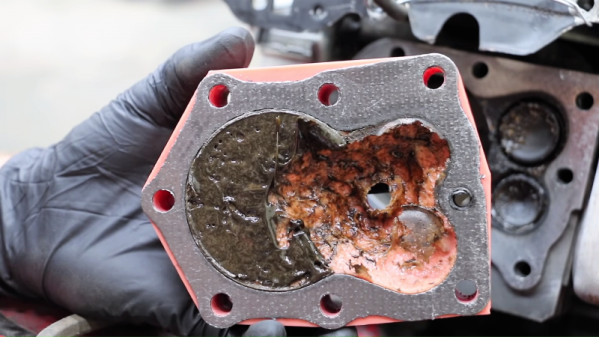
If this bench test of plastic cylinder heads is any indication, it’s possible – just as long as you’ve only got 40 seconds of mowing left to do. [Project Farm] has been running all sorts of tests on different materials as field-expedient cylinder heads for small gasoline engines, using everything from JB Weld epoxy to a slab of walnut. For this test, two chunky heads were printed, one from ABS, of the thermochromic variety apparently, the other in PLA. The test went pretty much as expected for something made of thermoplastic exposed to burning gasoline at high pressure, although ABS was the clear winner with two 40-second runs. The PLA only lasted half as long before the spark plug threads melted and the plug blew out. A gasket printed from flexible filament was also tested, with predictably awful results.

As bad as all this was, it still shows that 3D-printed parts are surprisingly tough. Each part was able to perform decently under a compression test, showing that they can stand up to pressure as long as there’s no heat. If nothing else, it was a learning experience. And as an aside, the cylinder heads were printed by [Terry] from the RedNeckCanadians YouTube channel. That video is worth a watch, if just for a few tips on making a 3D-printed copy of an object. Continue reading “Results Of 3D-Printed Cylinder Head Testing Fail To Surprise”

An MRI-Safe 3D Printed Pneumatic Stepper Motor

You will no doubt have seen those videos where MRI machines suck up all sorts of metallic objects with hilariously disastrous results. The magnetic field in one of these machines can easily pull in metal objects from across the room, exerting a force of several hundred pounds on any ferrous object unlucky enough to wander too close. As you can probably imagine, designing mechanical devices that can operate in such an intense magnetic field is exceptionally difficult.

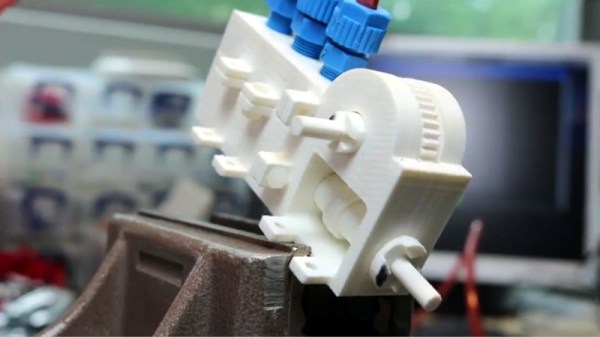
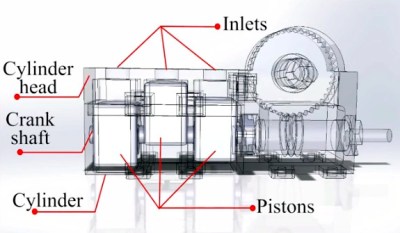
But this fully 3D printed pneumatic stepper motor designed by [Foad Sojoodi Farimani] might one day change that. The PneuAct, which he presented at the recent International Conference on Robotics and Automation (ICRA) in Brisbane, Australia, manages to run at up to 850 RPM with full position control using bursts of air rather than electronic pulses. Made entirely of plastic and without any electronic components, the PneuAct can not only operate in intense magnetic fields but also areas with flammable gases where sparks could potentially cause an explosion.

We often say that a design is “fully” 3D printable, even though it might require screws or other bits of hardware. But in the case of the PneuAct, it’s truly all printed. It has to be, or else the whole thing would be ripped apart when it got to close to the MRI machine. Each and every piece of the motor is printed in ABS, and can be used without any additional machining or cleanup. No lubrication is required, and [Foad] mentions that the whole thing is so cheap that it can be disposable. Which is a huge advantage in medical environments where contamination could be a concern.

Design-wise the PneuAct is essentially an expanded version of the 3D printed air motors we’ve seen previously, but it would be fair to say that none has ever been studied so closely before.

Continue reading “An MRI-Safe 3D Printed Pneumatic Stepper Motor”

A 3D-Printed Bowl Feeder For Tiny SMD Parts

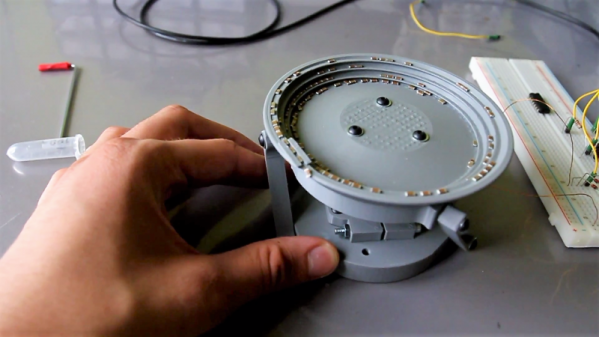
[Andrzej Laczewski] has something big in mind for small parts, specifically SMD resistors and capacitors. He’s not talking much about that project, but from the prototype 3D-printed bowl feeder he built as part of it, we can guess that it’s going to be a pretty cool automation project.

Bowl feeders are common devices in industrial automation, used to take a big pile of parts like nuts and bolts and present them to a process one at a time, often with some sort of orientation step so that all the parts are the right way around. They accomplish this with a vibratory action through two axes, which [Andrzej] accomplishes with the 3D-printed ABS link arms supporting the bowl. The spring moment of the arms acts to twist the bowl slightly when it’s pulled down by a custom-wound electromagnet, such that the parts land in a slightly different place every time the bowl shifts. For the parts on the shallow ramp spiraling up the inside of the bowl, that means a single-file ride to the top. It’s interesting to see how changing the frequency of the signal sent to the coil impacts the feed; [Andrzej] used a function generator to find the sweet spot before settling on a dedicated circuit. Watch it in action below.

We’re really impressed with the engineering that went into this, even if we wonder what the vibration will do to the SMD components. Still, we can’t wait to see this in a finished project – perhaps it’ll be integrated like this Arduino-fied bowl feeder.

Continue reading “A 3D-Printed Bowl Feeder For Tiny SMD Parts”

Pool Ball Return System Chalked Up To Ingenuity

Do you play pool? If so, you probably take the automatic ball return systems in bar and billiard hall tables for granted. [Roger Makes] was tired of walking around his home table to collect the balls every time he wanted to play, so he designed a time-saving ball return system.

Instead of falling into the little netted baskets that came with the table, the balls now drop into 3D-printed pockets and ride along dowel rod rails into a central collection box, which is suspended by straps beneath the rack-em-up end of the table. The rails themselves are fortified with ABS ribs that keep the balls from falling through.

Pool is all about geometry, and this really hit home when [Roger] was trying to merge the funnel part of the pocket with the exit chute in the design phase. He covered all the angles with a modular design that lets the chute rotate freely, which takes a lot of stress away from the dowel rods. We’ve got the video cued up after the break, so don’t bother with getting out your film canister full of quarters.

We can’t wait to see what [Roger Makes] next. Maybe it’ll be something like this OpenCV score-keeping system.

Continue reading “Pool Ball Return System Chalked Up To Ingenuity”

Repairs You Can Print: A Little Love For The Glove Box

A few years ago, [Brieuc]’s car blew a fuse. He went to replace it, which unfortunately means removing the entire glove box. In his haste to get his baby back on the road, he accidentally broke one of the clips that holds the glove box on the dashboard.

[Brieuc] tried to just glue the thing back together, but it didn’t hold because the part has to flex a little bit for people who need to get into the fuse box. No one seems to offer a replacement for this small but vital hunk of plastic, though he did find someone offering total glove box replacements at highway robbery prices. Since there was still one good clip, he used it to design and print a strong ABS replacement.

This is a great example of the one-off utility of 3D printers. [Brieuc] didn’t need an exact copy, and since he was replacing an injection-molded part with additive manufacturing, he had the freedom to start with a bare-bones design, make adjustments as needed, and iterate until he got it right. It didn’t take long. The layer orientation of the first print made the legs too weak, but that’s a simple fix. The second version has lasted for three years and counting.

We get it. You don’t have the same car as [Brieuc], so this particular fix doesn’t sway you. But someday in the future when your zipper breaks or your dishwasher detergent cup won’t latch, 3D printing will be there to help.

The Latest In 3D Printed Part Smoothing: Use A Brush

Part smoothing for 3D printed parts, especially parts printed in ABS, has been around for a while. The process of exposing an ABS part to acetone vapor turns even low-resolution prints into smooth, glossy 3D renderings that are stronger than ever. The latest improvement in part smoothing for 3D printed parts is now here: use a brush. Published in Nature‘s Scientific Reports, researchers at Waseda University have improved the ABS + acetone part smoothing process with a brush.

According to the authors of the paper, traditional filament-based printing with ABS has its drawbacks. The grooves formed by each layer forms a porous surface with a poor appearance and low rigidity. This can be fixed by exposing an ABS part to acetone vapor, a process we’ve seen about a million times before. The acetone vapor smoothing process is indiscriminate, though; it smooths and over-smooths everything, and the process involves possible explosions.

The researcher’s solution is a felt tip pen-like device that selectively applies acetone to a 3D printed part. Compared to the print over-smoothed in a vat of acetone vapor, more detail is retained. Also, there’s a ready market for felt tip pens and there isn’t one for crock pots able to contain explosive vapor. This is, therefore, research that can be easily commercialized.

Fail Of The Week: Upcycling Failed 3D Prints

Is it possible to recycle failed 3D prints? As it turns out, it is — as long as your definition of “recycle” is somewhat flexible. After all, the world only needs so many coasters.

To be fair, [Devin]’s experiment is more about the upcycling side of the recycling equation, but it was certainly worth undertaking. 3D printing has hardly been reduced to practice, and anyone who spends any time printing knows that it’s easy to mess up. [Devin]’s process starts when the colorful contents of a bin full of failed prints are crushed with a hammer. Spread out onto a properly prepared (and never to be used again for cookies) baking sheet and cooked in the oven at low heat, the plastic chunks slowly melt into a thin, even sheet.

[Devin]’s goal was to cast them into a usable object, so he tried to make a bowl. He tried reheating discs of the material using an inverted metal bowl as a form but he found that the plastic didn’t soften evenly, resulting in Dali-esque bowls with thin spots and holes. He then flipped the bowl and tried to let the material sag into the form; that worked a little better but it still wasn’t the win he was looking for.

In the end, all [Devin] really ended up with is some objets d’art and a couple of leaky bowls. What else could he have done with the plastic? Would he have been better off vacuum forming the bowls or perhaps even pressure forming them? Or does the upcycling make no sense when you can theoretically make your own filament? Let us know in the comments how you would improve this process.

Continue reading “Fail Of The Week: Upcycling Failed 3D Prints”