Accelerometer-based Game Control Using An IOS Device Courtesy Of HTML5

This game of Space Invaders is played by tilting your iPhone to the left or right. It’s a demonstration of HTML5 used to link devices in-browser. The only setup that’s required is for the base device to load up a webpage, then the control device scans a QR code (or just types in a link) to connect with the game. You can give it a try right now if you want.

It only works with iOS devices but we believe that’s because mobile Safari has the ability to poll accelerometer data and other browsers do not. If this was using on-screen buttons rather than the tilt controls it would work on any device that implements HTML5. The connection is facilitated by Node.js and Socket.IO. The QR code that is generated by the host machine’s page includes a unique ID which allows the control device to link with it. Once loaded, commands from the controller are sent via Socket.IO to the node on the host machine.

As with this HTML5-based sensor data application, we think this method is important because it allows control without the need for a standalone application. We’re hoping to see a lot of this in embedded projects in the future. By serving data to a smart phone or other device you remove to need for a physical user interface in your projects, which means you can make great things while spending less.

[via Reddit]

Another Homebrew Segway Clone Comes In At Under $300

[Matt Turner] tipped us off back in January about his homemade Segway project. Unfortunately that message slipped through the cracks but we’re glad he sent in a reminder after reading Friday’s feature an a different 2-wheeled balancer.

We like it that he refers to this project as being on the budget of a graduate student with a young family. We certainly understand where he’s coming from, and we hope he can ride this to job interviews to show them he truly lives engineering. The control circuitry is a bit higher-end than we’re used to seeing. He chose a Cypress CY8C29466 SoC to control the device. But the sensors are a common choice, using the Wii Motion Plus and Wii Nunchuk for the gyroscope and accelerometer they contain. This is a no-brainer since the sensors are high-quality, cheap and available locally, and communicate of the standard I2C protocol.

When looking for motors [Matt] was happy to find an old electric wheelchair on Craig’s List. This also gave him a gear box, wheels, and tires. He added a pair of motor drivers, with his own alterations to suppress feedback. Sounds like they run a little hot because he plans to add cooling fans to them in the future. But this first iteration is up and running quite well as you can see in the clip after the break.

Continue reading “Another Homebrew Segway Clone Comes In At Under $300”

USB Slingshot Controller Is For The Birds

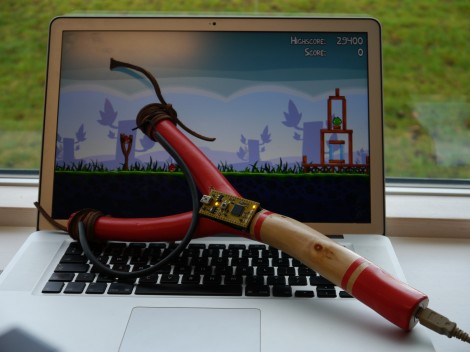
This USB slingshot controller really brought a smile to our faces. Part of it is the delightfully silly promo video you’ll find after the break. [Simon Ford] combined nature and technology to bring this USB-enabled slingshot into existence.

The frame itself is from a branch he found in the Epping Forrest of London. He whittled away the bark, and hollowed out an opening in at the base of the ‘Y’ to receive an accelerometer board. It has a pair of female pin headers to interface with the mbed seen in the image above. But the real hack here is the code he wrote to translate accelerometer data into appropriate mouse movements. His success in the area makes this translate the virtual world of Angry Birds in a visceral experience of killing things with a slingshot.

We’re suckers for this type of project. Two examples that pop into mind are these musical instrument hacks for Rock Band 2.

Continue reading “USB Slingshot Controller Is For The Birds”

Using A Cheap Accelerometer With Arduino Comes With A Catch

[Boris Landoni] put together a guide to using an inexpensive 3-axis accelerometer with Arduino. The chip that he chose for the exercise is an MMA7455L made by Freescale. It’s got a lot of nice features packed into it, using hardware to do some of the things you’d need software for with other chips like reporting in which direction the chip is moving, detecting when movement has stopped, and few others. It’s an I2C device, so the examples he provides will be super simple to port to your uC of choice.

But as the title says, there’s a catch. The chip is extremely versatile and you can get your hands on one for under $2. But check out the size of it. That’s a DFN (dual flat no-lead) package which means there are no pins on it. The package has solder contacts on the bottom which do not protrude out the sides. If you want to do some at-home prototyping with the chip you’ll need a hot air pencil or reflow gear as hand soldering is unlikely to be successful. We’re not saying it’s impossible, but it is quite tricky.

Of course, if you’ve got the secret to getting this done with a quality soldering iron we’d like to hear about it.

Ball-in-maze Game Shows Creativity And Classic 8-bit Sound

[M. Eric Carr] built this a long time ago as his Senior Project for EET480. It’s an electronic version of the ball-in-maze game. We’ve embedded this video after the break for your convenience.

The game has just one input; an accelerometer. If you’re having trouble visualizing the game, it works the same as this Android-based version, but replaces the physical maze and marble with a virtual maze on the graphic LCD screen. This has huge implications. Instead of just recreating the maze on the screen, [Eric] designed a multi-screen world, complete with warp blocks, which adds difficulty to  finding a solution. It also means that multiple different mazes can be played if you get tired of playing the same level.

This game also features music. A separate PIC microcontroller uses PWM to push out the 8-bit sound heard in the video. From the YouTube comments we learned that [Eric] didn’t write the music himself, but we still appreciate the playback quality he achieves with his hardware.

Continue reading “Ball-in-maze Game Shows Creativity And Classic 8-bit Sound”

POV Bauble Uses DIY Accelerometer To Sync The Image

So we saw this tip come in and thought–oh, another POV device. We watched the video (embedded after the break), took a sip of coffee, then almost sprayed the beverage all over the computer when we realized that this uses a diy sensor to synchronize the POV image.

[Ch00f] came up with the idea for the sensor after seeing a similar implementation on a commercial POV toy. Instead of using a proper accelerometer to sense the motion, the toy uses a plastic bead in a channel. When you move the body of the toy the bead rolls to one end or the other, covering or exposing a reflective sensor.

A similar sensor is used here. A drinking straw servers as the channel, with a paper-covered nylon screw as the bead. [Ch00f] cut a window in the bottom of the straw for his reflective sensor, then sealed each end with a wad of paper.

This method works, but not as well as he had hoped. It seems the refresh rate and timing of the particular sensor he’s using is rather poor. If it were replaced with one that is simply and IR LED and phototransistor (like the sensors from [Jack’s] last video) he thinks it would work a lot better.

via Buildlounge.

Continue reading “POV Bauble Uses DIY Accelerometer To Sync The Image”