Glowtie Is Perfect For Those Fancy Dress Raves

Are you bored of your traditional bow tie? Do you wish it had RGB LEDs, WiFi, and a web interface that you could access from your smartphone? If you’re like us at Hackaday…maybe not. But that hasn’t stopped [Stephen Hawes] from creating the Glowtie, an admittedly very slick piece of open source electronic neckwear that you can build yourself or even purchase as an assembled unit. Truly we’re living in the future.
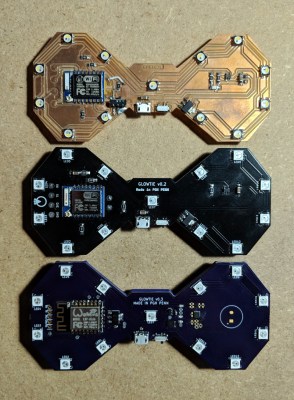
Evolution of the Glowtie

While we’re hardly experts on fashion around these parts (please see the “About” page for evidence), we can absolutely appreciate the amount of time and effort [Stephen] has put into its design. Especially considering his decision to release the hardware and software as open source while still putting the device up on Kickstarter. We seen far too many Kickstarters promising to open the source up after they get the money, so we’re always glad to see a project that’s willing to put everything out there from the start.

For the hardware, [Stephen] has gone with the ever popular ESP8266 module and an array of WS2812B LEDs around the edge of the PCB. There’s also a tiny power switch on the bottom, and a USB port for charging the two 1S 300mAh lipo batteries on the backside of the Glowtie. The 3D printed rear panel gives the board some support, and features an integrated bracket that allows it to clip onto the top button of your shirt. For those that aren’t necessarily a fan of the bare PCB look or blinding people with exposed LEDs, there’s a cloth panel that covers the front of the Glowtie to not only diffuse the light but make it look a bit more like a real tie.

To control the Glowtie, the user just needs to connect their smartphone to the device’s WiFi access point and use the web-based interface. The user can change the color and brightness of the LEDs, as well as select from different pre-loaded flashing and fading patterns. The end result, especially with the cloth diffuser, really does look gorgeous. Even if this isn’t the kind of thing you’d wear on a daily basis, we have no doubt that you’ll be getting plenty of attention every time you clip it on.

It should be said that [Stephen] is no stranger to wearable technology. We’ve previously covered his mildly terrifying wrist mounted flamethrower, so if he managed to build that without blowing himself up, we imagine building a light up tie should be a piece of cake in comparison.

Continue reading “Glowtie Is Perfect For Those Fancy Dress Raves”

Easy Access Point Configuration On ESP8266

One of the biggest advantages of using the ESP8266 in your projects is how easy it is to get WiFi up and running. Just plug in the WiFi library, put the SSID and encryption key in your source code, and away you go. It authenticates with your network in seconds and you can get on with building your project. But things get a little trickier if you want to take your project someplace else, or distribute your source code to others. Quickly we learn the downside of using static variables for authentication.

While there are already a few solutions to this problem out there, [Martin Raynsford] wasn’t too thrilled with them. Usually they put the ESP8266 in Access Point mode, allow the user to connect, and then ask which network they should authenticate with. But he didn’t want his projects to require an existing network, and figured he could do just as well making a field-configurable AP.

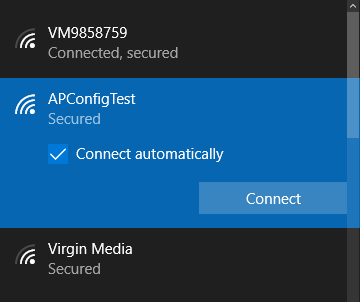
Using it is simple. Once the ESP8266 starts up it will create a new network in the form of “APConfig XXXXXX”, which should be easy enough to find from your client side device. Once connected, you can go to a simple administration page which allows you to configure a new AP name and encryption key. You even have the option to create an open AP by leaving the “Password” field blank. Once rebooted, the ESP8266 will create a new network with the defined parameters.

[Martin] has also included a “backdoor” to let anyone with physical access to the ESP8266 board create a new open AP that can be used to reconfigure the network settings. During boot up there is a brief period, indicated with specific blinks of the LED, wherein you can hit the reset button and trigger the open AP. This keeps you from getting locked out of your own project if you forget what key you gave it.

If you’re not one to go the austere route, take a look at some of the more robust solutions we’ve seen for easier end-user setup of the ESP8266.

Deploying A Turnkey Raspberry Pi System

If you only do projects for yourself, you are spoiled. After all, you know your environment better than anyone. You know what power you’ll have, the temperature range, and how your network is configured. This last part is especially problematic if you are trying to deploy something that connects to a wireless LAN. How can you configure, say, a Raspberry Pi so that it can connect to an unknown user’s WiFi network? Fixing that problem is the goal of [schollz’s] Raspberry Pi Turnkey project.

The idea is simple. A Raspberry Pi image boots up for the first time and offers a WiFi hotspot itself called ConnectToConnect. The WiFi password is also ConnectToConnect. Once connected, you get configuration options that allow you to tailor the system to your network. Sure, you could have people log in and reconfigure via a serial terminal, wired ethernet (which isn’t always set up right, either), or a USB keyboard But that’s not a great out-of-the-box experience for most customers.

Continue reading “Deploying A Turnkey Raspberry Pi System”

Simultaneous AP & Client On The Pi Zero W

The Raspberry Pi Zero W is a great platform for IoT projects, with a smattering of GPIO and onboard WiFi. However, security is an important consideration when it comes to the Internet of Things and it can be beneficial to keep your IoT devices on a separate network for safety’s sake. [Albert] wanted to do this all on board the Pi Zero W, and figured out how to get it acting as an access point and a client all at the same time.

[Albert] starts off with a fresh install of Raspbian Stretch, and sets the Pi up in OTG mode. This allows access to the Pi over a USB serial terminal. This is great for productivity when working on headless networking projects, as it can be frustrating trying to work with an SSH session that keeps dropping out when you change settings.

After creating a second named device (ap0) to go along with the one created automatically by the kernal (wlan0), DNSmasq is installed to act as a DHCP server for the AP. Hostapd is then installed to control the AP settings. Following this, like anything in Linux, a flurry of configuration files are edited to get everything humming along and starting up automatically after a reboot. For some reason, things don’t start up smoothly, so [Albert] has a cron job that fires 30 seconds after bootup and toggles the interfaces off and on again, and that’s done the trick.

It’s a useful hack, as it allows the Pi Zero to act as a hub for IoT devices, while also creating a bridge between them and the internet. Traffic can be managed to stop random internet users flicking your lights on and off and overspeeding your dishwasher.

We’ve seen the Pi Zero used for just about everything under the sun so far. If you’re just starting your own IoT build, perhaps you’d like to use the Pi Zero as a streaming camera?


Configure ESP8266 Wifi With WiFiManager

There’s no doubt that the ESP8266 has made creating little WiFi widgets pretty easy. However, a lot of projects hard code the access point details into the device. There’s a better way to do it: use the WiFiManager library. [Witnessmenow] has a good tutorial and a two-minute video (which you can see below).

Hard coding is fine if you are just tinkering around. However, if you are going to send your device away (or even take it with you somewhere) you probably don’t want to reprogram it every time you change access points. This problem is even worse if you plan on a commercial product. WiFiManager does what a lot of commercial devices do. It initially looks like an access point. You can connect to it using a phone or other WiFi device. Then you can configure it to join your network by setting the network ID, password, etc.

Continue reading “Configure ESP8266 Wifi With WiFiManager”

Never Gonna Give Up Free WiFi

Our conscience almost prevented us from posting this one. Almost.

What do people all around the world want most? Free WiFi. And what inevitable force do they want to avoid most, just after death and taxes? Rick Astley. As a getting-started project with the ESP8266, Hackaday.io user [jaime] built a “free WiFi portal” that takes advantage of people’s deepest desires. Instead of delivering sweet, high-bandwidth connectivity, once you click through the onerous terms and conditions, it delivers you a looped GIF with background music.

And all of this on $4 worth of hardware, with firmware assembled in the cloud and easily available to anyone. We live in a truly frivolous glorious age.

Digging through our archives, we found a number of Rickroll posts that we’d rather forget, but this steam-powered record player bears a second look.

DNS Tunneling With An ESP8266

There’s a big problem with the Internet of Things. Everything’s just fine if your Things are happy to sit around your living room all day, where the WiFi gets four bars. But what does your poor Thing do when it wants to go out and get a coffee and it runs into a for-pay hotspot?

[Yakamo]’s solution is for your Thing to do the same thing you would: tunnel your data through DNS requests. It’s by no means a new idea, but the combination of DNS tunneling and IoT devices stands to be as great as peanut butter and chocolate.

DNS tunneling, in short, relies on you setting up your own DNS server with a dedicated subdomain and software that will handle generic data instead of information about IP addresses. You, or your Thing, send data encoded in “domain names” for it to look up, and the server passes data back to you in the response.

DNS tunneling is relatively slow because all data must be shoe-horned into “domain names” that can’t be too long. But it’s just right for your Thing to send its data reports back home while it’s out on its adventure.

Oh yeah. DNS tunneling may violate the terms and conditions of whatever hotspot is being accessed. Your Thing may want to consult its lawyer before trying this out in the world.