Teletype Machine Resurrected

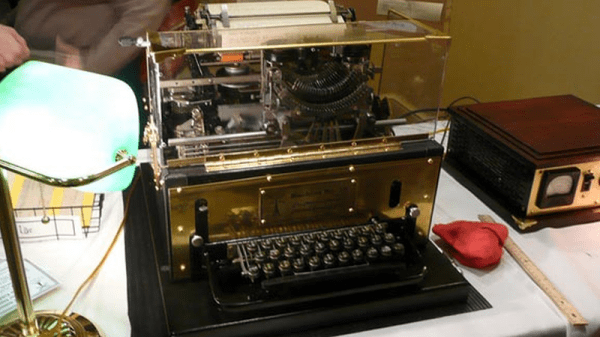
A teleprinter is, at its heart, an automatic typewriter.  It’s electrically controlled and has some smarts to be able to decode an incoming message and has something that will move the keys.   These printers have been in use since the late 1800’s and [AethericLtd] have refurbished an old 1930’s design and given it a bit of steampunk flair.

As is common with older mechanical devices that have been sitting for extended periods of time, the first thing this machine needed was a bath. The machine was separated into its three main parts and soaked in a degreasing solvent. The keyboard was the dirtiest, so it got an overnight soak. Since little of the mechanism was electrical, most of it could be submerged which helped with the cleaning.

The next step in the restoration was lubrication. In order to do a proper job, the manuals (which were available online) were consulted and synthetic motor oil used for lubrication. Once all the hundreds of parts were oiled, [AethericLtd] started working on the wiring. The original wiring in this machine was called Deltabeston – a type of wire by General Electric which uses asbestos insulation. To play it safe, that wire was left alone. The selector magnet required only 4 volts to pull up, but 4 volts wasn’t enough to run the machine. The power supply used was a 120 VDC, 200 mA supply through a 2 KΩ, 10 W resistor.

Once everything was back together and working, [AethericLtd] could take machine out and show it off. The website describes not only the restoration process but also the setup, how to connect to the machine and how to communicate with the machine. Great work! If you are interested in these machines, there have been a few Teleprinter projects on the site before: this one has been modified to connect to a modern modem, and this one prints out tweets.

Continue reading “Teletype Machine Resurrected”

Reuleaux Coaster

What’s better than a cool build? A cool build with valuable advice! Add a few flashy pictures and you have [Martin Raynsford]’s Reuleaux triangle coasters blog post. [Martin Raynsford] wanted to share his advice about the importance of using jigs and we’re sold. He was able to make 100 coasters in a single day and if he’s like us, after number ten, the work gets a little hurried and that is when mistakes are made.

Jig is a broad term when it comes to tooling but essentially, it holds your part in place while you work on it. In this case, a jig was made to hold the coaster pieces while they were glued together. [Martin Raynsford] didn’t need any registration marks on the wood so even the back is clean. If you look closely, the coaster is two parts, the frame and the triangle. Each part is three layers and they cannot separated once the glue dries. If any part doesn’t line up properly, the whole coaster is scrap wood.

This robot arm engraved 400 coasters in a day but maybe you would prefer if you simply had your beer delivered to your new coasters.

Continue reading “Reuleaux Coaster”

Milling A Flow Sensor To Safeguard A Laser Tube

Powerful lasers get powerfully hot and if you don’t keep them cool you’ll pay the price. After two such experiences [NixieGuy] got smart and milled this flow sensor as a failsafe.

Laser cutters are awesome. But acquiring one can be expensive, and keeping them in working order is no small feat. From the gunk that builds up as a byproduct of vaporizing the cutting stock, to keeping the optics focused correctly, it’s a game that forces you to become a laser cutter operator and not merely a user. One of the worst things to deal with is having to replace a burnt out laser tube. They do have a life to them but in this case the filter on the water cooling system clogged and the tube cooked itself. Twice.

Flow sensor shown in the upper right.

This flow sensor now acts as an interconnect with the laser enable line. Starting with an acrylic rod, [NixieGuy] machined out a center hole for a magnetic stopper, then milled three channels for water to pass around it. Each end of the rod was turned on a lathe to interface with plastic tubing of the water cooling system, and a slot was milled on the outside for a reed switch.

The demo video is below. You can see that when water flows it pushes the magnetic stop up (against gravity) where it engages the reed switch, allowing the laser to operate. If something impedes the flow of water (even if the pump still runs) the laser will be disabled and (hopefully) prevent future tube loss.

Want to see some of the oops moments faced by many a laser cutter operator? Check our guide on how to fail at laser cutting.

Continue reading “Milling A Flow Sensor To Safeguard A Laser Tube”

Simultaneous AP & Client On The Pi Zero W

The Raspberry Pi Zero W is a great platform for IoT projects, with a smattering of GPIO and onboard WiFi. However, security is an important consideration when it comes to the Internet of Things and it can be beneficial to keep your IoT devices on a separate network for safety’s sake. [Albert] wanted to do this all on board the Pi Zero W, and figured out how to get it acting as an access point and a client all at the same time.

[Albert] starts off with a fresh install of Raspbian Stretch, and sets the Pi up in OTG mode. This allows access to the Pi over a USB serial terminal. This is great for productivity when working on headless networking projects, as it can be frustrating trying to work with an SSH session that keeps dropping out when you change settings.

After creating a second named device (ap0) to go along with the one created automatically by the kernal (wlan0), DNSmasq is installed to act as a DHCP server for the AP. Hostapd is then installed to control the AP settings. Following this, like anything in Linux, a flurry of configuration files are edited to get everything humming along and starting up automatically after a reboot. For some reason, things don’t start up smoothly, so [Albert] has a cron job that fires 30 seconds after bootup and toggles the interfaces off and on again, and that’s done the trick.

It’s a useful hack, as it allows the Pi Zero to act as a hub for IoT devices, while also creating a bridge between them and the internet. Traffic can be managed to stop random internet users flicking your lights on and off and overspeeding your dishwasher.

We’ve seen the Pi Zero used for just about everything under the sun so far. If you’re just starting your own IoT build, perhaps you’d like to use the Pi Zero as a streaming camera?


Hackaday Prize Entry: Ebers – Diabetes Care, Step By Step

Diabetes is a disease that, among other things, has significant effects on the feet due to a combination of neuropathy, vascular issues, and other factors. You may have seen special diabetes socks with features like non-elasticated cuffs for better circulation and a lack of seams to prevent the formation of blisters. Taking care of  your feet is essential in diabetes to prevent injury and infection. Ebers is a project that seeks to help in just this area.

Ebers monitors plantar pressure, temperature, and humidity in the sole of the shoe. It then feeds this data back to a smartphone for analysis over Bluetooth. The brain of the project is an Arduino Pro Mini which is tasked with interfacing with the various sensors.

The project relies on 3D printed insoles which fit inside the shoe of the wearer. This is a particularly useful application of 3D printing, as it means the insole can be customised to fit the individual, rather than relying on a smaller selection of pre-sized forms. This has the additional benefit of allowing the insole to be designed to minimise pressure on the foot in the first place, further reducing the likelihood of injury and infection. The pressure sensing is actually built into the insole itself, and can measure pressure at several different areas of the foot.

Overall, it’s a project with huge potential health benefits for those with diabetes. We look forward to seeing where this project goes in future, and how it can bring improvements to the quality of life for people the world over.

We’re Using The Word Firmware Wrong

I had an interesting discussion the other day about code written for an embedded system. I was speaking with Voja Antonic about ‘firmware’. The conversation continued forward but I noticed that he was calling it ‘software’. We later discussed it and Voja told me he thought only the parts of the code directly interacting with the microcontroller were firmware; the rest falls under the more generic term of software. It really had me wondering where firmware stops being firmware and is merely software?

The topic has remained on my mind and I finally got around to doing some dictionary searches. I’m surprised that I’ve been using the word differently and I think most of the people I’ve heard use it are doing the same — at least as far as dictionary definitions are concerned. My go to sources are generally Merriam-Webster and Oxford English dictionaries and both indicate that firmware is a type of software that is indelible:

Permanent software programmed into a read-only memory.

computer programs contained permanently in a hardware device (such as a read-only memory)

According to this definition, I have never written a single bit of firmware. Everything I have written has been embedded software. But surely this is a term that must change with the times as technology progress so I kept digging.

Continue reading “We’re Using The Word Firmware Wrong”

Earth Rovers Explore Our Own Planet

While Mars is currently under close scrutiny by NASA and other space agencies, there is still a lot of exploring to do here on Earth. But if you would like to explore a corner of our own planet in the same way NASA that explores Mars, it’s possible to send your own rover to a place and have it send back pictures and data for you, rather than go there yourself. This is what [Norbert Heinz]’s Earth Explorer robots do, and anyone can drive any of the robots to explore whatever locations they happen to be in.

A major goal of the Earth Explorer robot is to be easy to ship. This is a smaller version of the same problem the Mars rovers have: how to get the most into a robot while having as little mass as possible. The weight is kept to under 500g, and the length, width, and height to no more than 90cm combined. This is easy to do with some toy cars modified to carry a Raspberry Pi, a camera, and some radios and sensors. After that, the robots only need an interesting place to go and an Internet connection to communicate with Mission Control.

[Norbert] is currently looking for volunteers to host some of these robots, so if you’re interested head on over to the project page and get started. If you’d just like to drive the robots, though, you can also get your rover fix there as well. It’s an interesting project that will both get people interested in exploring Earth and in robotics all at the same time. And, if you’d like to take the rover concept beyond simple exploration, there are other machines that can take care of the same planet they explore.

Continue reading “Earth Rovers Explore Our Own Planet”