A Thermal Camera With A Vintage Twist

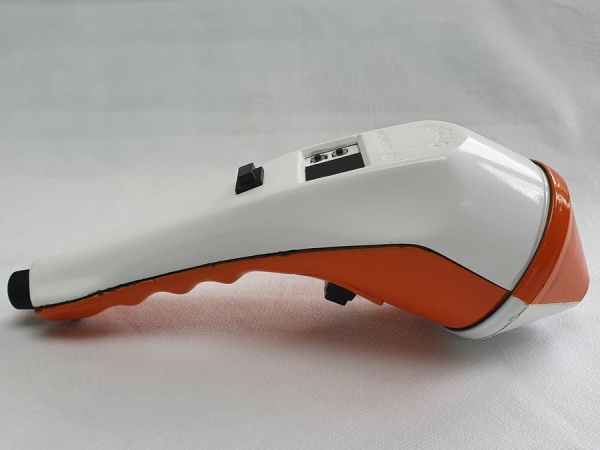
Nowadays we often value the superb design of vintage technology. It is, therefore, laudable when a broken piece of old electronics is given a new purpose. These types of builds are exactly [Martin Mander’s] cup of tea as he confirmed by turning a 1979 Apollo microwave monitor into a thermal camera (video embedded below).

Intrigued by its unique design, [Martin Mander] picked up the original microwave monitor at a secondhand sale, although the device 
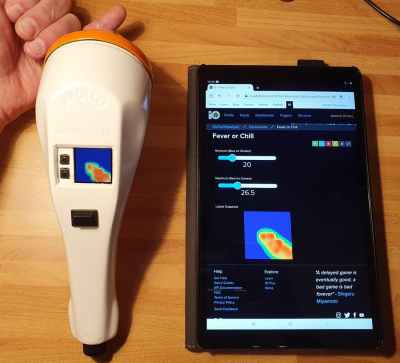
was not exactly in mint condition. Supposedly this type of detector was used to monitor the exposure of personnel to microwave radiation in an industrial environment.

After removing all the guts, he replaced them with a Raspberry Pi Zero W, Adafruit thermal camera, 1.3″ TFT display, and a USB battery pack. It is especially nice that [Martin Mander] was able to mount all the components without relying on 3D prints but instead, he hand-carved some custom panels and brackets from waste plastic.

The software is based on Python and automatically uploads the captured images to an Adafruit.IO dashboard. With 8 x 8 pixels the resolution of the sensor is not great but by using bicubic interpolation he was able to convert it to a 32 x 32 image which was enough to take some interesting pictures of his cat and other household items.

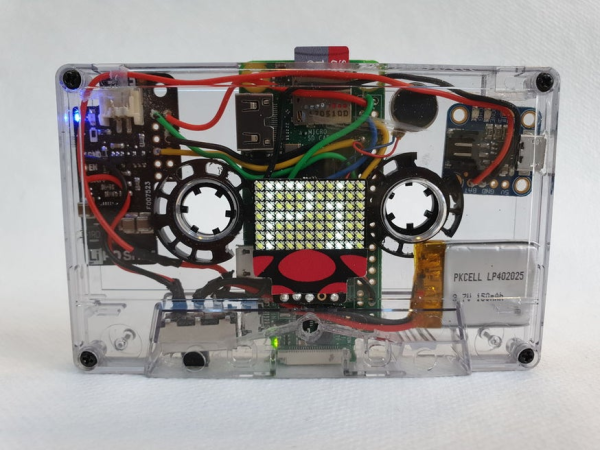
It is also worthwhile to check out some of [Martin Manders] other retro-tech mods like his cassette Pi IoT scroller.

Continue reading “A Thermal Camera With A Vintage Twist”

IoT Cassette Scroller Never Needs A Pencil

The see-through electronics craze of the ’80s and ’90s clearly had an effect on [MisterM], and we can totally relate. Those candy-colored components inside undoubtedly launched a few thousand kids in the direction of electronics, as we can attest.

Though the odds seemed very much against him, [MisterM] was able to fit all the necessary components for a scrolling IoT notifier inside a standard cassette tape. It took a bit of surgery on both the Raspberry Pi Zero W and the donor cassette in the name of getting all the components to fit in such a tight space. We’re glad he kept at it, because it looks amazing.

The Raspi uses Adafruit.IO and IFTTT to get all kinds of notifications — tweets, weather, soil moisture, you name it — and scrolls them across an 11×7 LED matrix. A vibrating disc motor gives a buzzing heads up first, so [MisterM] doesn’t miss anything. Hit the break button and flip this thing over, because the build video is all queued up on the B-side.

If you’d rather play around with cassette decks, add in some playback speed potentiometers to mess with the sound, or go all out and make a Mellotron.

Continue reading “IoT Cassette Scroller Never Needs A Pencil”

ESP8266 Powered Tank With Voice Control

The high availability of (relatively) low cost modular components has made building hardware easier than ever. Depending on what you want to do, the hardware side of a project might be the hacker equivalent of building with LEGO. In fact, we wouldn’t be surprised if it literally involved building with LEGO. In any event, easy and quick hardware builds leave more time for developing creative software to run the show. The end result is that we’re starting to see very complex systems broken down into easy-to-replicate DIY builds that would have been nearly impossible just a few years ago.

[igorfonseca83] writes in to share with us his modular tank platform that uses the ESP8266 and a handful of software hacks to allow for voice control from the user’s mobile device. Presented as a step-by-step guide on Hackaday.io, this project is perfect for getting started in Internet-controlled robotics. Whether you just want to experiment with Google Assistant integration or use this as a blank slate to bootstrap a remotely controlled rover, this project has a lot to offer.

The chassis itself is a commercially available kit, and [igorfonseca83] uses a L298N dual channel H-bridge module to control its two geared motors. A Wemos D1 serves as the brains of the operation, and three 18650 3.7V batteries provide the juice to keep everything running. There’s plenty of expansion capability to add sensors and other gear, but for this project getting it rolling was the only concern.

Software wise, there are a number of pieces that work together to provide the Google Assistant control demonstrated in the video after the break. It starts by interfacing the ESP8266 board Adafruit.IO, which connects to IFTTT, and then finally Google Assistant. By setting up a few two variable phrases in IFTTT that get triggered by voice commands in Google Assistant, you can push commands back down to the ESP8266 through Adafruit.IO. It’s a somewhat convoluted setup, admittedly, but the fact that involves very little programming makes it an interesting solution for anyone who doesn’t want to get bogged down with all the minutiae of developing your own Internet control stack.

[igorfonseca83] is no stranger to building remotely controlled rovers. Last year we covered another of his creations which was commanded through a web browser and carried an Android phone to stream video of its adventures.

Continue reading “ESP8266 Powered Tank With Voice Control”

ESP8266 Zelda Heart Responds To Tweets

It might not be enough to make you the Hero of Time, but this piece of Hylian interactive art would still be a worthy addition to your game room. [Jeremy Cook] writes in to tell us about how he put together this 8-bit style heart display, and goes into enough detail on the hardware and software sides of things that you shouldn’t have any problem adapting his design for your own purposes.

The build is pretty simple overall but it does assume you have a CNC to cut the basic shape out of MDF. You could cut the shape by hand if you had to, but if you don’t have a CNC the next best thing might be to 3D print the case. You’d potentially have to print it in two parts right down the center though, depending on how big your bed is. Whichever way you create the case, you’ll then need to cut the shape out of a piece of acrylic to make the face.

In any event, once the pieces are cut out [Jeremy] adds in a Wemos D1 Mini, a power supply, and some red LED strips. He provides a wiring diagram, but it’s fairly straightforward stuff. With a couple of 2N2222 transistors he controls the LED strips right from the digital pins of the ESP8266.

The software side is setup to be controlled via IFTTT by way of Adafruit.io. When IFTTT sees one of the keywords on Twitter, it passes a message to Adafruit.io which ultimately talks to the ESP8266 and gets the heart going. The software supports three states (on, off, and half) and gives a good example of a basic IoT implementation on the ESP8266 if you’re looking for some inspiration.

This hack seems like it would fit in perfectly with the Zelda home automation project we covered last year.

The Smartest Air Freshener In The Room

Many automatic air fresheners are wasteful in that they either ceaselessly spritz the room, and manual ones need to be — well — manually operated. This will not do in an era of smart products, so Instructables user [IgorF2] has put together an air freshener that does more than check if you’re around before freshening things up.

The air freshener uses a NodeMCU LoLin and an MG 995 servomotor, with a NeoPixel ring acting as a status light. Be aware — when the servo is triggered there is a significant spike in current, so be sure you aren’t powering the air freshener from a PC USB port or another device. After modeling the air freshener’s case in Fusion 360 — files available here — [IgorF2] wired the components together and mounted them inside the 3D printed case.

Hardware work completed, [IgorF2] has detailed how to set up the Arduino IDE and ESP8266 support for a first-time-user, as well as adding a few libraries to his sketch. A combination of an Adafruit.IO feed and ITTT — once again, showing the setup steps — handles how the air freshener operates: location detection, time specific spritzing, and after tapping a software button on your phone for those particularly lazy moments.

Continue reading “The Smartest Air Freshener In The Room”