Extreme Refurbishing: Amiga Edition

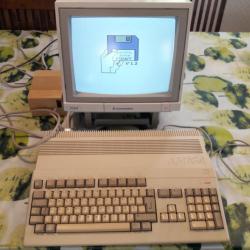
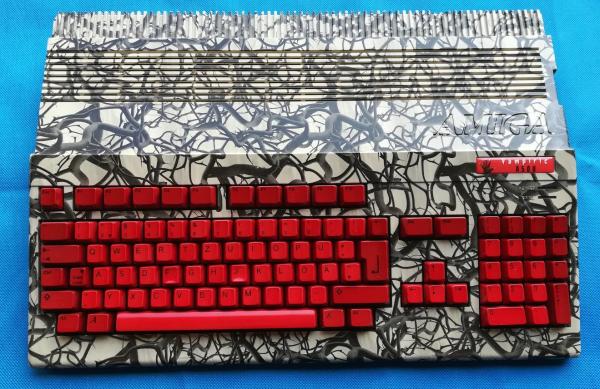
The last Amiga personal computer rolled off the assembly line in 1996, well over 20 years ago. Of course, they had their real heyday in the late 80s, so obviously if you have any around now they’ll be in need of a little bit of attention. [Drygol] recently received what looks like a pallet of old Amiga parts and set about building this special one: The Vampiric Amiga A500.

The foundation of this project was a plain A500 with quite a bit of damage. Corrosion and rust abounded inside the case, as well as at least one animal. To start the refurbishment, the first step was to remove the rust from the case and shields by an electrochemical method. From there, he turned his attention to the motherboard and removed all of the chips and started cleaning. Some of the connectors had to be desoldered and bathed in phosphoric acid to remove rust and corrosion, and once everything was put back together it looks almost brand new.

Of course, some other repairs had to be made to the keyboard and [Drygol] put a unique paint job on the exterior of this build (and gave it a name to match), but it’s a perfect working Amiga with original hardware, ready to go for any retrocomputing enthusiast. He’s no stranger around here, either; he did another extreme restoration of an Atari 800 XL about a year ago.

Resurrecting An Amiga 500+

Recently, I was lucky enough to receive a big haul of retro computer gear from a friend who was emptying out his garage. Even better, the haul was almost entirely old Amiga gear — my favorite computing platform of all time. Upon returning home, I gleefully sorted through the boxes, powering things up one by one. Amazingly, everything worked… except for one lonely Amiga 500+. I was greeted by a dull grey screen. This wouldn’t do, so naturally, I got to work.

It seemed like a shame to be opening the machine, as after almost 30 years of life, this one still had its warranty seal intact. Regardless, nothing ventured, nothing gained – the Torx bits were at hand and the screws were coming out.

Continue reading “Resurrecting An Amiga 500+”

Rebuilding An Amiga 500 PSU

One of the challenges of keeping a vintage computer up and running is the limited availability of spare parts. While not everything has hit dire levels of availability (not yet, anyway), it goes without saying that getting a replacement part for a 30+ year old computer is a bit harder than hitting up the local electronics store. So the ability to rebuild original hardware with modern components is an excellent skill to cultivate for anyone looking to keep these pieces of computing history alive in the 21st century.

This is in ample evidence over at [Inkoo Vintage Computing], where repairs and upgrades to vintage computers are performed with a nearly religious veneration. Case in point: this detailed blog post about rebuilding a dead Amiga 500 power supply. After receiving the machine as a donation, it was decided to attempt to diagnose and repair the PSU rather than replace it with a newly manufactured one; as much for the challenge as keeping the contemporary hardware in working order.

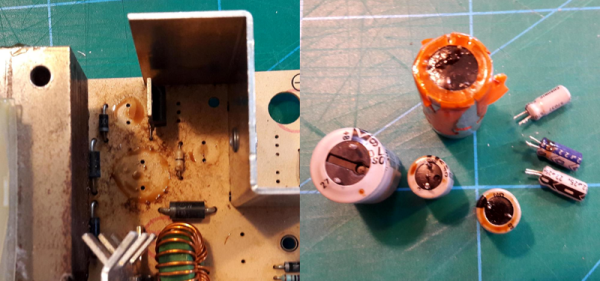
What was found upon opening the PSU probably won’t come as a huge surprise to the average Hackaday reader: bad electrolytic capacitors. But these things weren’t just bulged, a few had blown and splattered electrolyte all over the PCB. After removing the bad caps, the board was thoroughly inspected and cleaned with isopropyl alcohol.

[Inkoo Vintage Computing] explains that there’s some variations in capacitor values between different revisions of the Amiga PSU, so it’s best to match what your own hardware had rather than just trying to look it up online. These capacitors in particular were so old and badly damaged that even reading the values off of them was tricky, but in the end, matching parts were ordered and installed. A new fuse was put in, and upon powering up the recapped PSU, the voltages at the connector were checked to be within spec before being plugged into the Amiga itself.

As a test, the Amiga 500 was loaded up with some demos to really get the system load up. After an hour, the PSU’s transformer was up to 78°C and the capacitors topped out at 60°C. As these parts are rated for 100°C (up from 85°C for the original parts), everything seemed to be within tolerances and the PSU was deemed safe for extended use.

This sort of repair isn’t exactly rare with hardware this old, and we’ve seen similar work done on a vintage Apple power supply in the past. If you’re less concerned with historical accuracy, [Inkoo Vintage Computing] has also shown off adapting an ATX PSU for use with the Amiga.

The Best New Amiga Title Of 2018?

Just because a system becomes obsolete for most of us doesn’t mean that everyone stops working with them. Take a look at this brand new game for the Amiga 500 called Worthy, which is sure to make most of us regret ever upgrading our home computers, despite the improvements made since 1987.

The group who developed the game is known as Pixelglass and they have done a lot of work on this platform, releasing several games over the past few years. Their latest is Worthy, an action-adventure game that looks similar to the top-down perspective Zelda games from the SNES. It’s an impressive piece of work for a system that few of us own anymore, but if you have one (or even if you have a good emulator) you might want to give it a whirl.

If developing games for retro systems is your style, this isn’t limited to personal computers like the Amiga. We’ve seen development platforms for the Super Nintendo that will let you run your own code, and even other methods for working with the Sega Saturn if you’re feeling really adventurous.

Thanks to [Chappy1978] for the tip!

Continue reading “The Best New Amiga Title Of 2018?”

An Amiga 500 For The 21st Century

There was a period in the late 1980s when the home computer to own did not come with an Apple logo and was not an IBM, Compaq, or any of the other clones, but instead sported a Commodore logo. The Amiga 500 was an all-in-one console-style cased machine that maybe wasn’t quite the computing powerhouse you might have wished it to be, but gave you enough of the capabilities of the more accomplished 16-bit machines of the day to be an object of desire while also having a games catalogue second to none.

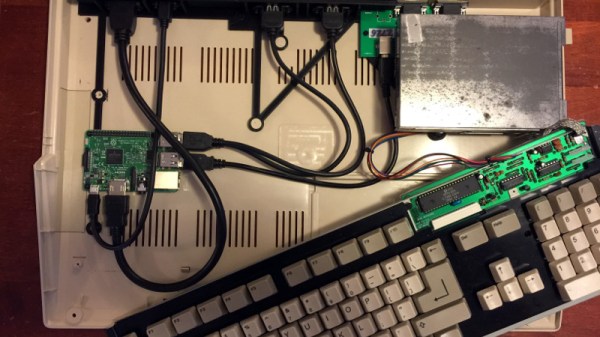
A500s have survived in reasonable numbers, but inevitably working A500s haven’t. Fortunately there are decent emulators, and it was for one of these that [intric8] has produced an extremely well-done installation of a Raspberry Pi 3 in an Amiga case. The intention has been throughout to avoid modification or damage to the Amiga case, and eventually to have all Amiga internal peripherals including the floppy drive in a fully working condition.

The result has a Tynemouth Software USB adaptor for the Amiga keyboard, and a set of nicely designed 3D printed backplates to bring the extended Raspberry Pi ports to the back of the case. The floppy isn’t yet interfaced and there isn’t a socket for the quadrature mouse, but otherwise it’s a very tidy build. He might be interested in one of the several USB to quadrature interfaces we’ve featured over the years.

You might ask why so much effort should be put in for an emulation of an A500, and in a sense you’d be right to do so. The Pi will run the emulator from any case or none. But if you happen to have a spare A500 case, why not give this one a go!

Converting Power Supplies For Antique Computers

Just because something is “never used” doesn’t mean it’s good. [Inkoo Vintage Computing] learned that lesson while trying to repair an Amiga 500 and finding parts online that were claimed to be “new” in that they were old stock that had never been used. The problem was that in the last 30 years the capacitors had dried out, rendering these parts essentially worthless. The solution, though, was to adapt a modern PSU for use on the old equipment.

The first hurdle to getting this machine running again was finding the connector for the power supply. The parts seemed to have vanished, with some people making their own from scratch. But after considering the problem for a minute longer they realized that another Commodore machine used the same parts, and were able to source a proper cable.

Many more parts had to be sourced to get the power supply operational, but these were not as hard to come across. After some dedicated work with the soldering iron, the power supply was put to use running the old Amiga. Asture readers will know that [Inkoo Vintage Computing] aren’t strangers to the Amiga. They recently were featured with a nondestructive memory module hack that suffered from the same parts sourcing issues that this modification had, but also came out wonderfully in the end.

Respectfully Modifying The Amiga 500

Modifying the Amiga 500 to speed up access to RAM in a memory expansion pack is a well documented procedure, with guides on the process written in the early 1990’s when the hardware was only a few years old. But as they were written for contemporary hardware, they make no concessions for how one should be treating a vintage computer that’s now over 30 years old. In 1993, cutting traces on the Amiga 500 motherboard was just a last ditch effort to eek a few more months of service life out of an outdated desktop computer. But in 2018, it’s kind of like when that old lady tried to “restore” a fresco of Jesus in Spain; it might be done with the best of intentions, but you still screwed the thing up good and proper.

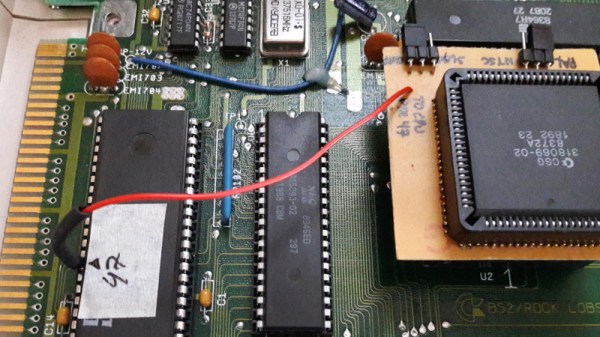
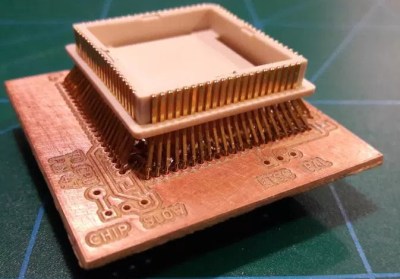
Such things don’t fly over at [Inkoo Vintage Computing]. There you can find a guide that details the impressive lengths one can go to if they want to perform the classic modification without any irreversible changes to the motherboard. To avoid the cut traces and soldered bodge wires, this version of the modification makes use of a novel adapter that breaks out the necessary connections on the 8372A chip.

The adapter is simply a homemade PCB with both male and female plastic leaded chip carrier (PLCC) connectors. The few pins on the chip that needed rerouting are exposed as solder pads on the adapter for easy wiring. There are even a couple jumpers on the adapter to turn the modifications on and off.

Not surprisingly, the trickiest part of building this adapter was sourcing the antiquated PLCC connectors. Assuming you can even find them, you are then left with the challenging task of soldering them together. Judging by the pictures on the [Inkoo Vintage Computing] page, it’s no walk in the park.

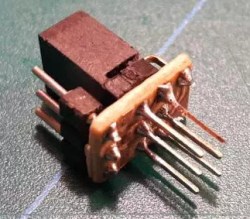
Another similar arrangement is used in the expansion bay of the Amiga, where a pin is virtually “cut” in the connector. A tiny PCB is soldered to a 3×2 header to reroute the signals, and another jumper is used to enable and disable the pin. Luckily, the long pins on the Amiga memory expansion are forgiving enough that the little board can fit in between them without breaking electrical contact.

We’re no stranger to the Amiga 500 around these parts. We’ve covered how to get the 1987-vintage machine online in the 21st century, as well as employing a Raspberry Pi to emulate the original floppy drive. You can even make your own faux-Amiga with a 3D printed case, if you suffer from a sort of existential dread when working on a computer that’s older than you are.