The Arduino IDE Finally Grows Up

While the Arduino has a very vocal fan club, there are always a few people less than thrilled with the ubiquitous ecosystem. While fans may just dismiss it as sour grapes, there are a few legitimate complaints you can fairly level at the stock setup. To address at least some of those concerns, Arduino is rolling out the Arduino Pro IDE and while it doesn’t completely address every shortcoming, it is worth a look and may grow to quiet down some of the other criticisms, given time.

For the record, we think the most meaningful critiques fall into three categories: 1) the primitive development environment, 2) the convoluted build system, and 3) the lack of debugging. Of course, there are third party answers for all of these problems, but now the Pro IDE at least answers the first one. As far as we can tell, the IDE hides the build process just like the original IDE. Debugging, though, will have to wait for a later build.

Continue reading “The Arduino IDE Finally Grows Up”

Pinging The Depths Of A Rain Barrel

Rain barrels are a great way to go green, as long as your neighborhood doesn’t frown upon them. [NikonUser]’s barrel sits up high enough that he has to climb up on an old BBQ and half-dangle from the pipe to check the water level, all the while at the risk of encountering Australian spiders.

Arachnophobia, it turns out, is a great motivator. At first, [NikonUser] dreamed up a solar-powered IoT doodad that would check the level and report the result on a web page. He battled the Feature Creep and decided to build a handheld device that pings the water level with an ultrasonic sensor and displays it on a 7-segment.

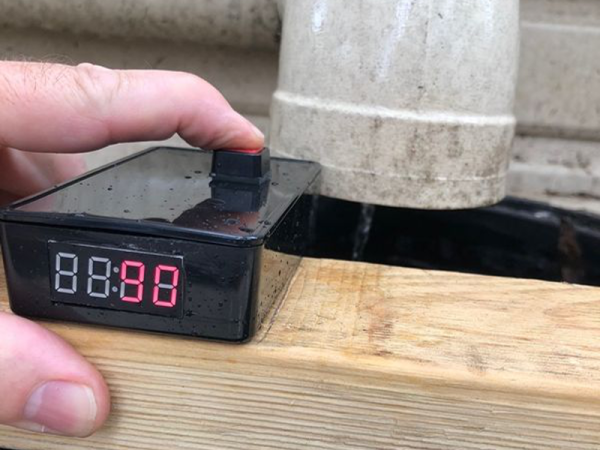
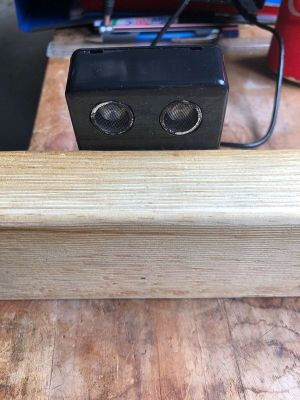
Everything is contained in a water-resistant box and driven by an Arduino Pro. The box is mounted on a piece of scrap lumber that lays across the top of the barrel. This allows the HC-SR04’s eyes to peer over the edge and send pings toward the bottom. It also helps to keep the readings consistent and the electronics from taking a swim.

Operation is simple: [NikonUser] reaches up, sets the plank across the barrel, and pushes the momentary. This activates the Arduino, which prompts the HC-SR04 to take several readings. The code averages these readings, does a little math, and displays the percentage of water remaining in the barrel.

Interested in harvesting rain water, but not sure what to do with it? You can use it for laundry, pour it in the toilet tank instead of flushing, or make an automated watering system for your garden.

Tiny Hotplate Isn’t Overkill

When working on a new project, it’s common to let feature creep set in and bloat the project. Or to over-design a project well beyond what it would need to accomplish its task. Over at Black Mesa Labs, their problem wasn’t with one of their projects, it was with one of their tools: their hot plate. For smaller projects, an 800W hot plate was wasteful in many ways: energy, space, and safety. Since a lot of their reflow solder jobs are on boards that are one square inch, they set out to solve this problem with a tiny hot plate.

The new hot plate is perfectly sized for the job. Including control circuitry, it’s around the size of a credit card. The hot plate is powered from a small surplus 20V 5A laptop power supply and does a nice 4 minute reflow profile and cools off completely in under a minute. Compared to their full-sized hot plate, this is approximately 29 minutes faster, not to mention the smaller workspace footprint that this provides. The entire setup cost about $20 from the heating element to the transistors and small circuit board, and assuming that you have an Arduino Pro sitting in your junk bin.

It’s a good idea to have a reflow oven or a hot plate at your disposal, especially if you plan to do any surface mount work. There are lots of options available, from re-purposed toaster ovens to other custom hot plates of a more standard size. Overkill isn’t always a bad thing!

Continue reading “Tiny Hotplate Isn’t Overkill”

Arduino-Controlled Marquee Arrow Points The Way To Whatever You Like

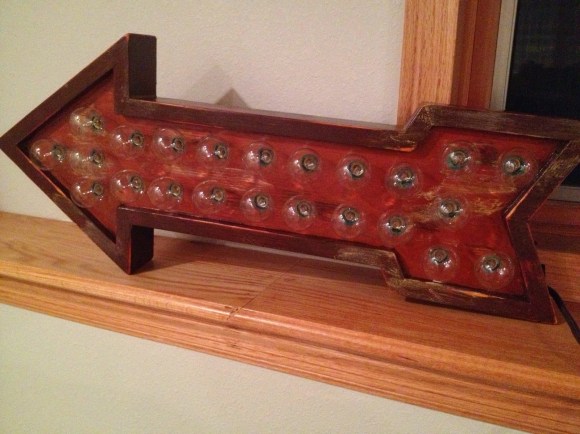
Reader [pscmpf] really digs the scrolling light look of old marquee signs and as soon as he saw some Christmas lights with G40 bulbs, he was on his way to creating his own vintage-look marquee arrow.

We must agree that those bulbs really do look like old marquee lights or small vanity globes. [pscmpf] started by building, varnishing, and distressing the wooden box to display the lights and house the electronics. He controls the lights with an Arduino Pro and an SSR controller board. The 24 lights are divided into ten sections; each of these has its own solid-state relay circuit built around an MC3042 as the opto-coupler, with a power supply he made from a scrap transformer.

[pscmpf] shares some but not all of his code as it is pretty long. There are five patterns that each play at three different speeds in addition to a continuous ‘on’ state. In his demonstration video after the jump, he runs through all the patterns using a momentary switch. This hack proves that Arduino-controlled Christmas lights are awesome year-round.

Continue reading “Arduino-Controlled Marquee Arrow Points The Way To Whatever You Like”

Dr. Frankenstein’s Wireless Xbox One Steering Wheel

Buy an Xbox One controller and hack it immediately? That’s exactly what [tEEonE] did so he could merge it with a Simraceway SRW-S1 steering wheel. He loves racing games and was psyched to play Forza 5. He already had the steering wheel, but it’s strictly a PC peripheral. [tEEonE] wanted the wheel to control the steering, gas, and brakes and found both the XB1 controller and the SRW-S1 well-suited to the hack.

For steering, [tEEonE] substituted the SRW-S1’s accelerometer for the XB1’s left joystick pot. He connected the X and Y to analog pins on an Arduino Pro. Then he mapped the rotation angles to voltage levels using a DAC and wired that to the XB1 joystick output. The XB1 controller uses Hall effect sensors and magnets on the triggers to control the gas and brake. He removed these and wired the SRW-S1 paddles to their outputs and the XB1 controller is none the wiser.

He also rigged up a 3-point control system to control the sensitivity and calibrate the angles: a button to toggle through menu items and two touch modules to increment and decrement the value. These he wired up to a feedback interface made by reusing a 15-LED strip from the SRW-S1. Finally, he had space left inside the housing for the XB1’s big rumble motors and was able to attach the small motors to the gas and brake paddles with the help of some 3-D printed attachments. Check out this awesome hack in action after the break.


Continue reading “Dr. Frankenstein’s Wireless Xbox One Steering Wheel”

Simple Light Painting Bar Build

[SkyWodd] took the easy route when it came time to build this light painting bar. But he was still met with great success. Thanks to his well-documented work you should be able to throw this together for yourself in about an hour.

The idea here is to build a full-color display that will draw a picture in a long-exposure photograph. We’ve seen the concept used with 64 discrete RGB LEDs, but there’s almost no soldering to be done with this project. Instead, [SkyWodd] used an addressable RGB LED strip. It has 64 pixels, all taking commands via the SPI protocol. This helps keep the number of microcontroller connections to a minimum. He lashed the entire system onto a long hunk of wooden dowel and grabbed a camera.

You’ll need a DSLR as each image needs to have an exposure time approaching 10 seconds. One thing to note is that it may be best to leave the LED bar stationary and move the camera. If you use a tripod it should help keep the vibrations to a minimum.

LED Matrix Helmits Inspiried By You-Know-Who

Here is a post from [John’s Projects]. For the insane, satirical, and incredible 2011 Omaha Groundhog Prom [John] and his buddy fabricated  helmets reminiscent of our favorite robot rockers.  [John] needed something harder, better, faster, stronger than the competition and wound up creating LED matrices that mount behind aerodynamic motorcycle helmet visors.

The helmets were constructed in about a weeks time and in a similar fashion to the real helmets. [John] sourced some cheap motorcycle headgear and mounted the LEDs, their driving transistors, and ballast resistors to a 1/32″ (flexible) plexiglass sheet that sits face to face with the wearer. [John] walks through the whole process starting with a half inch grid drawn onto a paper template. The template is cut from the plexi using tin snips, then LED holes are carefully drilled in the thin plastic using various bits up to 13/64″. The 90 some odd LEDs are, one more time, fitted then hot glued in place and soldered in vertical columns to simplify things and prevent any short circuit. An Arduino Pro (via common emitter 2n2222 on/off circuits) provides some digital love to the 18 LED columns and is connected to a Velleman Sound-to-light kit which modulates the brightness of the whole visor based on da funk. Two pots are also wired to provide sensitivity and pattern selection to the human after all.

We can’t imagine the technologic setup is fresh after being subjected to the steam machine, high life, and whatever else for too long. Oh yeah, Some brighter LEDs could give the helmets night vision and make the whole thing come alive with emotion. Something about us is burnin to know what powers the helmets. Nice work [John]!

If you are looking to do some homework on these high fidelity rock’n roll outfits in the prime time of your life check out this very detailed example, a helmet construction video,  or finish the costume off with some EL wire.

Check out some videos of these superheros rollin’ & scratchin’ after the jump!

Continue reading “LED Matrix Helmits Inspiried By You-Know-Who”