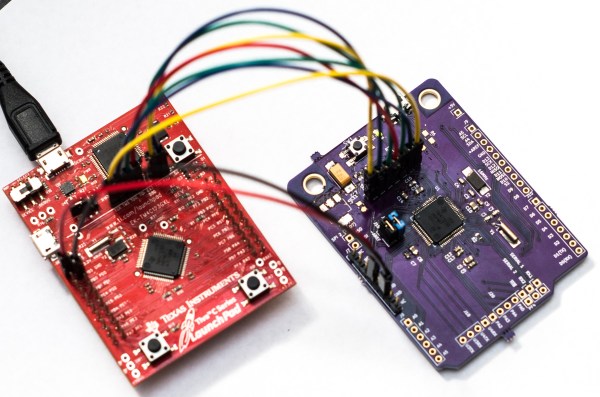
DIY Tiny Single-PCB Synthesizer

[Jan Ostman] has been pushing the limits of sound synthesis on the lowly AVR ATMega microcontrollers, and his latest two project is so cute that we just had to write it up. The miniTS shares the same basic sound-generation firmware with his previous TinyTS, which we’ve covered here before, but adds a lot more keys, an OLED, and MIDI, while taking away some of the knobs.

Both feature keyboards that are just copper pads placed over a ground plane, and the code does simple capacitive-sensing to figure out if they’re being touched or not. The point here is that you could pick up a PCB from [Jan] on the cheap, and experiment around with the code. Or you could just take the code and make a less refined version for yourself with a cheapo Arduino and some copper plates.

Either way, we like the combination of minimal materials and maximum tweakability, and think it’s cool that [Jan] shares the code, if not also the PCB designs. Anyone with PCB layout practice could get a clone worked up in an afternoon, although it’s going to be cheaper to get these made in bulk, and you’re probably better off just buying one from [Jan].

Anatomically Correct Plotter Avoids Back Scratch Fever

Everybody needs somebody sometimes, even if it’s just for when your back itches. But directing your itchy interlocutor to the correct spot can be a spatial relations challenge: “Right in the middle… no, down a bit… left… no, the other left! Harder! Wait, not that hard!” Why bother with all that messy interpersonal communication and human contact when you can build an automated, precision-guided back scratcher?

[VijeMiller] has aluminum extrusion tastes on a cardboard budget, but don’t let that put you off this clever build. The idea is pretty simple: a two-axis plotter that moves a rotary-action business end to any point within a V-shaped work envelope. The Arduino in the base talks to a smartphone app that lets you point to exactly the spot in need of attention on what for most of us would be an incredibly optimistic photorealistic map of the dorsal aspect of the body (mildly NSFW photo in the link above dips below the posterior border). Point, click, sweet relief.

The video below shows the rig in action, along with the Thespian skills we’ve come to know and love from [VijeMiller] with such classics as the fake floating 19th green, the no-idling-while-texting alert, and the more recent ker-sploosh fighting foam filled toilet. It does seem like he changed his name from [TVMiller] somewhere along the line, but he can’t throw us off the trail that easily.

Continue reading “Anatomically Correct Plotter Avoids Back Scratch Fever”

Remotely Controlling A Not-So-Miniature Hot Air Balloon

Calling [Matt Barr]’s remote controlled hot air balloon a miniature is a bit misleading. Sure, it’s small compared with the balloons that ply cold morning skies with paying passengers and a bottle of champagne for the landing. Having been in on a few of those landings, we can attest to the size of the real thing. They’re impressively big when you’re up close to them.

While [Matt]’s balloon is certainly smaller, it’s not something you’d just whip together in an afternoon. Most of [Matt]’s build log concentrates mainly on the gondola and its goodies — the twin one-pound camp stove-style propane tanks, their associated plumbing, and the burner, a re-tasked propane weed torch from Harbor Freight. Remote control is minimal; just as in a full-size balloon, all the pilot can really do is turn the burner on or off. [Matt]’s approach is a high-torque RC servo to control the burner valve, which is driven by an Arduino talking to the ground over a 2.4-GHz RF link. The balloon is big enough to lift 30 pounds and appears to be at least 12 feet tall; we’d think such a craft would run afoul of some civil aviation rules, so perhaps it’s best that the test flight below was a tethered one.

Sadly, no instructions are included for making the envelope, which would be a great excuse for anyone to learn a little about sewing. And knowing how to roll your own hot air balloon might come in handy someday.

Continue reading “Remotely Controlling A Not-So-Miniature Hot Air Balloon”

Hackaday Prize Entry: Arduino Splash Resistant Toilet Foamer

There are some universal human experiences we don’t talk about much, at least not in public. One of them you’ll have in your own house, and such is our reluctance to talk about it, we’ve surrounded it in a fog of euphemisms and slang words. Your toilet, lavatory, john, dunny, khazi, bog, or whatever you call it, is part of your everyday life.

For his Hackaday Prize entry, [VijeMiller] tackles his smallest room head-on. You see, for him, the chief horror of the experience lies with the dreaded splashback. Yes, a bit of projectile power dumping leaves the old rump a little on the damp side. So he’s tackled the problem with some maker ingenuity and installed an Arduino-controlled foam generator that injects a mixture of soap and glycerin to fill the bowl with a splash-damping load of foam. Rearward inundation avoided.

The parts list reveals that the foam is generated by a fish tank aerator, triggered by a relay which is driven by an Arduino Uno through a power transistor. A solenoid valve controls the flow, and a lot of vinyl tubing hooks it all together. There is an HC/06 Bluetooth module with an app to control the device from a phone, though while he’s posted some Arduino code there is no link to the app. There are several pictures, including a cheeky placement of a Jolly Wrencher, and a shot of what we can only surmise is a text, as foam overflows all over the bathroom. And he’s put up the video we’ve placed below the break, for a humorous demonstration of the device in action.

Continue reading “Hackaday Prize Entry: Arduino Splash Resistant Toilet Foamer”

Mission Control For Kerbal

[Niko1499] had a plan. He’d built a cool hardware controller for the game Kerbal Space Program (KSP). He got a lot of positive reaction to it and decided to form a company to produce them. As many people have found out, though, that’s easier said than done, and the planned company fell short of its goals. However, [Niko1499] has taken his controller and documented a lot about its construction, including some of the process he used to get there.

If you haven’t run into it before, KSP is sort of half simulator, half game. You take command of an alien space program and develop it, plan and execute missions, and so on. The physics simulation is quite realistic, and the game has a large following.

When we first saw the photos, we thought it was an old Heathkit trainer, and–indeed–the case is from an old Heathkit. However, the panel is laser cut, and the software is Arduino-based. [Niko1499] covers a few different methods of letting the Arduino control the game by emulating a joystick, a keyboard, or by using some software to take serial data and use it to control the game.

Continue reading “Mission Control For Kerbal”

Reverse-Engineering The Peugeot 207’s CAN Bus

Here’s a classic “one thing led to another” car hack. [Alexandre Blin] wanted a reversing camera for his old Peugeot 207 and went down a rabbit hole which led him to do some extreme CAN bus reverse-engineering with Arduino and iOS. Buying an expensive bezel, a cheap HDMI display, an Arduino, a CAN bus shield, an iPod touch with a ghetto serial interface cable that didn’t work out, a HM-10 BLE module, an iPad 4S, the camera itself, and about a year and a half of working on it intermittently, he finally emerged poorer by about 275€, but victorious in a job well done. A company retrofit would not only have cost him a lot more, but would have deprived him of everything that he learned along the way.

Adding the camera was the easiest part of the exercise when he found an after-market version specifically meant for his 207 model. The original non-graphical display had to make room for a new HDMI display and a fresh bezel, which cost him much more than the display. Besides displaying the camera image when reversing, the new display also needed to show all of the other entertainment system information. This couldn’t be obtained from the OBD-II port but the CAN bus looked promising, although he couldn’t find any details for his model initially. But with over 2.5 million of the 207’s on the road, it wasn’t long before [Alexandre] hit jackpot in a French University student project who used a 207 to study the CAN bus. The 207’s CAN bus system was sub-divided in to three separate buses and the “comfort” bus provided all the data he needed. To decode the CAN frames, he used an Arduino, a CAN bus shield and a python script to visualize the data, checking to see which frames changed when he performed certain functions — such as changing volume or putting the gear in reverse, for example.

The Arduino could not drive the HDMI display directly, so he needed additional hardware to complete his hack. While a Raspberry Pi would have been ideal, [Alexandre] is an iOS developer so he naturally gravitated towards the Apple ecosystem. He connected an old iPod to the Arduino via a serial connection from the Dock port on the iPod. But using the Apple HDMI adapter to connect to the display broke the serial connection, so he had to put his thinking cap back on. This time, he used a HM-10 BLE module connected to the Arduino, and replaced the older iPod Touch (which didn’t support BLE) with a more modern iPhone 4S. Once he had all the bits and pieces working, it wasn’t too long before he could wrap up this long drawn upgrade, but the final result looks as good as a factory original. Check out the video after the break.

It’s great to read about these kinds of hacks where the hacker digs in his feet and doesn’t give up until it’s done and dusted. And thanks to his detailed post, and all the code shared on his GitHub repository, it should be easy to replicate this the second time around, for those looking to upgrade their old 207. And if you’re looking for inspiration, check out this great Homemade Subaru Head Unit Upgrade.

Continue reading “Reverse-Engineering The Peugeot 207’s CAN Bus”

Hack Your Hike With This Arduino Puzzle Geocache

For those who love to hike, no excuse is needed to hit the woods. Other folks, though, need a little coaxing to get into the great outdoors, which is where geocaching comes in: hide something in the woods, post clues to its location online, and they will come. The puzzle is the attraction, and doubly so for this geocache with an Arduino-powered game of Hangman that needs to be solved before the cache is unlocked.

The actual contents of a geocache are rarely the point — after all, it’s the journey, not the destination. But [cliptwings]’ destination is likely to be a real crowd pleaser. Like many geocaches, this one is built into a waterproof plastic ammo can. Inside the can is another door that can only be unlocked by correctly solving a classic game of Hangman. The game itself may look familiar to long-time Hackaday readers, since we featured it back in 2009. Correctly solving the puzzle opens the inner chamber to reveal the geocaching goodness within.

Cleverly, [cliptwings] mounted the volt battery for the Arduino on top of the inner door so that cachers can replace a dead battery and play the game; strangely, the cache entry on Geocaching.com (registration required) does not instruct players to bring a battery along.

It looks like the cache has already been found and solved once since being placed a few days ago in a park north of Tucson, Arizona. Other gadget caches we’ve featured include GPS-enabled reverse caches, and a puzzle cache that requires IR-vision to unlock.

Continue reading “Hack Your Hike With This Arduino Puzzle Geocache”