ATTiny Hacks: Run Your Arduino Project On An ATTiny!

Yup. We have all been there. You throw together a really elaborate Arduino project that only really needs a couple pins, far fewer than the Arduino’s native microcontrollers have to offer. Well fear not, [Thatcher] has solved just this problem by adding some ATTtiny cores to the Arduino IDE. His blog details the process from grabbing the MIT developed core files and loading them up in your Arduino software directories. The modification looks simple and although [Thatcher] shows the whole process on a Mac it only involves unzipping and tossing files into a folder. With ATTiny chips only a few bucks each this is perfect for those simple software driven hacks that don’t require an entire Uno duct taped to the outside of an enclosure.  Nice work [Thatcher]!

Update: Bluetooth Super Nintendo Controller For Android

[Rich’s] newest version of a Bluetooth connected Super Nintendo controller takes what was already good and makes it better. We looked at the original version back in May, which is built into a knockoff controller  — [Rich] mentions that he got a lot of flack for defacing retro equipment and wants to set the record straight. The most notable difference between the two controllers is that the batteries are now housed inside the case. He switched over to an 850 mAh Lithium Ion battery, which takes much less room than the four AA batteries did. There is an integrated charger which connects via a mini USB jack as seen in the image above. Bother versions of the controller can be used to play emulators without rooting your Android device.

Unfortunately you won’t get to look inside the case. What we can tell you is that the build no longer uses a BlueSMiRF board , opting for a less expensive Bluetooth solution. We also know that the build is still Arduino compatible, sporting an ATmega328 chip running the bootloader. The lack of detail is because [Rich] is working to market the controller with a limited-quantity preorder. Check out his video presentation of the new version after the break.

Continue reading “Update: Bluetooth Super Nintendo Controller For Android”

Program An Arduino Using Your Sound Card

audioino_programming_arduino_with_sound

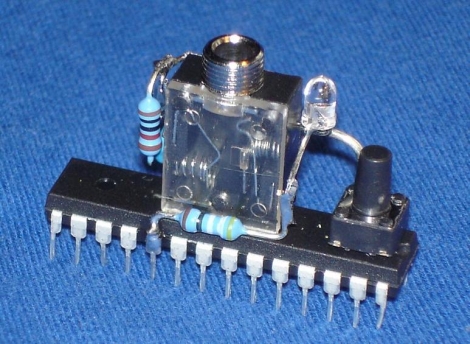
[Chris] wrote us to share a neat technique he has been using to program the Arduinos he uses in his projects. He likes to build bare bones Arduino clones rather than sacrifice full dev boards, and instead of programming them via traditional means, he is using his computer’s sound card.

He builds a simple dead bug Arduino (which he calls an Audioino) using a handful of resistors, a pair of caps, an LED, a reset switch, and most importantly – an audio jack. After burning a special audio bootloader to the chip, he can connect the Arduino directly into his computer’s speaker port for programming.

Once the microcontroller is connected to his computer, he runs the IDE-generated hex file through a Java app he created, which converts the data into a WAV file. With the Arduino put into programming mode, he simply plays the WAV file with an audio player, and the code is uploaded.

He says that this method of programming comes in handy in certain cases where he builds things for friends, because they can easily update the software on their own without a lot of fuss.

Security System Gives You A Call When It Senses Intruders

gsm_motion_detector_alarm_system

[Dimitris] decided to build a homemade alarm system, but instead of triggering a siren, sending an SMS message, or Tweeting about an intrusion, he preferred that his system call him when there was trouble afoot. He says that he preferred a call over text messaging because there are no charges associated with the call if the recipient does not pick up the line, which is not the case with SMS.

The system is based around an off the shelf motion detector that was hacked to work with an old mobile phone. The motion detector originally triggered a siren, but he stripped out the speaker and wired it to a bare bones Arduino board he constructed. The Arduino was in turn connected to the serial port of an unused Ericssson T10s mobile phone. This allows the Arduino to call his mobile phone whenever the motion detector senses movement.

The system looks to be quite useful, and while [Dimitris] didn’t include all of the code he used, he says others should be able to replicate his work without too much trouble.

GPS Audio Tour Brought To You By Surface Speakers

The team at Eschelle Inconnue wanted to “trace a sound cartography of Islam” in Marseilles, France, so they came up with a clever little GPS walking tour powered by an Arduino, MP3 playback module, and a surface transducer speaker.

The team used a Processing app to define geographic areas where each MP3 file would play. An Arduino on the build queries a GPS module and selects the audio file from an MP3 playback module. This isn’t uncommon, and a lot of large outdoor museums (think battlefields) have similar setups.

Determining which audio to play at what location is fairly easy, but that’s not what makes this build special. Instead of simply hooking up a pair of headphones to the build, the team decided to use a surface speaker that turns just about any solid material into a speaker. From the writeup, this is supposed to, “diffuse sounds by giving the illusion to collect them, to listen to the words of the walls, the whisperings through the materials” but we think it’s just a great way to have several people listen to the same audio file at the same time.

Upgrading RAM In An Arduino Mega

[Andy] stuffed some more RAM onto an Arduino Mega and his three-part walk through on the design, construction, and software is a great read and one of the more ‘hard core’ Arduino builds we’ve seen.

The build is centered around a 512K × 8 SRAM module [PDF warning]. Because the RAM is divided up into about 512,000 chunks of 8 bits, the Arduino has to access the RAM through 16 ‘address lines’, then send the data through 8 ‘data lines’. [Andy] didn’t want to use up 24 pins on his Arduino, so he used a latch to multiplex the lowest 8 address lines and the data lines together. With the 512KB RAM expansion installed, the Mega is able to address a whopping 520 Kilobytes.

We’ve seen a few builds that have been limited by the amount of RAM available in the Arduino, like capturing video and some robot hacks, and adding some more RAM to those builds would be great. Multiplexing data and address lines using a latch can be expanded even further, but 520KB ought to be enough for anybody.

Awesome Fiber Optic LED Viking Helmet

octobrite_led_mohawk_helmet

[Garrett] over at MaceTech was approached by a friend who needed a light-up mohawk installed on a Viking helmet, and he needed it ASAP.

Now, [Garrett] does tons of work with LEDs but it’s not every day you are asked to construct a sound-responsive LED mohawk. He had all sorts of LEDs and other bits on hand, but finding the fiber optics that would make up the mohawk itself took a bit of time.

After a bit of searching, he located some cheap bulk fiber optic toy wands, and got busy cutting them apart to remove the fiber bundles. The fibers were glued into a laser cut plastic assembly, where they were paired with a handful of OctoBrite CYANEA modules [Garrett] had on hand. He bought a handful of components from SparkFun, including an Arduino Pro Mini to control the device, as well as an electret mic and graphic equalizer chip to handle the audio input/filtering.

He wrapped up the code portion of the mohawk and handed it off to his friend, who says that the “helmet is +99 to epic awesomeness”, which sounds like a ringing endorsement to us.

[via BuildLounge]

Check out the video below to see the fiber optic mohawk helmet in action.

Continue reading “Awesome Fiber Optic LED Viking Helmet”