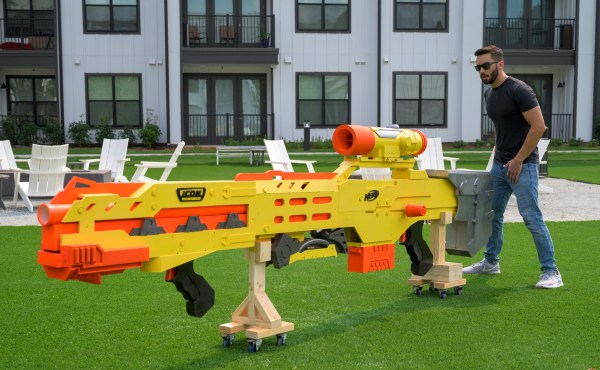
vektorkollektor-deploy-familyInPark

Vektor Kollektor Inspector

With the world opening up again, [Niklas Roy] and [Kati Hyyppä] have been busy making a public and collaborative project. Meet the Vektor Kollektor, a portable drawing machine experience, complete with a chip-tune soundtrack. It’s great to see public art meet the maker community with zero pretension and a whole lot of fun!

The build started with an HP7475A pen plotter from the 80s, one that was DOA (or was fried during initial testing). [Niklas] and [Kati] kept the mechanism but rebuilt the controls allowing for easy integration with an Arduino Nano and to be powered with a motorcycle battery.

The magic seems to be less in the junk-bin build (which is great) and more in the way this team extended the project. Using a joystick with arcade buttons as an input, they carted Vektor Kollektor to public parks and streets where they invited others to make art. The Kollekted drawings are available on a gallery website in a very cool animated form, freely available for download, on t-shirts, 3D prints, and on coffee mugs because, why not?

Some select drawings are even spray-painted on walls using a large plotter, and we really hope [Niklas Roy] and [Kati Hyyppä] share details on that build soon. Of course this comes hot on the heels of the workshop window cyborg we saw from these two hardware artists.

Continue reading “Vektor Kollektor Inspector”

Small low-cost CNC mill with rotary tool

Minimal Mill: The Minamil

Having a few machine tools at one’s disposal is a luxury that not many of us are afforded, and often an expensive one at that. It is something that a large percentage of us may dream about, though, and with some commonly available tools and inexpensive electronics a few people have put together some very inexpensive CNC machines. The latest is the Minamil, which uses a rotary tool and straps it to an economical frame in order to get a functional CNC mill setup working.

This project boasts impressively low costs at around $15 per axis. Each axis uses readily available parts such as bearings and threaded rods that are readily installed in the mill, and for a cutting head the build is based on a Dremel-like rotary tool that has a similarly low price tag. Let’s not ignore the essentially free counterweight that is used.

For control, an Arduino with a CNC shield powers the three-axis device which is likely the bulk of the cost of this project. [Paul McClay] also points out that a lot of the material he needed for this build can be salvaged from things like old printers, so the $45 price tag is a ceiling, not a floor.

The Minamil has been demonstrated milling a wide variety of materials with excellent precision. Both acrylic and aluminum are able to be worked with this machine, but [Paul] also demonstrates it in its capacity to mill PCBs. It does have some limitations but for the price it seems that this mill can’t be beat, even compared to his previous CNC build which repurposed old CD drives.

Highly Configurable Open Source Microscope Cooked Up In FreeCAD

What do you get when you cross a day job as a Medical Histopathologist with an interest in 3D printing and programming? You get a fully-baked Open Source microscope, specifically the Portable Upgradeable Modular Affordable (or PUMA), that’s what. And this is no toy microscope. By combining a sprinkle of off-the-shelf electronics available from pretty much anywhere, a pound or two of filament, and a dash of high quality optical parts, PUMA cooks up quite possibly one of the best open source microscopy experiences we’ve ever tasted.

GitHub user [TadPath] works as a medical pathologist and clearly knows a thing or two about what makes a great instrument, so it is a genuine joy for us to see this tasty project laid out in such a complete fashion. Many a time we’ve looked into an high-profile project, only to find a pile of STL files and some hard to source special parts. But not here. This is deliberately designed to be buildable by practically anyone with access to a 3D printer and an eBay account.

The project is not currently certified for medical diagnostics use, but that is likely only a matter of money and time. The value for education and research (especially in developing nations) cannot really be overstated.

A small selection of the fixed and active aperture choices

The modularity allows a wide range of configurations from simple ambient light illumination, with a single objective, great for using out in the field without electricity, right up to a trinocular setup with TFT-based spatial light modulator enabling advanced methods such as Schlieren phase contrast (which allows visualisation of fluid flow inside a live cell, for example) and a heads-up display for making measurements from the sample. Add into the mix that PUMA is specifically designed to be quickly and easily broken down in the field, that helps busy researchers on the go, out in the sticks.

The GitHub repo has all the details you could need to build your own configuration and appropriate add-ons, everything from CAD files (FreeCAD source, so you can remix it to your heart’s content) and a detailed Bill-of-Materials for sourcing parts.

We covered fluorescence microscopy before, as well as many many other microscope related stories over the years, because quite simply, microscopes are a very important topic. Heck, this humble scribe has a binocular and a trinocular microscope on the bench next to him, and doesn’t even consider that unusual. If you’re hungry for an easily hackable, extendable and cost-effective scope, then this may be just the dish you were looking for.

Continue reading “Highly Configurable Open Source Microscope Cooked Up In FreeCAD”

Arduino Powered Heat Pump Controller Helps Warm Your Toes

Heat pump heating technology is starting to pop up more and more lately, as the technology becomes cheaper and public awareness and acceptance improves. Touted as a greener residential heating system, they are rapidly gaining popularity, at least in part due to various government green policies and tax breaks.

[Gonzho] has been busy the last few years working on his own Arduino Powered Open Source heat pump controller, and the project logs show some nice details of what it takes to start experimenting with heat pumps in general, if that’s your game. Or you could use this to give an old system a new lease of life with an Arduino brain transplant.

In essence they are very simple devices; some kind of refrigerant is passed through a source of heat, absorbing some of it, it then flows elsewhere, and is compressed, which increases its temperature, before that increased heat is lost where the increase in temperature is desired.

This heat source could be a river, a mass of pipes buried in the ground, or simply the air around you. The source and quality of the heat source as well as the desired system operating temperature dictate the overall efficiency, and with ground-source systems it’s even possible to dump excess heat directly into the ground and store it for when required later. This could be the result of a residential cooling system, or even directly sourced from a solar heated setup.

This heat pumping process is reversible, so it is possible to swap the hot and cold ends, just by flipping some valves, and turn your space heater into a space cooler. This whole process can trace its roots back to the super talented Scottish professor, William Cullen who in 1748 was the first person on record to demonstrate artificial refrigeration.

The power needed to run the compressor pump and control gear is usually electrically derived, at least in non-vehicular applications, but the total power required is significantly less than the effective heating (or cooling) power that results.

We’ve covered a few heat pump hacks before, like this guy who’s been heating his house geothermally for years, but not so many platforms designed for experimentation from the ground up.

The associated GitHub project provides the gerber files as well as the Arduino code, so you’ve got a great starting point for your own heat pumping builds.

Word clock in the style of the Christmas lights from Stranger Things. If you know, you know.

Stranger Things Message Board Passes The Time By Spelling It Out

Will Netflix’s nostalgic hit Stranger Things be back for a fourth series anytime soon? We could pull out a Ouija board and ask the spirits, but we’d much rather ask closer to the source, i.e. a spirit in the upside down. And you know that the best way to do that is with LEDs — one for each letter of the alphabet so the spirit can spell out their messages.

Arduino, ESP01, and real-time clock powering this Stranger Things word clockAlthough contact with the Demogorgon’s world isn’t likely with [danjovic]’s open-source Stranger Things board, you are guaranteed to get the time spelled out for you every minute, as in, ‘it’s twenty-five (or six) to four’. And if you want to freak out your unwitting friends, you can covertly send messages to it from your phone.

There are two versions now — the original desktop version, and one that hangs on the wall and uses a high-quality photo print for the background. Both use an ESP-01 and an Arduino to help drive the 26 RGB LEDs, and use a DS2321 real-time clock for timing. We love the enameled wiring job on the wall-mount version, but the coolest part has to be dual language support for English and Brazilian Portuguese. You can check out demos of both after the break.

We’ve seen many a word clock around here, but this is probably one of the few that’s dripping with pop culture. If it’s stunning modernism you want, take a look at this painstakingly-constructed beauty.

Continue reading Stranger Things Message Board Passes The Time By Spelling It Out”

Smooth Servo Motion For Lifelike Animatronics

Building an animatronic robot is one thing, but animating it in a lifelike fashion is a completely different challenge. Hobby servos are cheap and popular for animatronics, but just letting it move at max speed isn’t particularly lifelike. In the video after the break, [James Bruton] demonstrates how to achieve natural motion with a simple animatronic head and a few extra lines of code.

Very little natural body movement happens at a constant speed, it’s always accelerating or decelerating. When we move our heads to look at something around us, our neck muscles accelerate our head sharply in the chosen direction and then slows down gradually as it reaches its endpoint. To do this in Arduino/C code, a new intermediate position for the servo is specified for each main loop until it reaches the final position. The intermediate value is the sum of 95% of the current position, and 5% of the target position. This gives the effect of the natural motion described above. The ratios can be changed to suit the desired speed.

The delay function is usually one of the first timing mechanisms that new Arduino programmers learn about, but it’s not suited for this application, especially when you’re controlling multiple servos simultaneously. Instead, the millis function is used to keep track of the system clock in the main loop, which fires the position update commands at the specified intervals. Adafruit wrote an excellent tutorial on this method of multitasking, which [James] based his code on. Of course, this should be old news to anyone who has been doing embedded programming for a while, but it’s an excellent introduction for newcomers.

Like most of [James]’s projects, all the code and CAD files are open source and available on GitHub. His projects make regular appearances here on Hackaday, like his mono-wheel balancing robot and mechanically multiplexed flip-dot display.

Continue reading “Smooth Servo Motion For Lifelike Animatronics”

Photo of a prototyping breadboard with an Arduino, whose analog inputs are connected to an array of four small op-amp circuits which perform the voltage slicing function of the Quantizer circuit described in this article.

Arduino Measures 20V Signals Using Quantizer

Canadian electronics geek and nascent YouTuber [Technoyaki] wanted to measure 20 volt signals on his Arduino. One might typically use a voltage divider to knock them down to the 5 volt range of the Arduino’s 10-bit A/Ds. But he isn’t one to take the conventional approach. Instead of using two resistors, [Technoyaki] decides to build an analog circuit out of sixteen resistors, four op amps and a separate 6 VDC supply.

Oscilloscope photo showing the output signals from each of the quantizer's four op amps. They are positioned staggered on the screen so that you can see the original sinusoidal signal clearly.

What is a quantizer? In the usual sense, a quantizer transforms an analog signal (with an infinity of possible values) to a smaller (and finite) set of digital values. An A/D converter is a perfect example of a quantizer. [Technoyaki], stretching the definition slightly, and uses the term to describe his circuit, which is basically a voltage slicer. It breaks up the 20 V signal into four separate 5 V bands. Of course, one could almost  accomplish this by just using an Arduino Due, which has a 12-bit A/D converter (almost, because it has a lower reference voltage of 3.3 V). But that wouldn’t be as much fun.

Why use all these extra components? Clearly, reducing parts count and circuit complexity was not one of [Technoyaki]’s goals. As he describes it, the reason is to avoid the loss of A/D resolution inherent with the traditional voltage divider. As a matter of semantics, we’d like to point out that no bits of resolution are lost when using a divider — it’s more accurate to say that you gain bits of resolution when using a circuit like the quantizer.  And not surprising for precision analog circuitry, [Technoyaki] notes that there are yet a few issues yet to be solved. Even if this circuit ultimately proves impractical, it’s a neat concept to explore. Check out the video below the break, where he does a great job explaining the design and his experiments.

Even though this isn’t quite a cut-and-paste circuit solution at present, it does show another way to handle large signals and pick up some bits of resolution at the same time. We wrote before about similar methods for doubling the A/D resolution of the Arduino. Let us know if you have any techniques for measuring higher voltages and/or increasing the resolution of your A/D converters.

Continue reading “Arduino Measures 20V Signals Using Quantizer”