Building A Replacement For A Broken Dehumidifier Controller

dehumidifier-replacement-controller

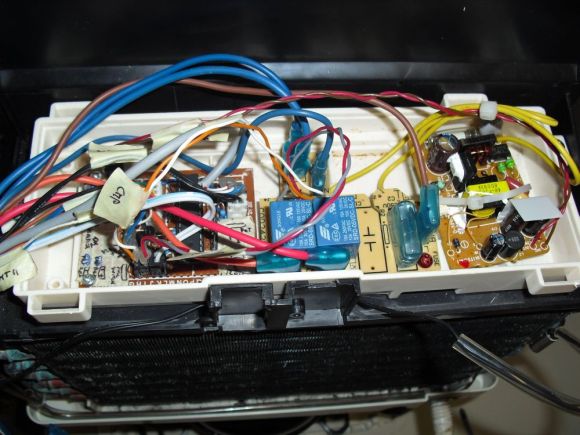
We’ve thought of doing a project like this ourselves as the dehumidifier we ordered online runs the fan 24/7 no matter what the humidity conditions. But it wasn’t that [Davide Gironi] was unhappy with the features on his unit. It’s that the dehumidifier controller stopped working so he replaced it with one of his own design. The original humidity sensor was mechanical and simply broke. He used an AVR along with a humidity and frost sensor to get the appliance up and running again.

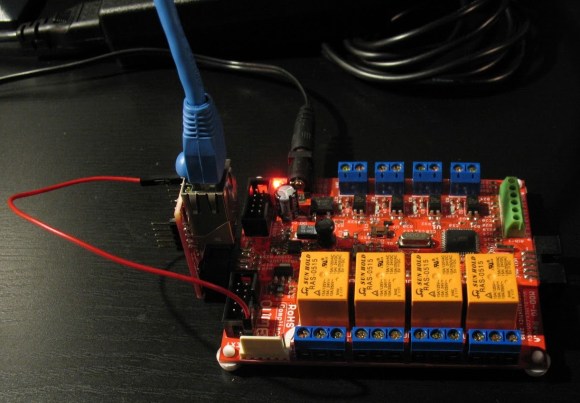
A DHT22 humidity sensor is polled by the ATmega8 chip and compared to the user-adjustable trimpot value. If it is above that threshold the unit is switched on using one of the relays seen in the image above. The one problem you have to watch out for when using compressor cooled appliances is ice accumulation on the radiator. [Davide] uses a thermistor for temperature feedback, switching the compressor off when it gets below 7C and turning it back on again when it is above 12C.

The replacement still uses the reservoir sensor and indicator LEDs. We, however, would recommend using the watchdog timer on the chip to ensure that it is reset if something goes wrong in the code.

Embedded Web Server Is All About Clever Formatting

embedded-web-server

Take a look around here and you’ll find all kinds of embedded web servers. This one doesn’t look all that interesting, especially because it’s just a NIC plugged into a development board. But for us the interesting part is in how [Andrew Rossignol] chose to format the webpage assets to best utilize the under-powered server.

The project was spawned as part of a class in Internet Embedded Systems which [Andrew] is taking. The board has an ATmega16 microcontroller and he’s using the ever popular ENC28J60 on that Ethernet adapter board. The TuxGraphics TCP/IP Stack takes care of communications with the network.

One constraint which [Andrew] imposed upon himself was to use just a single response which the available RAM limits to about  700 bytes. Any decent webpage needs to have at least some graphics but that’s tough with the size limit. He managed to display an AVR logo by optimizing an SVG in Inkscape then stripped the rest of the cruft using VIM (explained in the demo after the break). With that piece of Linux-fu in his pocket he set to work streamlining the CSS file. The webpage isn’t just static either. He displays the server up-time and even allows the relays and LEDs on the Olimex board to be controlled.

Despite the limitations of the ATmega family they still seem to do some amazing Internet-connected stuff. Here’s one used as a Minecraft server.

Continue reading “Embedded Web Server Is All About Clever Formatting”

Making It Easier To Build Firmware

OSHW Logo

Most microcontroller manufacturers give you some kind of free development toolchain or IDE with their silicon products. Often it’s crippled, closed source, and a large download. This is pretty inconvenient when you want to have firmware that’s easy to build and distribute. I’ve found many of these toolchains to be annoying to use, and requiring closed source software to build open source firmware seems less than desirable.

It’s possible to build code for most microcontrollers using command line tools. You’ll need a compiler, the device manufacturer’s libraries and header files, and some method of flashing the device. A lot of these tools are open source, which lets you have an open source toolchain that builds your project.

Setting up these tools can be a bit tricky, so I’m building a set of templates to make it easier. Each template has instructions on setting up the toolchain, a Makefile to build the firmware, and sample code to get up and running quickly. It’s all public domain, so you can use it for whatever you’d like.

Currently there’s support for AVR, MSP430, Stellaris ARM, and STM32L1. More devices are in the works, and suggestions are welcome. Hopefully this helps people get started building firmware that’s easy to build and distribute with projects.

Color NTSC Video Directly From An AVR Chip

color-ntsc-from-avr-chip

We’ve seen composite video out from AVR chips many times before. But we can’t remember coming across one that managed to produce a color signal. This project does just that, producing a color video signal from an ATmega168 without using external integrated circuits.

[CNLohr] is seen here showing off his accomplishment. You’ll remember him from the glass-slide PCB server project he’s been working on recently. This time around it’s a small piece of gaming hardware which he’s working on. But using four pins from the microcontroller, connected via resistors in parallel, he is able to generate a color NTSC signal without using a chip like the AD723.

After the break you can see the two minute demo in which he shows the game running for just an moment, then gives a general overview of how the signals are being built. There isn’t a ton of explanation, but he did post his code as well as a resource for you to teach yourself more about the NTSC standard. Maybe you can make a color version of that AVR tetris game?

Continue reading “Color NTSC Video Directly From An AVR Chip”

CuteUino: Only Use The Parts Of The Arduino That You Need For Each Project

CuteUino

[Fran’s] been working on her own version of the Arduino. She calls it CuteUino for obvious reasons. The size of the thing is pretty remarkable, fitting within the outline of an SD card. But that doesn’t mean you won’t get the power that you’re used to with the device. She’s broken it up into several modules so you can choose only the components that you need for the project.

The main board is shown on the right, both top and bottom. It sports the ATmega328p (it’s hard to believe we could make out the label on the chip package in the clip after the break) in a TQFP-32 package soldered to the underside of what she calls the Brain Module. You can also see the extra long pins which stick through from the female pin headers mounted on the top side of the board. Inside of these pin headers you’ll find the clock crystal, status LEDs, and a capacitor. The other module is an FTDI board used to connect the AVR chip to a USB port.

You’ll definitely want to check out her prototyping post for this project. She uses a very interesting technique of combining two single-sided boards to make a 3-layer PCB. The side that was not copper clad is fitted with copper foil by hand to act as a ground plane for the vias. Neat!

Continue reading “CuteUino: Only Use The Parts Of The Arduino That You Need For Each Project”

Another Salvo In The PIC Vs. AVR Holy War

Ah, PIC vs. AVR, the never-ending battle of electronic design supremacy. Some people swear by Atmel’s AVR microcontrollers, while others are wrong. [majenko] is firmly planted in Microchip’s PIC camp, so he wrote up a nice comparison of Atmel’s AVR versus Microchip’s PIC family of microcontrollers. The results aren’t that surprising; PIC microcontrollers come out as a better product that no hobbyist uses because no hobbyist uses them.

Atmel and their series of AVR microcontrollers has seen a huge increase in popularity in the hobbyist market in the last few years, no doubt thanks to the Arduino and other AVR-powered dev boards. This isn’t to say Microchip and PIC haven’t seen their time in the lime light; there was a time when you could actually buy electronic components at Radio Shack, including kits containing Microchip’s very popular but somewhat outdated Basic Stamp.

After going over the capabilities of the Atmel AVR ATMega328p, the similarly equipped Microchip’s PIC PIC18F25K80, and TI’s MSP430G2533, [majenko] found the perennial favorite, the AVR, lacked in some very important categories. The AVR has a lower resolution ADC, fewer PWM pins, fewer 16-bit timers, while costing about $0.75 more.

Of course [majenko]’s analysis doesn’t take into account the intangibles of choosing a PIC over an AVR. Thanks to the Arduino’s adoption of the AVR, there are many, many more code and schematic examples floating around on the Internet for just about every project imaginable. The development tools for PIC are a bit more expensive than their AVR equivalents; A PICkit2 runs about $50 while AVR ISP programmers can be found just about everywhere for pocket change.

It’s a lazy Sunday, so all ‘yall can go on and argue in the comments.

Interpreting Brainf*#k On An AVR

We won’t call it useless, but we will ask why [Dan] wrote a brainfuck interpreter for the AVR

It’s not generating code for the AVR; think of it more as a bootloader. To run a brainfuck program, [Dan] uploads it to the EEPROM inside his ATMega32, after which the microcontroller takes over and starts performing whatever instruction the brainfuck program tells it to do. Because the whole thing runs off the EEPROM, the code size is limited to 1022 bytes. Enough for any brainfuck program written by a human, we think.

As for why [Dan] would want an AVR to build an interpreter for a language that is nearly unreadable by humans, we honestly have no idea other than the common, ‘because it’s there’ sentiment. There are some pretty cool projects out there that use brainfuck, including this genetic algorithm software developer. Right now, though, blinkey LEDs are enough to keep us happy, so you can see a video of brainfuck doing its thing on a LED bar display after the break.

Continue reading “Interpreting Brainf*#k On An AVR”