We’re going to build an electronic Hackaday Badge, and by “we”, I mean Hackaday community members who are passionate about the project.
I’ll be leading the charge. I had a great learning experience the last time I helped design the e-paper badge for the 2013 Open Hardware Summit, and hope to learn a lot along the way this time too. Since then, Badges have come a long way – at cons like DEFCON, LayerONE, Shmoocon, The Next Hope, Open Hardware Summit, The EMF, SAINTCON, SXSW Create, The Last Hope, TROOPERS11, ZaCon V and of course the rad1o from this year’s CCCamp. Word is that this year’s Open Hardware Summit badge is going to be pretty kickass too. So, we have some very big shoes to fill. But this doesn’t have to be about “my badge is better than yours”. And this badge isn’t meant to be specific to any single con or event. So what does the Badge do, then? “It’s a physical extension of the hackaday.io community, made specifically for hacker gatherings of all types and sizes.”
2015 was the year of the unofficial hardware badge at DEF CON 23. There were a ton of different hardware badges designed for the love of custom electronics and I tried to catch up with the designer of each different badge. Here is the collection of images, video demos, and build details for each one I saw this weekend.
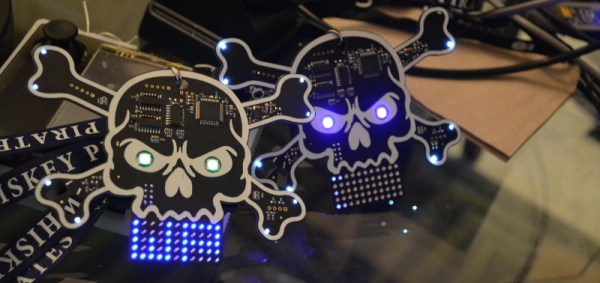
Whiskey Pirates
Gorgeous text treatment on back of this badge is indicative of [True’s] mastery
[TrueControl] did a great job with his badge design this year for the Whiskey Pirate Crew. This is a great update from the badge he designed last year, keeping the skull and bones outline. It uses a PSOC4 chip to control a ton of LEDs. The eyes are RGB pixels which are each on their own PCB that is soldered onto the back of the badge, with openings for the LED to show through. Two AA batteries power the board which has a surface-mount LED matrix. The user controls are all capacitive touch. There is a spinner around one eye, and pads for select and back. The NRF24L01 radio operates at 2.4GHz. This badge is slave to commands from last year’s badge. When the two are in the same area the 2015 badges will scroll the nickname of the 2014 badge it “sees”. The piezo element also chirps many different sounds based on the interactions with different badges.
[True] makes design an art form. The matte black solder mask looks fantastic, and he took great care in use of font, size, alignment, and things like letting copper show through for a really stunning piece of hardware art.
Keep reading for ten more great badges seen over the weekend.
The 23rd DEFCON — the Western Hemisphere’s largest hacker conference — doesn’t start until tomorrow but Thursday has become the de facto start for regulars. [Brian] and I rolled into town this afternoon and are working on gathering as much information as possible about the badge challenge.
This year the badge is a 7″ vinyl record. Traditionally the badge alternates years of electronic badges and ones that aren’t. Spend your weekend pulling your hair our trying to solve the puzzles. Check out all the pictures and information (updated as we gather it) and work together collaboratively for a solution by requesting to join the crew on the Badge Hacking page.
Hackaday Breakfast on Sunday
If you’re in town Sunday morning, come nurse your hangover with [Brian], [Eric], and me. We’re headed to Va Bene Caffè at 10:30am on 8/9/15. It’s just across the street in the Cosmopolitan. Request to join this event and I’ll send you a reminder so you don’t forget. You can also hit me up on Twitter for a reminder. See you then (and don’t forget to bring hardware to show off if you have some!).
Conference badges are getting more complex each year. DEFCON, LayerONE, Shmoocon, The Next Hope, Open Hardware Summit, The EMF, SAINTCON, SXSW Create, The Last Hope, TROOPERS11, ZaCon V and of course the CCC, have all featured amazing badges over the years. This years CCCamp 2015 rad1o badge is taking things several notches higher. The event will run from 13th through 17th August, 2015.
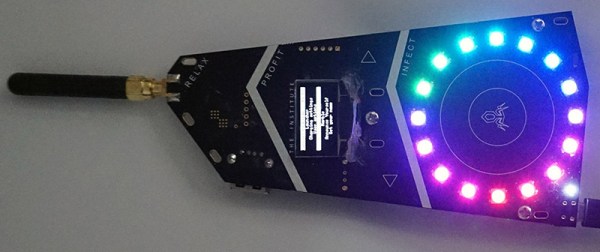
The rad1o Badge contains a full-featured SDR (software defined radio) transceiver, operating in a frequency range of about 50 MHz – 4000 MHz, and is software compatible to the HackRF One open source SDR platform. The badge uses a Wimax transceiver which sends I/Q (in-phase/quardrature-phase) samples in the range of 2.3 to 2.7 GHz to an ARM Cortex M4 CPU. The CPU can process the data standalone for various applications such as FM radio, spectrogram display, RF controlled power outlets, etc., or pass the samples to a computer using USB 2.0 where further signal processing can take part, e.g. using GnuRadio. The frequency range can be extended by inserting a mixer in the RF path. Its got an on-board antenna tuned for 2.5GHz, or an SMA connector can be soldered to attach an external antenna. There’s a Nokia 6100 130×130 pixel LCD and a joystick, which also featured in the earlier CCCamp 2011 badge known as the r0ket.
A 3.5mm TRRS audio connector allows hooking up a headphone and speaker easily. The LiPo battery can be charged via one of the USB ports, while the other USB port can be used for software updates and data I/O to SDR Software like GnuRadio. Check out the project details from their Github repository and more from the detailed wiki which has information on software and hardware. There’s also a Twitter account if you’d like to follow the projects progress.
This years Open Hardware Summit also promises an awesome hackable badge. We’ll probably feature it before the OHS2015 conference in September.
Thanks to [Andz] for tipping us off about this awesome Badge.
Go to DEFCON and you’ll stand in line for five hours to get a fancy electronic badge you’ll be showing to your grandchildren some day. Yes, at DEFCON, you buy your hacker cred. LayerOne is not so kind to the technically inept. At LayerOne, you are given a PCB, bag of parts, and are told to earn your hacker cred by soldering tiny QFP and SOT-23 chips by hand. The Hardware Hacking Village at LayerOne was packed with people eagerly assembling their badge, or badges depending on how cool they are.
The badges are designed by [charlie x] of null space labs, one of the many local hackerspaces around the area. The design and construction of these badges were documented on the LayerOne Badge project on hackaday.io, and they’re probably best con badges we’ve ever seen.
There are two badges being distributed around LayerOne. The first is an extremely blinkey badge with a Cypress PSoC4 controlling 22 individually addressable RGB LEDs. Most conference attendees received a bare PCB and a bag of parts – the PCB will get you in the door, but if you want your nerd cred, you’ll have to assemble your own badge.
There are still a few interesting features for this badge, including an ESP8266 module that will listen to UDP packets and drive the LEDs. Yes, a random person on the same WiFi AP can control the LEDs of the entire conference event. The badges can also be chained together with just three wires, but so far no one has done this.
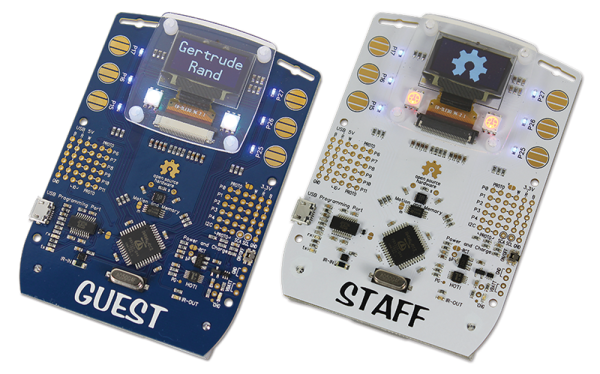
The second badge – for speakers and staff – is exceptionally more powerful. It’s a Linux box on a badge with two Ethernet connectors running OpenWRT. For a con badge, it’s incredibly powerful, but this isn’t the most computationally complex badge that has ever been at a LayerOne conference. For last year’s badge, [charlie] put together a badge with an FPGA, SAM7 microcontroller, SD card, and OLED display. They were mining Bitcons on these badges.
The Hardware Hacking Village was loaded up with a dozen or so Metcal soldering irons, binocular microscopes, and enough solder, wick, and flux to allow everyone to solder their badge together. Everyone who attempted it actually completed their badge, and stories of badge hacking competitions at other cons were filled with tales of people sprinkling components on random solder pads. Imagine: a conference where people are technically adept. Amazing.
SMD solder stencil for the LEDs
A hot plate was available for those who were not cool enough to solder 22 smd LEDs
By far the most desirable booth for the crowds at SXSW Create was the Sparkfun quadrant. We call it a quadrant because they had a huge footprint approaching 1/4 the tented area, but it was well used. They brought a number of staff down to Austin in order to give away a legit electronic badge project they call BadgerHack.
We love badge hacking. LOVE IT! But South-by isn’t purely a hardware conference so the badges aren’t made of PCBs (for shame). Add to that, free entry to Create scores you a wristband but no badge.
This is the answer to that, a badge giveaway and build-off aimed at kids but cool enough to make me feel only slightly awful for accepting one when I pretty much knew they were going to run out before the final day was done.
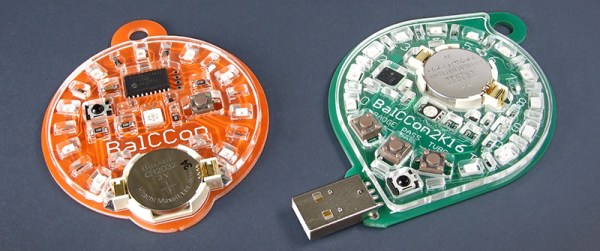
The USB stick PCB is, as you guessed it, an Arduino compatible loaded up with an FTDI chip and an ATmega328p which they call the BadgerStick. Accompanying this is a multiplexed 8×7 LED matrix board. Solder the three pin headers and the battery holder leads, connect to the plastic badge using the supplied double-stick tape, and you have a badge that scrolls a message in LEDs.
What an awesome giveaway. I really like it that they didn’t cut corners here. First off, the kids will value the badge much more because they had to actually assemble it rather than just being handed a finished widget. Secondly, there is the USB to serial chip and USB footprint that means they can reprogram it without any extra equipment. And an LED matrix… come on that’s just a gateway drug to learning Wiring. Bravo Sparkfun and Atmel for going this route with your marketing bucks.
The badge activity rounded out with some hardware interfacing. There’s a 3-pin socket that attendees could plug into 4 different stations around the booth. Once done they received a coupon code for Sparkfun that scrolls whenever the badge is booted up. For some at-home fun, the writeup (linked at the top) for the BadgerHack firmware is quite good. It offers advice on changing what is displayed on the badge and outlines how to build a game of Breakout with just a bit of added hardware.
The 2014 SAINTCON is only the second time that the conference has been open to the public. They give out conference badges which are just an unpopulated circuit board. This makes a lot of sense if you figure the number of people who actually hack their badges at conferences is fairly low. So he headed off to the hardware hacking village to solder on the components by hand — it’s an Arduino clone.
This is merely the start of the puzzle. We really like that the published badge resources include a crash course on how to read a schematic. The faq also attests that the staff won’t solder it for you and to get your microcontroller you have to trade in your security screw (nice touch). Once up and running you need to pull up the terminal on the chip and solve the puzzles in the firmware’s menu system. This continues with added hardware for each round: an IR receiver, thermistor, EEPROM, great stuff if you’re new to microcontrollers.
[Josh] mentions that this is nothing compared to the DEFCON badge. Badge hacking at DEFCON is **HARD**; and that’s good. It’s in the top-tier of security conferences and people who start the badge-solving journey expect the challenge. But if you’re not ready for that level of puzzle, DEFCON does have other activities like Darknet. That is somewhere in the same ballpark as the SAINTCON badge — much more friendly to those just beginning to developing their crypto and hardware hacking prowess. After all, everyone’s a beginner at some point. If that’s you quit making excuses and dig into something fun like this!