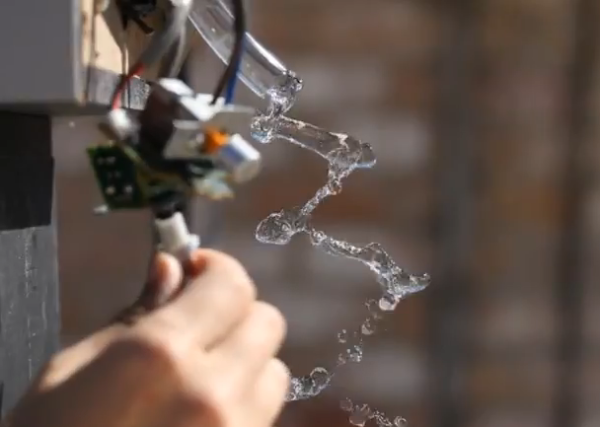
Unwrapping Images Of Cylindrical Objects

unwrapping-images-of-cylindrical-objects

Here’s an automated setup that lets you create flat images of cylindrical objects. The example shown above takes a creamer and lets you see what the painted pattern looks like when viewed continuously.

The image capture rig is similar to turntable photography setups that allow you to construct animated GIF files or 3D models of objects. The subject is places on a stepper motor which allows precise control when rotating the object between frames. The EiBotBoard (which we’ve seen in at least one other project) is designed for the EggBot printer. But it is used here to interface the motor and capture equipment with the Raspberry Pi.

We’re a little uncertain if the RPi actually handles the image manipulation. The project uses ImageMagick, which will certainly run on the RPi. There is a mention of the Raspberry Pi camera joing the rig as a future improvement so we do expect to see a fully-automatic revision at some point.

[via Adafruit via EMSL]

Flash Controller Works With Point And Shoot Cameras

Needless to say, there’s a world of difference between the expensive DSLR cameras professional photographers use and the point-and-shoot models carried by commoners. One such difference is the ability to use slave flashes – a second flash set off to the side of the subject for better illumination. Most of these slave flash units are triggered when they see a bright light, or when the on-camera flash goes off. Point and shoot models usually have a ‘pre-flash’ that cause a slave flash to trigger prematurely. [Kerry] built a really neat slave flash that is able to work with these point-and-shoot cameras, and is pretty easy to build as well.

There are two options when it comes to building a flash that can work with a point-and-shoot: First, measure the time between the pre-flash and real flash, and then simply delay the slave flash. This option has a few problems. Even when [Kerry] tested this technique on the same camera, the delay between the flashes were never consistant.

The second option is to simply ignore the pre flash and synchronize with the main flash. This is a little harder, but if done right this technique is nearly foolproof.

[Kerry] ended up building a small circuit out of a 556 timer chip and an LM339n comparator that turns itself ‘on’ just a little bit after it sees the pre flash. From there, the device looks for the main flash and triggers itself whenever it sees another bright source of light.

The finished product works beautifully, and is simple enough for just about anyone to build on a piece of perf board.

Raspberry Pi Camera Board Coming Early Next Year

We’ve seen hundreds of builds tinker around with the GPIO pins on the Raspberry Pi. They’re great for bridging the gap between physical sensors and a virtual world, but there are a few more unused and ignored pins on the Raspberry Pi. The folks at the Raspberry Pi foundation are finally giving these unused pins a life of their own with the new camera module for our favorite single board computer.

The specs for the camera are fairly impressive – it can record H.264 video at 1080p and 30 frames per second. Best of all, it costs only $25.

There are a few more hurdles to pass before the Raspi foundation can send this board out to manufacturers. They still need to make sure the ribbon cable doesn’t emit any interference, but if all goes right the camera module should be available early next year.

You can see the camera in action in the video after the break. If you listen closely you can hear [Rob Bishop] of the Raspi foundation say they’re also working on a display add on for the other  unused pins on the Pi, something we can’t wait to see.

Continue reading “Raspberry Pi Camera Board Coming Early Next Year”

Beefing Up A Smoke Alarm System With Video, Temperature, And Connectivity

Here’s a little smoke detector hack which [Ivan] has been working on. He wanted to extend the functionality of a standard detector and we’re happy to see that he’s doing it with as little alteration to the original equipment as possible (this is a life-saving device after all). He sent all the build images for the project to our tips line. You’ll find the assembly photos and schematic in the gallery after the break.

As you can see his entry point is the piezo element which generates the shrill sound when smoke as been detected. He connected this to his own hardware using an optoisolator. This allows him to monitor the state of the smoke alarm on his server. It then takes over, providing a webpage that display’s the board’s temperature sensor value and streams video from an infrared camera.

Of course this is of limited value. We’ve always made sure that our home was equipped with smoke detectors but the only time they’ve ever gone off was from normal cooking smoke or after an extremely steamy shower. But still, it’s a fun project to learn from and we’ve actually got several of the older 9V battery type of detectors sitting in our junk bin.

Continue reading “Beefing Up A Smoke Alarm System With Video, Temperature, And Connectivity”

Optimizing Your Electronics Projects With A Camera

What do you do when you have a microcontroller you’re trying to optimize? One method is using a debugger, but for AVRs and such that’s not a very common technique. For lower-level electronics projects, it’s nearly impossible, even. [Cnlohr] built a small Minecraft server that listens to in-game redstone circuits, but the performance of his real-world to block-world bridge wasn’t what he hoped. He came up with a pretty clever way of figuring out what was slowing his server down without any special gear at all.

[cnlohr]’s Minecraft server is just a simple AVR microcontroller, Ethernet adapter, and SD card affixed to a beautiful glass PCB. The performance of his server wasn’t what he expected; downloading a largish file from the server resulted in a download rate of about 55kbps, much slower than he expected. He wasn’t quite sure what the hangup was, so he took a camera and with a long exposure time took a very blurry picture.

The Minecraft server has a blue LED to show when the SD card was being accessed. In the picture above, [cnlohr] saw that SD card access was taking far too long, and if he wanted to optimize the code this would be the place to start.

Not bad for a dead-simple method of seeing where the code on your microcontroller project is slowing down.

Continue reading “Optimizing Your Electronics Projects With A Camera”

Making An Overhead Camera Gantry, Take 2

Last week we saw [Todd]’s solution to getting a tripod out-of-the-way when filming a few DIY videos. It’s an overhead camera gantry that allows him to move a camera around his garage workshop without a tripod getting in the way. This weekend, he’s back with a new and improved version. It’s a vast improvement over his Mk 1 gantry system, and it much simpler to build, to boot.

[Todd]’s new and improved overhead camera gantry builds is a vast improvement on his previous build. In the original build, [Todd] used only one cross piece between the overhead garage door tracks, and the carriage suspending the tripod overhead was extremely clunky.

Version 2 of [Todd]’s camera gantry again makes use of unused garage door tracks to suspend a tripod above his workshop. This time, though, he’s using two rails between these garage door tracks making pushing the tripod around his workshop much easier – even when not pushing it from the middle.

To move the camera across the workspace, [Todd] did away with the square tube between the garage door tracks and used another set of garage door tracks. It’s a beautiful system that moves very, very smoothly between his workbench and welding station, perfect for making a few high-quality DIY videos.

You can check out [Todd]’s build video after the break.

Continue reading “Making An Overhead Camera Gantry, Take 2”

Camera Gantry Rides On Garage Door Tracks

For as many garage and workshop videos we feature here on Hackaday, we’re surprised we haven’t seen this sooner.

[Todd] makes a bunch of videos in his garage shop, but using a tripod is a pain; he’s always tripping over his camera setup and it is just generally in the way all the time. His solution was to mount his camera to an overhead gantry, using the unused tracks for his garage door to move the camera around his workshop.

The build started with [Todd] taking his tripod and fabbing a mounting plate for it to be suspended in mid-air. This would leave the camera upside-down, so [Todd] also made a 90 degree bracket with a 1/4-20 bolt to hold the camera in position.

The actual gantry part of the build is fairly clever. First, [Todd] got a piece of square tubing the same length as the distance between his two garage door tracks. He made a truck that rides on six casters for this tube, then mounted this tube on garage door wheels.

The result allow [Todd] to move his camera anywhere within the footprint of his garage door tracks, including over his workbench and welding area. An ingeniously useful build that’s sure to provide a stable platform for his vlog-type thingies.

Vidia after the break.

Continue reading “Camera Gantry Rides On Garage Door Tracks”