MSP430 Gaming Shield Based On The Gameduino

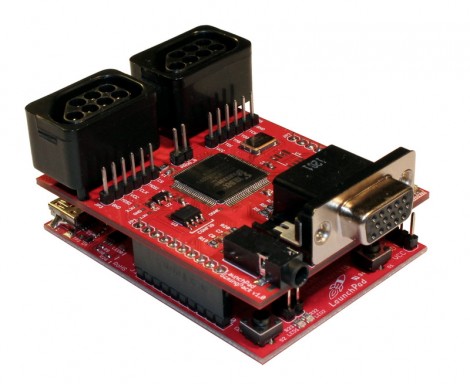
Get your 8-bit gaming fix with this gaming shield for the TI Launchpad. It’s called the Launchpad GamingPack and was developed as part of TI’s 2012 Intern Design Contest. The team had just six weeks to complete the project.

The video after the break starts off with some fast-motion PCB layout. It is followed by footage of the board being populated, then anchored with graphics testing and some game play demonstrations. It looks like a real blast! NES controller ports were included on the board, and the device puts out 400×300 VGA, as well as audio.

As with the Gameduino, the hard work is done by the FPGA at the center of this board. It handles all of the VGA timing work, using what looks like 3-bit color. It is also responsible for generating the audio and monitoring the inputs. Since the team was under a time crunch the shield also includes a 10-pin header on the underside which was added for easy connection with a logic analyzer.

Continue reading “MSP430 Gaming Shield Based On The Gameduino”

A Wireless MAME Coffee Table Controller

MAME coffee table plan

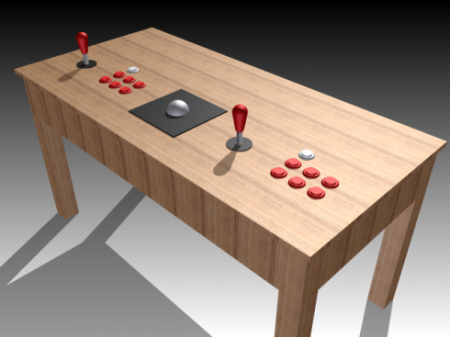
Although we’ve featured quite a few MAME controllers here, we thought we’d feature one more. It’s only a well-drawn mechanical plan at this point, but if the results are anything like the model or detail drawing, we will be quite impressed.

One thing that is of particular interest is the planned parts list. Amongst them are the typical joysticks, buttons, and even a trackball. What may be new to some of our readers is the bluetooth arcade controller by [Wayne and Layne] opensource hardware kits. Although they aren’t cheap at just under $80, and requre an Arduino Mega for use, this is nonetheless an interesting control option. The maximum button presses may be another limiting factor at 6, but it should be a cleaner solution than cannibalizing one or more wireless controllers.

Of course, we’d be negligent if we didn’t at least give you a link to a completed MAME controller. Be sure to feast your eyes on these images if you’d like some finished controller eye candy or check out the pic after the break!

Continue reading “A Wireless MAME Coffee Table Controller”

Building A Custom Interface For Surplus HF Radios

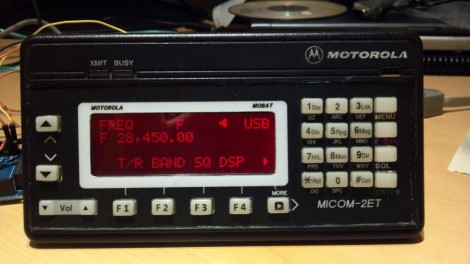
[PRC148] picked up a Motorola Micom radio from eBay. These are US State Department surplus, but apparently the 125 Watt HF units are top-of-the-line at a tenth of the sticker price. The one hangup is that they’re headless; you can’t control them without additional hardware. But the Internets are often kind to the hobbyists, and this is no exception. You can get software to run the radio from a PC thanks to the Micom Yahoo Group. [PRC148] took that software as an example and built his own stand-alone interface. [Cached version of the page]

The head unit is an Arduino driving a four-line LCD display and a rather large array of buttons. The forum thread linked above shows his humble beginnings on a breadboard. During the project [PRC148] learned a lot of skills to end up with what you see above. Hiding behind the reused bezel is a PCB he designed in Eagle CAD and etched himself. It allowed him to cram the tactile switches close enough to work with the button overlay on this keypad.

UPDATE: The traffic from this feature took down the forum hosting the content. They requested that we do not link to them because of this. A cached version without images can be found above thanks to [Termm].

Building A Controller For MMOs

It’s a simple fact of gaming that controllers are more suited for shooters, while the WASD + mouse control of the PC gaming master race is more suited for real-time strategy games and MMOs. [Gabriel] wanted to challenge this idea, so he put together a controller combining the best of a mouse and keyboard for some hand-held RTS and MMO action.

The Keyball Controller as [Gabe] calls it is an amazing amalgamation of a 3rd party XBox and PS3 controllers, an SNES controller, a trackball, two USB keyboards and a ton of Bondo. The front of the Keyball features a WASD D-pad, scroll wheel, trackball, tiny keyboard and a few other commonly used buttons. The rear of the controller is loaded down with tons of trigger buttons and a few meta buttons that alter the function of other buttons.

The fabrication of the controller is absolutely phenomenal and certainly something that deserves to be copied. We’ve seen some controllers duplicated with a silicone mold and resin, so we can only hope that [Gabe] is looking at RTV silicone at the moment.

Building An Autonomous Robot From An Xbox 360 Controller

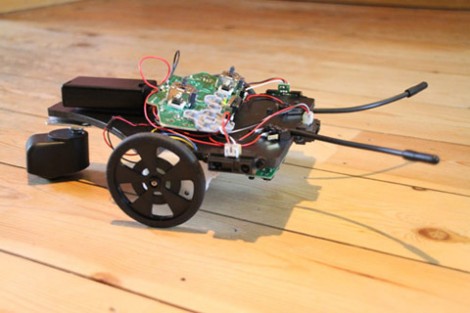
Wow, it’s amazing what [Carl] was able to build using an Xbox 360 control PCB as the base for his robot. His forum posts just touches the surface of the build, but he linked to a PDF file which has the full details.

This build basically attaches sensors and replacement motors to the controller board… and that is it! Some distance sensors are connected to the analog inputs for the left and right trigger. The whiskers use a couple of leaf switches soldered to controller button pads. The motors are geared replacements that use the same connectors as the rumble motors did.

The idea is that the controller is connected to a PC via the wireless radio it has on the PCB. Once the connection is made the PC software can read from all of the sensors and drive the motors accordingly. It would also be really easy to use a single-board solution like the RPi to do away with the need for a remote PC. But this is a fantastic start, and an approach which we had never before considered. See some video of the little guy getting around the room after the break.

Continue reading “Building An Autonomous Robot From An Xbox 360 Controller”

USB Dongle For Unmodified NES Controllers

This USB dongle will let you use your unmodified NES controllers on a computer. That’s because it includes the same socket you’d find on the classic console.

The image above shows the prototype. Instead of etching the copper clad board, each trace was milled by hand (presumably with a rotary tool). To the left the black square is made of several layers of electrical tape that builds the substrate up enough to fit snugly in a USB port.

An ATtiny45 running the V-USB stack has no problem reading the controller data and formatting it for use as a USB device. This is actually the second iteration of the project. The first attempt used an ATtiny44 and a free-formed circuit housed inside the controller. It worked quite well, but required alterations to the circuit board, and you needed to replace the stock connector with a USB plug. This dongle allows the controller to go unaltered so it can be used with an NES console again in the future.

Playing Footsie With Your Video Games

[Jon] will be tapping away with his toes during gaming session thanks to this foot controller which is packed with buttons and sensors. It’s the second iteration of the build. The original had some solder joints break and the USB stopped working. He had also been experiencing some erratic behavior and so he decided to upgrade the control hardware and add a few more things in the process.

This version uses an Arduino Uno as the interface board. He did a bunch of prototyping to find the best way to hook up all the analog sensors, and how to properly debounce the buttons. Once he was happy with the inputs he set about finding a better way to use the USB HID standard with the device. We were surprised to hear that the ATmega16u2 (one of the new AVR chips which includes USB hardware) doesn’t play nicely with Linux. But [Jon] managed to hack his way around that issue and now he’s gaming with an even better foot controller than before.