Soviet-Era Auto Dialler Uses Magnetic Rope Core Memory

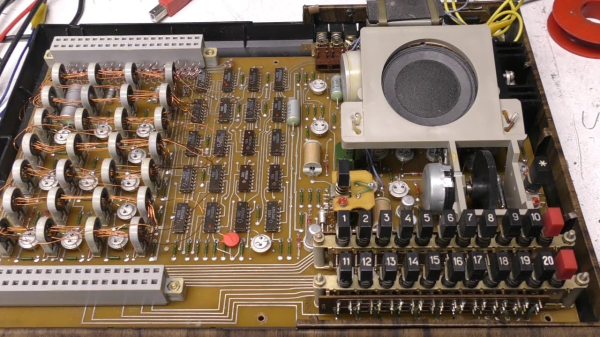
We’ve seen a few interesting magnetic core memories on these fine pages over the years, but we don’t recall seeing too many user programmable magnetic core memory devices. This interesting Russian telephone auto dialer in its day would have been a very useful device, capable of storing and dialing forty user programmable 7-digit numbers. [mikeselectricstuff] tore into one (video, embedded below), and found some very interesting tech. For its era, this is high technology stuff. Older Russian tech has a reputation for incredibly ingenious use of older parts, that can’t be denied. After all, if it works, then there’s no need to change it. But anyway, what’s interesting here is how the designers decided to solve the problem of programming and recalling of numbers, without using a microprocessor, by using discrete logic and core rope memory.

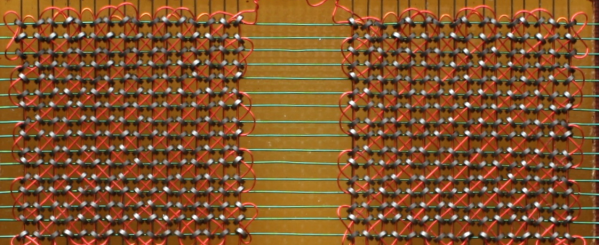
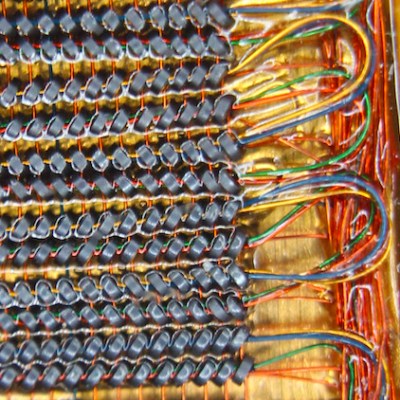
This is the same technology used by the Apollo Guidance Computer, but in a user configurable form, and obviously much smaller storage capacity. The core array consists of seven, four-bit words, one word per telephone digit, which will be read out sequentially bottom to top. The way you program your number is to take your programming wire, insert it into the appropriate hole (one row related to numbers 1-20, the other row is shifted 1-20 for the second bank) and thread it along the cores in a weave type pattern. Along the way, the wire is passed through or bypasses a particular core, depending upon the digit you are coding for. They key for this encoding is written on the device’s lid. At the end, you then need to terminate the wire in the matching top connector, to allow the circuit to be completed.

As far as we can tell, the encoding is a binary sequence, with a special ‘stop’ code to indicate telephone numbers with less than seven digits. We shall leave further analysis to interested parties, and just point you at the Original manufacturer schematics. Enjoy!

Of course we’re not just going to mention rope core memory and the AGC without linking to a fantastic article about the very same, and if that’s wetting your appetite for making a rope core memory, here’s a little thing about that too!

Continue reading “Soviet-Era Auto Dialler Uses Magnetic Rope Core Memory”

Taking A Walk Down [Computer] Memory Lane

There’s nothing quite like going to a museum and being given a tour by a docent who really knows their way around the exhibits. When that docent has first hand experience in the subject matter, the experience is enhanced even further. So you can imagine our excitement when hacker, maker, and former DEC mainframe memory engineer [Ned Utzig] published a tour of what he calls “Memories of Weird Memories of Computers Past.” [Ned] expertly guides us through each technology, adding flavor and nuance to an already fascinating subject.

The tour begins with early storage media such as IBM punch cards, and then walks us through time to the paper tape, vacuum tubes, and even complex vats of mercury — all used for the sake of storing data either permanently or temporarily.

Next in the exhibit is an impressive CRT hack that isn’t unlike modern DRAM. The tour continues on to ferrite core memory such as that used on mainframes, minicomputers, and even the Apollo Guidance Computer. Each type is examined for its strengths and weaknesses and its place in computing history.

We really appreciated the imaginative question posed toward the end of the article. We won’t give it away here- it’s worth it to go give The Mad Ned Memo a read.

Is obsolete technology your cup of tea? Perhaps an Arduino based experiment with core memory will scratch the itch, or maybe storing data in thin air will bring back memories of computers gone by.

Visualizing Magnetic Memory With Core 64

For the vast majority of us, computer memory is a somewhat abstract idea. Whether you’re declaring a variable in Python or setting a register in Verilog, the data goes — somewhere — and the rest really isn’t your problem. You may have deliberately chosen the exact address to write to, but its not like you can glance at a stick of RAM and see the data. And you almost certainly can’t rewrite it by hand. (If you can do either of those things, let us know.)

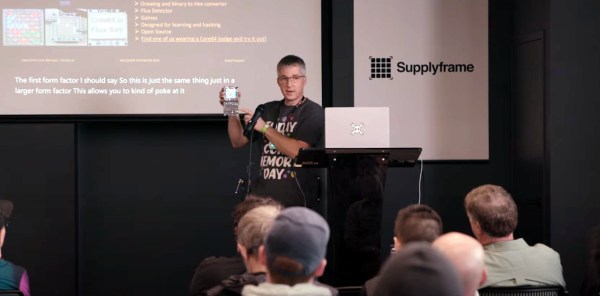
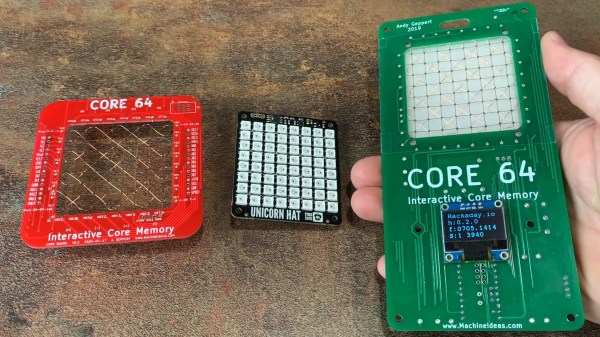
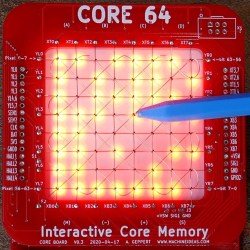
These limitations must have bothered [Andy Geppert], because he set out to bring computer memory into the tangible (or at least, visible) world with his interactive memory badge Core 64. [Andy] has gone through a few different iterations, but essentially Core 64 is an 8×8 grid of woven core memory, which stores each bit via magnetic polarization, with a field of LEDs behind it that allow you to visualize what’s stored. The real beauty of this setup is that it it can be used to display 64 pixel graphics. Better yet — a bit can be rewritten by introducing a magnetic field at the wire junction. In other words, throw a magnet on a stick into the mix and you have yourself a tiny drawing tablet!
This isn’t the first time we’ve seen cool experiments with core memory, and not even the first time we’ve seen [Andy] use it to make something awesome, but it really illuminates how the technology works. Being able to not only see memory being written but to manually write to it makes it all so much realer, somehow.

Continue reading “Visualizing Magnetic Memory With Core 64”

Soviet Core Memory Experiments

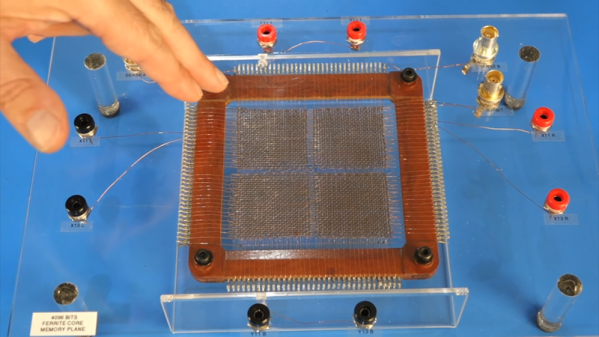
What do you do when you’ve bought some old Soviet core memory modules on eBay? If you are [CuriousMarc], you wire it up to some test connectors and use your test bench to see if the core memory still works. Spoiler alert: it does.

While it seems crude by today’s standard, there was a time when these memory modules would have been the amazing miniature tech of their day. Each little magnetic torus represents a bit and the modules have 1,024 and 4,096 tiny little donuts strung together in a grid.

Continue reading “Soviet Core Memory Experiments”

Ken Shirriff Unfolds A Nuclear Missile Guidance Computer With Impressive Memory

Longtime followers of [Ken Shirriff’s] work are accustomed to say asking “Where does he get such wonderful toys?”. This time around he’s laid bare the guidance computer from a Titan missile. To be specific, this is the computer that would have been found in the Titan II, an intercontinental ballistic missile that you may remember as a key part of the plot of the classic film WarGames. Yeah, those siloed nukes.

Amazingly these computers were composed of all digital logic, no centralized controller chip in this baby. That explains the need for the seven circuit boards which host a legion of logic chips, all slotting into a backplane.

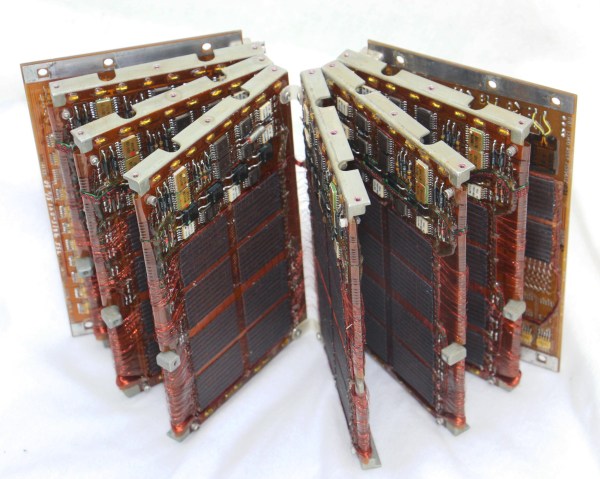
But it’s not the logic that’s mind-blowing, it’s the memory. Those dark rectangles on almost every board in the image at the top of the article are impressively-dense patches of magnetic core memory. That fanout is one of two core memory modules that are found in this computer. With twelve plates per module (each hosting two bits) plus a parity bit on an additional plate, words were composed of 25-bits and the computer’s two memory modules could store a total of 16k words.

This is 1970’s tech and it’s incredible to think that when connected to the accelerometers and gyros that made up the IMU this could use dead reckoning to travel to the other side of the globe. As always, [Ken] has done an incredible job of walking through all parts of the hardware during his teardown. He even includes the contextual elements of his analysis by sharing details of this moment in history near the end of his article.

If you want to geek out a little bit more about memory storage of yore, you can get a handle on core, drum, delay lines, and more in Al Williams’ primer.

Interactive Core Memory Shield Helps Explains The Past

[Andy Geppert] sends in his incredibly clever interactive core memory shield. 

In a great display of one hacker’s work being the base for another’s, [Andy] started out with [Jussi Kilpelainen]’s core memory shield for Arduino.  As he was playing with the shield he had a desire to “see” the core memory flipping and got the idea to add an LED matrix aligned behind the individual cores.

The first iteration worked, but it only showed the state that the Arduino believed the core memory to be in. What he really wanted was a live read on the actual state. He realized that an Adafruit Featherwing 8×8 matrix display also fits behind the core memory. Now the LEDs update based on the read state of the core memory. This allows him to flip the individual bits with a magnetic stylus and see the result. Very cool.

You can see a video of it working after the break.

Continue reading “Interactive Core Memory Shield Helps Explains The Past”

Core Rope Memory Makes One Of The Oddest LED Flashers We’ve Ever Seen

If you’ve heard of core rope memory, it will probably be in the context of vintage computing equipment such as Apollo-era NASA hardware. A string of magnetic cores and sense wires form a simple ROM arrangement, which though long-ago-superceded by semiconductor memory remains possible to recreate by the experimenter. It’s a path [Nicola Cimmino] has trodden, as he’s not only made a few nibbles of core rope memory, but incorporated it with an Arduino as part of one of the most unusual LED flashers we’ve ever seen. The memory holds a known sequence of bits which is retrieved in sequence by the Arduino, and the LED is kept flashing as long as the read values conform to those expected.

The memory itself is simple enough (and not to be confused with magnetic core memory). The cores are ferrite rings that form a sequence of small transformers that become the bits of the memory. Individual bits are set high or low by either passing a sense wire through a core to create a primary, or bypassing it. Multiple sense wires can be used for separate nibbles in the same cores, so for example his four nibbles all share the same four cores. Pulses are sent down the wires, either passing through a core or not, and equivalently picked up or not on sense lines.

In this case the sense wire is driven directly to ground by Arduino pins which means that the circuit is relying upon the current limiting of the ATmega328 to avoid destroying itself, it’s possible we’d add a driver transistor. The bits are read meanwhile from the secondary windings through a diode rectifier and capacitor to an Arduino analogue pin.

Core memory has been paired with an Arduino before on these pages, though of the RAM variety.