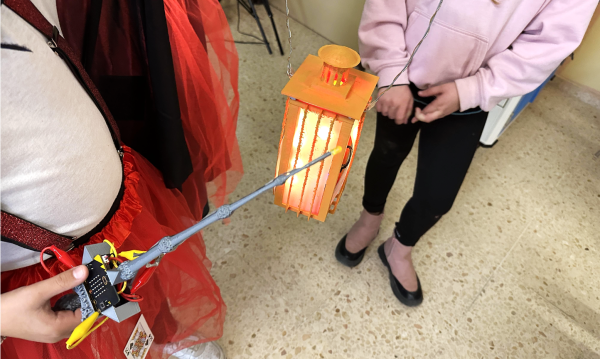
Watch This Scaly Gauntlet’s Hypnotizing, Rippling Waves

[Will Cogley]’s mechanized gauntlet concept sure has a hypnotizing look to it, and it uses only a single motor. Underneath the scales is a rod with several cams, each of which moves a lever up and down in a rippling wave as it rotates. Add a painted scale to each, and the result is mesmerizing. This is only a proof of concept prototype, and [Will] learned quite a few lessons when making it, but the end result is a real winner of a visual effect.

The gauntlet uses one motor, 3D printed hardware, and a mechanical linkage between the wrist and the rest of the forearm. Each of the scales is magnetically attached to the lever underneath, which provides some forgiveness for when one inevitably bumps into something. You can see the gauntlet without the scales in the video, embedded below the break, which should make clear how the prototype works.

The scales were created with the help of a Mayku desktop vacuum former by making lightweight copies of 3D printed scales. Interestingly, 3D printing each scale with full supports made for a useful mold; there was no need to remove supports from underneath the prints, because they are actually a benefit to the vacuum forming process. When vacuum forming, the presence of overhangs can lead to plastic wrapped around the master, trapping it, but the presence of the supports helps prevent this. 3D prints don’t hold up very well to the heat involved in vacuum forming, but they do well enough for a short run like this. Watch it in action and listen to [Will] explain the design in the video, embedded below.

Continue reading “Watch This Scaly Gauntlet’s Hypnotizing, Rippling Waves”

Remoticon Video: How To 3D Print Onto Fabric With Billie Ruben

We’re impressed to see the continued flow of new and interesting ways to utilize 3D printing despite its years in the hacker limelight. At the 2020 Hackaday Remoticon [Billie Ruben] came to us from across the sea to demonstrate how to use 3D printing and fabric, or other flexible materials, to fabricate new and interesting creations. Check out her workshop below, and read on for more detail about what you’ll find.

The workshop is divided into two parts, a hands-on portion where participants execute a fabric print at home on their own printer, and a lecture while the printers whirr away describing ways this technique can be used to produce strong, flexible structures.

The technique described in the hands on portion can be clumsily summarized as “print a few layers, add the flexible material, then resume the printing process”. Of course the actual explanation and discussion of how to know when to insert the material, configure your slicer, and select material is significantly more complex! For the entire process make sure to follow along with [Billie]’s clear instructions in the video.

The lecture portion of the workshop was a whirlwind tour of the ways which embedded materials can be used to enhance your prints. The most glamourous examples might be printing scales, spikes, and other accoutrement for cosplay, but beyond that it has a variety of other uses both practical and fashionable. Embedded fabric can add composite strength to large structural elements, durable flexibility to a living hinge, or a substrate for new kinds of jewelry. [Billie] has deep experience in this realm and she brings it to bear in a comprehensive exposition of the possibilities. We’re looking forward to seeing a flurry of new composite prints!

Hack Together Your Own Bat Signal

Bats use echolocation to see objects in front of them. They emit an ultrasonic pulse around 20 kHz (and up to 100 kHz) and then sense the pulses as they reflect off an object and back to the bat. It’s the same type of mechanism used by ultrasonic proximity sensors for object-avoidance. Humans (except perhaps the very young ones) can’t hear the ultrasonic pulses since the frequency is too high, but an inexpensive microphone in a simple bat detector could. As it turns out bat detectors are available off the shelf, but where’s the fun in that? So, like any good hacker, [WilkoL] decided to build his own.

[WilkoL’s] design is composed primarily of an electret microphone, microphone preamplifier, CD4040 binary counter, LM386 audio amplifier, and a speaker. Audio signals are analog and their amplitudes vary based on how close the sound is to the microphone. [WilkoL] wanted to pick up bat sounds as far away as possible, so he cranked up the gain of the microphone preamplifier by quite a bit, essentially railing the amplifiers. Since he mostly cares about the frequency of the sound and not the amplitude, he wasn’t concerned about saturating the transistor output.

The CD4040 then divides the signal by a factor of 16, generating an output signal within the audible frequency range of the human ear. A bat signal of 20 kHz divides down to 1.25 kHz and a bat signal of up to 100 kHz divides down to 6.25 kHz.

He was able to test his bat detector with an ultrasonic range finder and by the noise generated from jingling his keychain (apparently there are some pretty non-audible high-frequency components from jingling keys). He hasn’t yet been able to get a recording of his device picking up bats. It has detected bats on a number of occasions, but he was a bit too late to get it on video.

Anyway, we’re definitely looking forward to seeing the bat detector in action! Who knows, maybe he’ll find Batman.

Continue reading “Hack Together Your Own Bat Signal”

3D Printed DIY Neuralyzer

We agree with you. We can never have enough cosplay hacks. And the ones that include some electronics element definitely have a special place in our hearts. That’s why when we ran across [Maddogg0’s] 3D printed Neuralyzer on Instructables, we knew we had to share.

You may recall [How to make’s] DIY Neuralyzer that we featured a few weeks ago which required more of a metal-working approach. [Maddogg0’s] design might be a bit more convenient for those of you that have a 3D printer, but no machine shop.

We love the elegant simplicity of [Maddogg0’s] design. The entire enclosure is printed in two halves that are held together by magnets. One half of the enclosure houses a single coin cell battery and a tiny circuit board for holding the LEDs in place, really giving the Neuralyzer some shine. In true maker fashion, [Maddogg0] released the necessary design files on TinkerCAD so anyone can reuse, remix, and reshare.

Whichever design you fancy, [Maddogg0’s] or [How to make’s], be careful not to point the Neuralyzer at yourself and always remember to wear your sunglasses!


PCB Jewelry Never Looked So Good

[Gautchh] wanted to make something nice for his girlfriend. Being the DIY enthusiast he is, he thought a hand-made gift would resonate with her better than something he could pick up from the store. Enter NeckLight, a glow in the dark PCB necklace. He was first inspired by another project he ran across on Instructables, then decided to put his own little spin on the design. It’s cool how that works. Interestingly enough, it was his first time using Fusion 360, but you probably wouldn’t know that if you took a look at the results.

Aside from soldering, the trickiest part of this project was trying to get the LED intensities just right. [Gautchh] found the best way to do this was experimentally by testing each LED color with a series of resistors. He wanted to ensure he could get the color intensity and the LED current just right. Finally, with a touch of acetone, he was done (though he might want to try some alternatives to acetone next time).

[Gautchh] also thinks that this project would be a really nice way for beginners to learn surface mount (SMD) soldering. We’ve seen a few cool SMD LED projects before. Who could forget those competitive soldering challenges over at DEF CON?

Anyway. Thanks, [Gautchh]. We hope your girlfriend, and your dog, enjoyed their gifts.

Tips From A Former Niche Item Etsy Store

Etsy is a service aimed at providing a way for makers of handmade items to sell them online. [Bithead] closed up shop earlier this year and wrote up an interesting perspective on what did and didn’t work out. The main market for [Bithead]’s store was Star Wars cosplayers, because it all started with some Star Wars inspired com pads, some of which are pictured here.

One thing [Bithead] felt worked well overall was to “think big, start small, and scale fast.” In essence, bootstrap things by selling inventory on hand and carefully monitoring demand, then if demand is sustained, ramp up to larger batches, which are more efficient. The risk of making larger part orders and carrying more stock on hand is offset by the reliable demand. Waiting until solid data on reliable demand is available means missing out on early sales, but it’s a low risk approach that works well for niche products that have little or no real competition.

A couple things that didn’t work out were efforts to follow Etsy’s advice to add more products to attract a wider audience, and to try out tools for offering discounts and incentives aimed at turning abandoned carts into sales. Neither went well. The first resulted in adding items that sold poorly, diluted the focus of the store, and incurred a cost for each listing. The second never seemed to have any impact on sales whatsoever. Perhaps there is a place for these efforts, but [Bithead]’s niche market wasn’t it.

It’s a good read about how things went for an Etsy store that served a niche audience over three years. The perspective and experiences might be useful to anyone looking to turn a bright idea into something sold online, so if you’re at all interested, take a few minutes to check it out.

We’ve seen [Bithead]’s work before, this lightsaber-inspired violin bow was one project that went on to become a kit for sale.

Lighting Up Your Spectrespecs

In the ever-popular world of Harry Potter, a pair of Spectrespecs are useful if you’re hunting for wrackspurts and nargles. While we’ve never spotted either of these creatures ourselves, if you’d like to go out on a hunt, [Laveréna]’s build might be for you.

To start with, you’ll need the frames for the Spectrespecs. [Laveréna] elected to source hers commercially, but you can 3D print them or even craft them by hand if you so desire. Then, a TinyLily microcontroller board is installed, with its small size allowing it to be tucked neatly out of sight in the top of the sunglasses. Two NeoPixels are then installed, with the TinyLily programmed to flash the LEDs in the requisite blue and red colors for easy identification of supernatural creatures.

Tools such as cheap microcontrollers designed for wearables and low-cost addressable LEDs are making advanced cosplay designs easier than ever. Whipping up custom blinkables no longer requires knowledge of advanced multiplexing techniques and how to properly drive high-power LEDs. Of course, LED wearables do still get properly advanced – like this skin-based 7-segment display. If you’ve got a glowable project of your own that you’re dying to share, be sure to let us know!