A Simple Forth Development Board

forth

Forth is a very interesting programming language. It’s very flexible and is extremely efficient on low powered hardware, but unfortunately not very popular simply due to the fact that it’s not very popular. There were a few Forth-based microcomputers built in the 1980s, but these were largely unsuccessful.

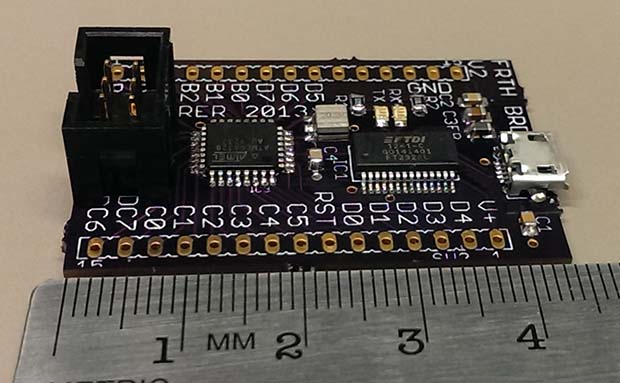
[Leon] is a Forth aficionado and came up with his own Forth development board in the hopes of Forth making a comeback. It’s a very small and cheap board – only about $12 in parts – but it’s still extremely powerful and a fun platform for investigating Forth.

Compared to other programming languages found in 80s microcomputers, Forth is just weird. It’s a stack-based language, so instead of adding two numbers like 3 + 4, Forth uses postfix notation (or Reverse Polish Notation) so the same statement is expressed as 3 4 +. It’s a much more efficient way for computers to handle data, and some claim it’s more efficient for humans as well.

[Leon] created his own board able to be programmed in Forth, shown above, that uses an ATMega328 microcontroller. He’s using AmForth to put Forth on his system, but also extended the base AmForth install with his own floating point version. making this version of Forth at least as powerful as any 80s microcomputer or ATMega development board is today.

[Leon] put together a great demo of the capabilities of Forth and his dev board. You can check that out below.

Continue reading “A Simple Forth Development Board”

How To Use The Kenetis KL25Z Freedom Board As An HID Mouse

[Eric] is interested in turning this Freedom development board into an air mouse by using the onboard accelerometer. But he had to work through the particulars of the USB HID mouse class before he could get that done.

This Freescale FRDM-KL25Z is one of the awesome ARM boards we looked at a year ago. Can you believe you can get this thing for like thirteen bucks? We suppose the gotcha is that the CodeWarrior IDE meant for use with them is not entirely free. But there is a free trial, and [Eric] shows how much easier it is to tailor the USB stack for your needs with it.

Don’t worry though. If you’re like us and use Open Source For The Win he’s got you covered as well. When you’re done reading his HID mouse writeup head on over to his six-part tutorial for building a free toolchain for the Kenetis boards.

Arduino-compatible, Quad-core ARM Dev Board

The Advent of the Raspberry Pi has seen an explosion in the market for ARM dev boards, sometimes even with pinouts for Arduino shields. The UDOO, though, takes those boards and ramps up the processing power for some very, very interesting builds.

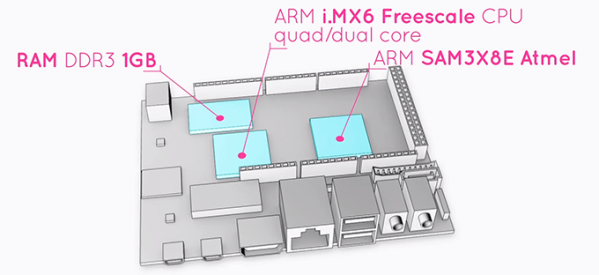
The UDOO comes equipped with a dual or quad-core ARM CPU running at 1GHz with 1 GB of RAM. Also on board is the Atmel SAM3X8E – the same chip in the new Arduino DUE – and has pinouts for all those Arduino shields you have lying around.

In addition to serving your next project as a souped-up Raspberry Pi, UDOO also includes 78 (!) GPIO pins, Gigabit Ethernet, a camera connector, one SATA port (on the quad-core version), and an LVDS header for attaching LCD monitors. Basically, the UDOO is the motherboard of an ARM-powered laptop with the pinouts to handle Arduino shields. It’s just like [Bunnie]’s laptop, only this time you can actually buy it.

The UDOO doesn’t come cheap, though: on the UDOO Kickstarter, the dual-core version is going for $150 while the quad-core is priced at $170. Still, if you need the power to run a pair of Kinects or want to build an awesome torrent box, you’d be hard pressed to find a more powerful board.

Etch Your Own CPLD Development Board

etch-your-own-cpld-breakout

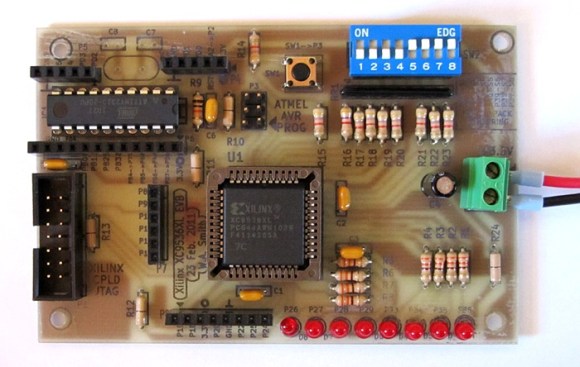
Ever wanted to make the jump from microcontrollers to logic chips? Although not technically the same thing we consider FPGA and CPLD devices to be in similar categories. Like FPGAs, Complex Programmable Logic Devices let you build hardware inside of a chip. And if you’ve got the knack for etching circuit boards you can now build your own CPLD development module. Long-time Hackaday readers will remember our own offering in this area.

Our years of microcontroller experience have taught us a mantra: if it doesn’t work it’s a hardware problem. We have a knack for wasting hours trying to figure out why our code doesn’t work. The majority of the time it’s a hardware issue. And this is why you might not want to design your own dev tools when just starting out. But one thing this guide has going for it is incremental testing. After etching and inspecting the board, it is populated in stages. There is test code available for each stage that will help verify that the hardware is working as expected.

The CPLD is programmed using that 10-pin header. If you don’t have a programmer you can build your own that uses a parallel port. Included on the board is an ATtiny2313 which is a nice touch as it can simulate all kinds of different hardware to test with your VHDL code. There is also a row of LEDs, a set of DIP switches, and a few breakout headers to boot.

Impressive Dev Boards For Your STM32 Dev Boards

stm32-discovery-breakout-boards

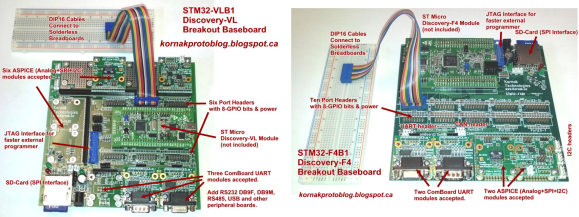
It seems there are a lot of people who have the same complaint about the STM32 Discovery boards; it can be difficult to add external hardware to them. Don’t get us wrong, we appreciate all of the pins being broken out (as opposed to the Stellaris Launchpad which we think has too few available). Here’s [Scot Kornak’s] solution to the problem. He created three different baseboards which the STM32 Discovery plugs into. Each is for a different model of dev board: the VL, F3, and F4. But he also thinks the baseboard we saw in this other project is a good choice for an F4 solution.

These large PCB add-ons bring functionality in two different ways. The first is by using expandable ports for drop in modules like serial communications connectors or Analog/SPI/I2C modules. For us, the second method is the most desirable. He routes each GPIO port to a 2×8 header and uses IDC cables (rainbow cable in these images) to connect them to a breadboard. Seeing this makes us wish STM had used discreet clusters of 16 pins instead of those super long dual pin headers.

Organ Pedals Fill In When Your Bass Player Is Missing

organ-foot-pedals-instead-of-string-bass

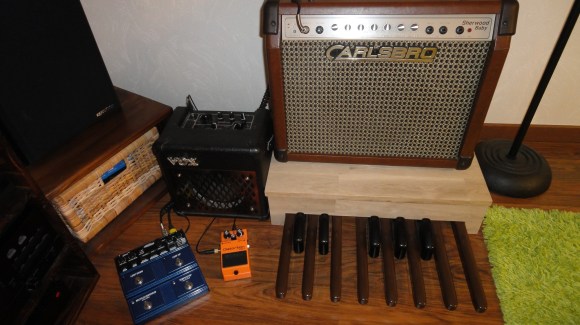
Since his string bass player isn’t always around [Antoine] built his own electric bass stand-in using the pedals from an old organ. The project — which he calls the Organ Donor — was inspired by a similar standalone organ pedal bass project. That instrument was built using a 555 timer to generate the sound. But [Antoine] has a little more room for growth as he’s using an old microcontroller development board to generate sound.

The octaves worth of pedals were pulled from an old broken Yamaha A55 Electone organ. After extracting the assembly from the instrument he built a nice wooden case around it. This doubles as a stand for the amplifier which broadcasts the sound. An old Freescale development board is wired up to twelve of the keys (the top C is unused). It generates a square wave at the appropriate frequency for each key. This signal is fed through a low-pass filter before being routed to the audio jack on the back of the case.

Future improvements include building an amplifier into the pedal assembly. We would also love to see different signal processing to expand the range of sounds the pedals can generate. We’re not sure of the capabilities of that microcontroller, but it would be neat to hear tone generation using stored samples.

In-depth Comparison At STM32 F3 And F4 Discovery Boards

The STM32 F3 and F4 Discovery boards have been around for a while now. We’ve looked at both separately and they’re impressive dev boards for the price. Now can get a closer look at each from this in-depth comparison of the two Cortex-M4 development tools.

To start off, both of the boards have the same size and footprint (there are two dual-row pin headers which break out the connections to the ARM chip). Fundamentally the F3 and F4 chips have a different level of features, but the boards themselves are aimed at different applications as well. The F3 series of microcontrollers looks to be more affordable than the F4, containing less program memory, no Ethernet capability, and only one USB port. But both have hardware floating-point abilities and they’re blazing fast. The boards offer a MEMS accelerometer for prototyping. But the Discovery-F3 also contains a gyroscope while the Discovery-F4 provides audio hardware like a microphone, and DAC.

If you want to use a Linux box to develop with these tools you might find this guide helpful.