Over-engineering Ding Dong Ditch

One day, [Samy]’s best friend [Matt] mentioned he had a wireless doorbell. Astonishing. Even more amazing is the fact that anyone can buy a software defined radio for $20, a small radio module from eBay for $4, and a GSM breakout board for $40. Connect these pieces together, and you have a device that can ring [Matt]’s doorbell from anywhere on the planet. Yes, it’s the ultimate over-engineered ding dong ditch, and a great example of how far you can take practical jokes if you know which end of a soldering iron to pick up.

Simply knowing [Matt] has a wireless doorbell is not enough; [Samy] needed to know the frequency, the modulation scheme, and what the doorbell was sending. Some of this information can be found by looking up the FCC ID, but [Samy] found a better way. When [Matt] was out of his house, [Samy] simply rang the doorbell a bunch of times while looking at the waterfall plot with an RTL-SDR TV tuner. There are a few common frequencies tiny, cheap remote controls will commonly use – 315 MHz, 433 MHz, and 900 MHz. Eventually, [Samy] found the frequency the doorbell was transmitting at – 433.8 MHz.

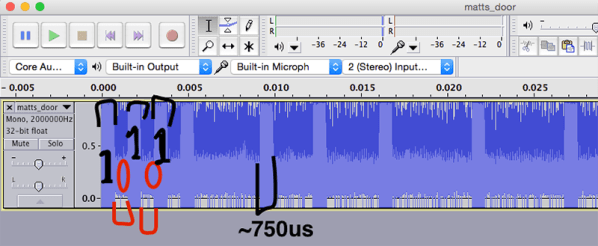
After capturing the radio signal from the doorbell, [Samy] looked at the audio waveform in Audacity. It looked like this doorbell used On-Off Keying, or just turning the radio on for a binary ‘1’ and off for a binary ‘0’. In Audacity, everything the doorbell transmits becomes crystal clear, and with a $4 434 MHz transmitter from SparkFun, [Samy] can replicate the output of the doorbell.

For the rest of the build, [Samy] is using a mini GSM cellular breakout board from Adafruit. This module listens for any text message containing the word ‘doorbell’ and sends a signal to an Arduino. The Arduino then sends out the doorbell code with the transmitter. It’s evil, and extraordinarily over-engineered.

Right now, the ding dong ditch project is set up somewhere across the street from [Matt]’s house. The device reportedly works great, and hopefully hasn’t been abused too much. Video below.

Continue reading “Over-engineering Ding Dong Ditch”

Doorbell

A 1920’s Doorbell Is Upgraded With 2010’s Technology

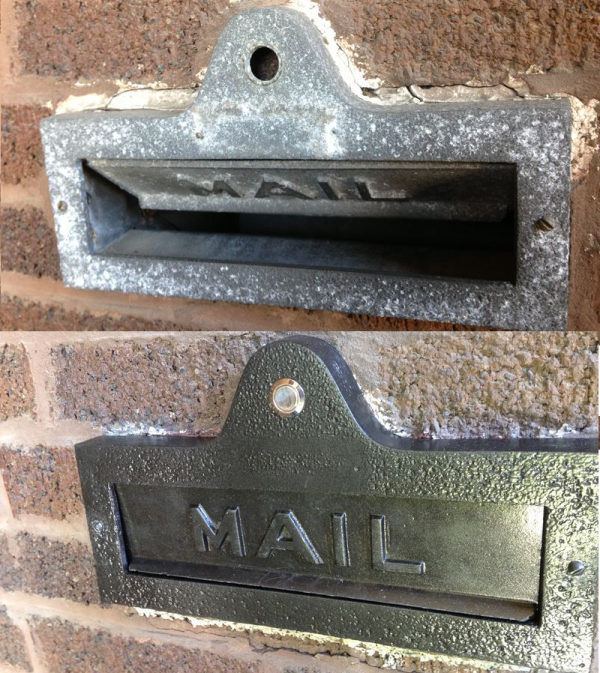
When you move into an old house, you are bound to have some home repairs in your future. [Ben] discovered this after moving into his home, built in 1929. The house had a mail slot that was in pretty bad shape. The slot was rusted and stuck open, it was covered in old nasty caulk, and it had a built-in doorbell that was no longer functional. [Ben] took it upon himself to fix it up.

The first thing on the agenda was to fix the doorbell. After removing the old one, [Ben] was able to expose the original cloth-insulated wiring. He managed to trace the wires back to his basement and, to his surprise, they seemed to be functional. He replaced the old doorbell button with a new momentary button and then hooked up a DIY doorbell using an XBee radio. [Ben] already had an XBee base station for his Raspberry Pi, so he was wrote a script that could send a notification to his phone whenever the doorbell was pushed.

Unfortunately, the old wiring just didn’t hold up. The push button only worked sporadically. [Ben] ended up purchasing an off the shelf wireless doorbell. He didn’t want to have to stick the included ugly plastic button onto the front of his house though, so [Ben] had to figure out how to trigger the new doorbell using the nice metallic button. He used the macro lens on his iPhone to follow the traces on the PCB until he was able to locate the correct points to trigger the doorbell. Then it was just a matter of a quick soldering job and he had a functional doorbell.

Once the electronics upgrades were complete, he moved on to fixing up the look of the mail slot. He had to remove the rust using a wire brush and sandpaper. Then he gave it a few coats of paint. He replaced the original natural insulation with some spray foam, and removed all the old nasty caulk. The final product looks as good as new and now includes a functional wireless doorbell.

We’re big fans of salvaging old-school home hardware. Another example that comes to mind is this set of door chimes with modernized driver.

Adding Features To The DoorBot

network sniffing doorbell

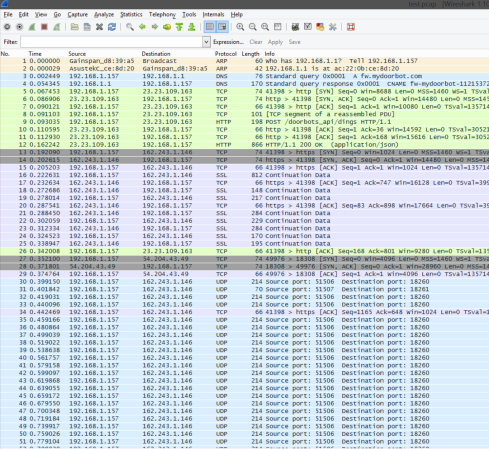
There’s an interesting network-enabled doorbell on the market from Edison Junior called the DoorBot that boasts some useful features, notably that it can make calls to a phone when someone pushes the button for the doorbell. However, [MadBeggar] saw the potential in this device and couldn’t wait to get some more functionality out of it, so he has reverse engineered the communications protocol for the doorbell.

His goals for the project were to implement third-party notifications such as text messaging, VoIP/SIP integration, and maybe even a desktop client. So far he has only been able to analyze the communications protocol but he hopes that others will be able to build upon his work or even add features he hasn’t thought of yet. The makers of the device promise to eventually deliver on some of these features but so far haven’t delivered.

There are some other projects out there that integrate wireless connectivity with a doorbell. However, [MadBeggar] notes that the DoorBot really stands out among all of the internet-enabled doorbell, mostly because nothing else around is as clean or is as easy to install as the DoorBot. He just wishes that the software wasn’t so clunky and that it had its full potential unlocked with these extra features. We’d say he’s on the right track!

Raspberry Pi Spies On Your Front Door

doorbell pictures

One of [Sander]’s first projects with a Raspberry Pi was to get it to send messages to his iPhone. From there he decided to take it a step further and wire the tiny computer up to his doorbell, creating a system that can send push messages to his phone whenever someone is at the front door.

[Sander]’s doorbell is wireless, and he decided to keep all of its original functionality. All it took to signal the Pi was a simple circuit tied to the doorbell’s status LED which turns off whenever the doorbell is pushed.

The Raspberry Pi runs a python program that handles the GPIO pin which is wired to the doorbell. When the doorbell is pushed, the program processes and sends the push notification while taking pictures of the visitor with an attached webcam. The pictures are included in the message so [Sander] can see who is at the front door. The code for the project is included on his project page.

This project rang a bell for us since we’ve seen projects using a Raspberry Pi and push notifications. None of them so far have included a webcam or utilized an existing wireless doorbell though, and this is a great step forward!

The PebblyPi: A Smart Doorbell

PebblyPi

A Pebble smart watch, and a Raspberry Pi. They are a perfect match. This is probably what [Daniel] thought when he embarked upon his latest project, a smart doorbell called the PebblyPi (tip submitted by [Ben]).

The actual project is quite easy to implement. All you need really need is a Raspberry Pi, a switch, a resistor, and a Pebble Smart Watch (plus a smart phone). Using a simple Python script on the Raspberry Pi, button press notifications are sent to Pushover, which allows the notification to arrive on your smart phone (and thus your Pebble Smart Watch). Pushover is a very cool notification service for Android devices, iPhones, iPads, and your Desktop. The concept behind this project is great, and the fact that it is so simple to implement opens up many other possibilities for interfacing your home electronics with the Pebble Smart Watch (or even just your smart phone). The ability to create custom notifications on any of your devices using any internet connected system is amazing!

You could receive notifications from your absurdly accurate weather station, or even your soil moisture monitor. Have you used Pushover in any of your projects? The possibilities are endless!

Continue reading “The PebblyPi: A Smart Doorbell”

DIY Bell For Your Trains Of Lionel

[Peter]’s dad recently rekindled his love for Lionel trains and wanted a bell to keep the crossings safe for O gauge drivers and pedestrians. Using parts he had lying around and a doorbell from the hardware store, [Peter] concocted this DIY train crossing bell at his dad’s request.

The idea was to make the bell chime about once per second. To achieve this, [Peter] used a non-repeating electro-mechanical doorbell that emits a single note on continuous press. You could also roll your own bell with a spring-loaded solenoid and something bell-like for it to strike.

[Peter]’s three-stage design uses a full-wave bridge rectifier to convert the AC from the train transformer to DC. He drops it to 5V and sends it through a 555 and some resistors to set the frequency and duty cycle. His output section translates the voltage back up to match the input desired by the doorbell.  [Peter] included a 1N4002 as a back EMF snubber to keep feedback from damaging the power MOSFET. Stick around for his demonstration video after the jump.

Continue reading “DIY Bell For Your Trains Of Lionel”

Mario Doorbell Guaranteed To Drive A-You A-Crazy

marioDoorbell

Is your doorbell not exciting enough for your guests? [Joe] wanted to provide a little entertainment for his visitors, so he redesigned his doorbell with a Mario theme.

Whenever someone presses the button—which carries the Mario coin image—the segment display increments and the Mario coin sound plays. To add variety, the life-up sound plays at every 10 coins and the mushroom upgrade sound plays upon reaching 100. [Joe] tried putting the life-up sound at its appropriate 100’s place and the mushroom sound at every 10, but he decided the brevity of life-up was more tolerable in the 10’s slot.

The project was divided into two components. The door button has a PIC16F628A microcontroller with a dual 7-segment LED display, a button, and a homemade circuit board. All this lives in a simple box covered by a Yoshi’s Island-themed decal. The button’s board connects to a separate ringer board—based around a PIC16F87—with a MCP4822 DAC and a 25LC1024 EEPROM. Button presses on the first board prompt a request for a sound clip read on the EEPROM. Keep clicking for a demo video below.

Continue reading “Mario Doorbell Guaranteed To Drive A-You A-Crazy”