RaspPi Photo Frame

Raspberry Pi Powered Super Digital Photo Frame

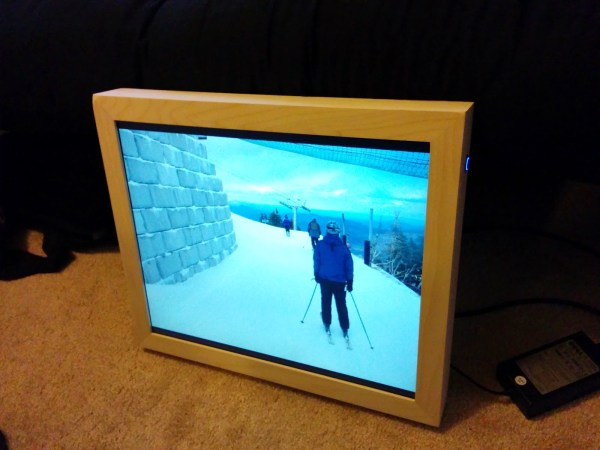
HaD reader [Greg] just finished an LCD picture frame project he’s been working on for a while. This is no ordinary photo display. His brother came up with the idea of having a device to display photos that could be changed remotely. [Greg] gave it some thought and came up with a plan; use a Raspi as the brains, connect to the internet via WiFi and display photos stored in a specific Google Drive folder. Any authorized user can upload photos remotely to the frame so the frame-owner has a constant stream of new photos to view.

Of course, using an off-the-shelf picture frame may have been too easy. Instead [Greg] decided to start with an old computer monitor and wrap it in a wooden frame so it looks good. Mounted to the back of the LCD is a Raspberry Pi with a USB WiFi dongle. The monitor runs at 14 VDC and luckily has an external power supply. Since the Pi runs at 5 V, a buck converter taps into the LCD’s input power and outputs a Pi-happy 5 volts.

This project doesn’t stop with displaying photos! The user can also switch to a weather view. The weather image displayed is generated from weather data pulled from the internet in the exact same manor used by folks who make stand-alone weather displays out of old Kindles. Oh yeah, switching between photos and weather is done by wireless remote! On the frame unit itself there is only one button, but it has 3 functions: A quick press turns the screen off, a short hold syncs with Google Drive and a long hold powers off the RaspPi.

If you’d like to make your own frame, [Greg] has graciously made all his scripts available for download…. not to mention his very detailed build log.

Quadcopter Beer Delivery System

One of the major design challenges when it comes to building an efficient quadcopter is weight. The idea here is that the more you can trim down the weight of the frame, motors, and circuitry, the longer the batteries will last. Or, in [dalbyman]’s case, the more beer it can carry.

[Dalbyman]’s housemate built the actual quadcopter, but then [dalbyman] got a little inebriated and decided that, while the quadcopter was exciting on its own, it would be even better with this modification. The actual device is a modified Pringles can with two servo motors on the bottom with arms that hold the beer. A parachute is attached to the beverage can and the assembly is loaded in. With a simple press of a button, the servos turn the arms and the beer falls out of the tube. Hopefully the parachute deploys and gently (and accurately) floats the beer to the thirsty person on the ground!

This project is a simple step that goes a long way towards a beer delivery system even Amazon could be proud of, and also shows off the capabilities of quadcopters in general. Perhaps the next step could be to automate the beer delivery system!


3D Windows Manager for Oculus

Using The Oculus Rift As A Multi-Monitor Replacement

[Jason] has been playing around with the Oculus Rift lately and came up with a pretty cool software demonstration. It’s probably been done before in some way shape or form, but we love the idea anyway and he’s actually released the program so you can play with it too!

It’s basically a 3D Windows Manager, aptly called 3DWM — though he’s thinking of changing the name to something a bit cooler, maybe the WorkSphere or something.

As he shows in the following video demonstration, the software allows you to set up multiple desktops and windows on your virtual sphere created by the Oculus — essentially creating a virtual multi-monitor setup. There’s a few obvious cons to this setup which makes it a bit unpractical at the moment. Like the inability to see your keyboard (though this shouldn’t really be a problem), the inability to see people around you… and of course the hardware and it’s lack of proper resolution. But besides that, it’s still pretty awesome!

In the future development he hopes to add Kinect 2 and Leap Motion controller integration to help make it even more user intuitive — maybe more Minority Report style.

Continue reading “Using The Oculus Rift As A Multi-Monitor Replacement”

Over-engineering Ding Dong Ditch

One day, [Samy]’s best friend [Matt] mentioned he had a wireless doorbell. Astonishing. Even more amazing is the fact that anyone can buy a software defined radio for $20, a small radio module from eBay for $4, and a GSM breakout board for $40. Connect these pieces together, and you have a device that can ring [Matt]’s doorbell from anywhere on the planet. Yes, it’s the ultimate over-engineered ding dong ditch, and a great example of how far you can take practical jokes if you know which end of a soldering iron to pick up.

Simply knowing [Matt] has a wireless doorbell is not enough; [Samy] needed to know the frequency, the modulation scheme, and what the doorbell was sending. Some of this information can be found by looking up the FCC ID, but [Samy] found a better way. When [Matt] was out of his house, [Samy] simply rang the doorbell a bunch of times while looking at the waterfall plot with an RTL-SDR TV tuner. There are a few common frequencies tiny, cheap remote controls will commonly use – 315 MHz, 433 MHz, and 900 MHz. Eventually, [Samy] found the frequency the doorbell was transmitting at – 433.8 MHz.

After capturing the radio signal from the doorbell, [Samy] looked at the audio waveform in Audacity. It looked like this doorbell used On-Off Keying, or just turning the radio on for a binary ‘1’ and off for a binary ‘0’. In Audacity, everything the doorbell transmits becomes crystal clear, and with a $4 434 MHz transmitter from SparkFun, [Samy] can replicate the output of the doorbell.

For the rest of the build, [Samy] is using a mini GSM cellular breakout board from Adafruit. This module listens for any text message containing the word ‘doorbell’ and sends a signal to an Arduino. The Arduino then sends out the doorbell code with the transmitter. It’s evil, and extraordinarily over-engineered.

Right now, the ding dong ditch project is set up somewhere across the street from [Matt]’s house. The device reportedly works great, and hopefully hasn’t been abused too much. Video below.

Continue reading “Over-engineering Ding Dong Ditch”

Reverse-Engineering A Game Boy Clone’s Boot ROM

[nitro2k01] got his hands on a Game Fighter, a clone of the original Game Boy. While there’s a ton of information about the boot ROM and operation of the original Game Boy, not much is known about these clones. [nitro2k01] wanted to learn more, so he used a clock-glitching technique to dump the device’s ROM and made some interesting discoveries about its copyright protection and boot process along the way.

Reading the contents of the Game Boy ROM is a bit challenging. The ROM is readable while booting, but afterwards the address space of the ROM is remapped for interrupt vectors and other uses. There are a couple of methods to get around this, but the simplest method involves glitching the crystal by grounding one of its leads. This causes the CPU to jump to random locations in memory. Eventually the CPU will jump to a location where the boot ROM is accessible (if you’re lucky!).

Although [nitro2k01]’s clone can run the same games as the Game Boy, it has a different boot ROM and also has some significant hardware differences. [nitro2k01] managed to use a modified version of the crystal-grounding technique to glitch his clock and dump the clone’s boot ROM. He found that the clone uses an unusual variation on the Game Boy’s copyright-checking technique, along with some other oddities. [nitro2k01] also posted a disassembly of the boot ROM, which he explains in detail.

Thanks for the tip, [Ove].

Fail Of The Week: Teddy Top And Fourteen Fails

Last summer, [Quinn] made the trip out to KansasFest, the annual Apple II convention in Kansas City, MO. There, she picked up the most modern Apple II system that wasn’t an architecturally weird IIGS: she lugged home an Apple IIc+, a weird little machine that looks like an old-school laptop without a screen.

Not content with letting an old computer just sit on a shelf looking pretty, [Quinn] is working on a project called the Teddy Top. ‘Teddy’ was one of the code names for the Apple IIc, and although add-ons to turn this book-sized computer into something like a laptop existed in the 80s, these solutions have not withstood the test of time. [Quinn] is building her own clamshell addition to her IIc+, and somehow failing at something she’s done hundreds of times before.

While the IIc+ has an NTSC composite output, the super-special video add-ons for the IIc+ used a DB15 expansion connector. Here, any add-on could access video sync signals, the a sound signal from the audio circuit, and even a +12V line that could drive loads up to 300 mA. It just so happened the display [Quinn] is using for this project runs at 12V, 200 mA. Everything was great, but as a worthy trustee of this computer’s Earthly existence, [Quinn] thought a bit of current limiting should be included in her addon. She designed a circuit around an NPN power transistor, that would allow the display to draw power until the load was around 250mA. After that, the transistor would start dumping excess power as heat. Yes, a fuse would be better. [Quinn] calls this Fail #1. There are thirteen more to go.

Continue reading “Fail Of The Week: Teddy Top And Fourteen Fails”

Reverse Engineering Super Animal Cards

If you don’t have a niece or nephew we encourage you to get one because they provide a great excuse to take apart kids’ toys.

[Sam] had just bought some animal-themed trading cards. These particular cards accompany a card-reader that uses barcodes to play some audio specific to each animal when swiped. So [Sam] convinces her niece that they should draw their own bar codes. Of course it’s not that easy: the barcodes end up having even and odd parity bits tacked on to verify a valid read. But after some solid reasoning plus trial-and-error, [Sam] convinces her niece that the world runs on science rather than magic.

But it can’t end there; [Sam] wants to hear all the animals. Printing out a bunch of cards is tedious, so [Sam] opens up the card reader and programs and Arduino to press a button and blink an IR LED to simulate a card swipe. (Kudos!) Now she can easily go through all 1023 possible values for the animal cards and play all the audio tracks, and her niece gets to hear more animal sounds than any child could desire.

Along the way, [Sam] found some interesting non-animal sounds that she thinks are Easter eggs but we would wager are for future use in a contest or promotional drawing or something similar. Either way, its great fun to get to listen in on more than you’re supposed to. And what better way to educate the next generation of little hackers than by spending some quality time together spoofing bar codes with pen and paper?