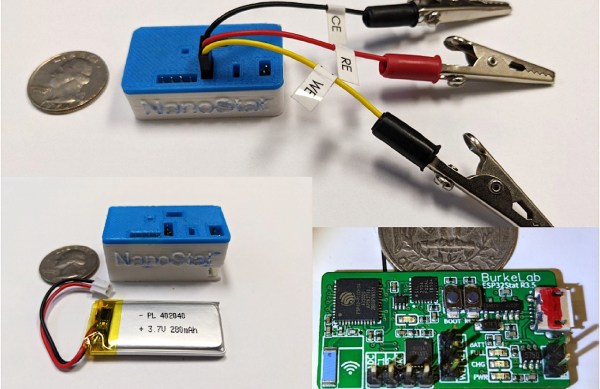
Picture of NanoStat in 3D-printed enclosure with LiPo battery and US quarter for scale.

An ESP32-Based Potentiostat

Ever wanted to make your own wireless chemical sensor? Researchers from the University of California, Irvine (UC Irvine) have got you covered with their ESP32-based potentiostat.

We’ve talked about potentiostats here on Hackaday before. Potentiostats are instruments that analyze the electrical properties of an electroactive chemical cell. Think oxidation and reduction reactions (redox) from your chemistry course, if you can remember that far back. Potentiostats can be used in several different modes/configurations, but the general idea is for these instruments to induce redox reactions within a given electroactive chemical cell and then measure the resulting current produced by the reaction. By measuring the current, researchers can determine the concentration of a known substance within a sample or even determine the identity of an unknown substance, to name a few potential applications.

These instruments have become mainstays in research labs around the world and have incredible utility in the consumer space. Glucometers, devices used to measure blood glucose levels, are an example of technologies that have made their way into everyday life due to the advances made in electrochemistry and potentiostat research over the last few decades. Given their incredible utility to scientific research and medical technologies, a great deal of effort has gone into democratizing potentiostats, making them more available to the general public for educational and hobbyist purposes. Of course, any medical applications must go through rigorous testing and approvals by each country’s appropriate governing bodies. So we’re talking more non-medical purposes here.

The first popular open-source, DIY potentiostat was the CheapStat, which we’ve covered here on Hackaday before. Since then, developing newer and more advanced open-source potentiostats has become a popular endeavor within the scientific community. The researchers from UC Irvine wanted to put their own special spin on the open-source potentiostat craze and they did so with their inclusion of the ESP32 as their main processor. This obviously opens up them up do a whole host (see what we did there) of wireless capabilities that others before them have not explored.

With the ESP32, they developed a nice web-based GUI that makes controlling and collecting data from the potentiostat very seamless and user-friendly. You can imagine the great possibilities here. Teacher-led classroom demonstrations where the instructor can easily access each student’s device over the cloud to help troubleshoot or explain results. Developing soil monitoring sensors that can be deployed all around a farm to remotely collect data on feed, soil composition, and plant health. The possibilities here sure are promising.

We hope you’ll dive into their paper as it’s well worth a read. Happy hacking, Hackaday.

Low Cost Metal 3D Printing By Electrochemistry

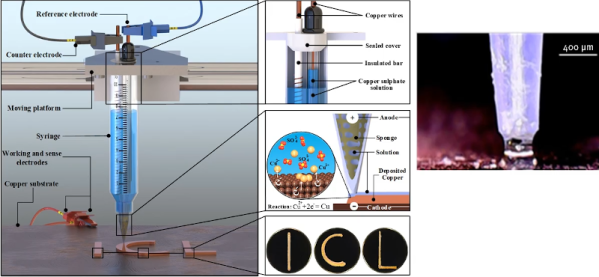
[Billy Wu] has been writing for a few years about electrochemical 3D printing systems that can handle metal. He’s recently produced a video that you can see below about the process. Usually, printing in metal means having a high-powered laser and great expense. [Wu’s] technique is an extension of electroplating.

Boiling down the gist of the process, the print head is a syringe full of electroplating solution. Instead of plating a large object, you essentially electroplate on tiny areas. The process is relatively slow and if you speed it up too much, the result will have undesirable properties. But there are some mind-bending options here. By using print heads with different electrolytes, you can print using different metals. For example, the video shows structures made of both copper and nickel. You can also reverse the current and remove metal instead of depositing it.

This looks like something you could pretty readily replicate in a garage. Electroplating is well-understood and the 3D motion parts could be a hacked 3D printer. Sure, the result is slow but, after all, slow is a relative term. You might not mind taking a few days to print a metal object compared to the cost and trouble of creating it in other ways. Of course, since this is copper, we also have visions of printing circuit board traces on a substrate. We imagine you’d have to coat the board with something to make it conductive and then remove that after all the copper was in place. When you build this, be sure to tell us about it.

We’ve seen electroplating pens before and that’s really similar to this idea. Of course, you can also make your 3D prints conductive and plate them which is probably faster but isn’t really fully metal.

Continue reading “Low Cost Metal 3D Printing By Electrochemistry”

Electrochemistry At Home

A few years ago, I needed a teeny, tiny potentiostat for my biosensor research. I found a ton of cool example projects on Hackaday and on HardwareX, but they didn’t quite fulfill exactly what I needed. As any of you would do in this type of situation, I decided to build my own device.

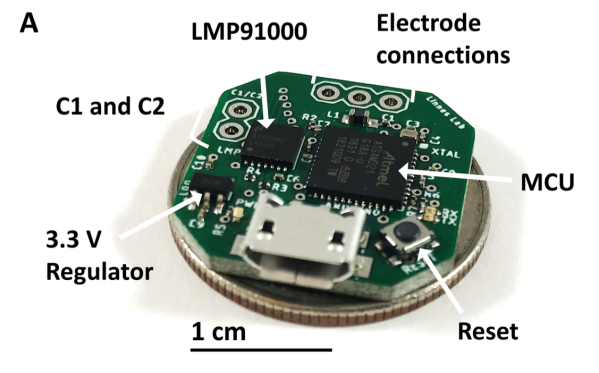
Now, we’ve talked about potentiostats before. These are the same devices used in commercial glucometers, so they are widely applicable to a number of biosensing applications. In my internet perusing, I stumbled upon a cool chip from Texas Instruments called the LMP91000 that initially appeared to do all the hard work for me. Unfortunately, there were a few features of the LMP91000 that were a bit limiting and didn’t quite give me the range of flexibility I required for my research. You see, electrochemistry works by biasing a set of electrodes at a given potential and subsequently driving a chemical reaction. The electron transfer is measured by the sensing electrode and converted to a voltage using a transimpedance amplifier (TIA). Commercial potentiostats can have voltage bias generators with microVolt resolution, but I only needed about ~1 mV or so. The problem was, the LMP91000 has a resolution of ~66 mV on a 3.3 V supply, mandating that I augment the LMP991000 with an external digital-to-analog converter (DAC) as others had done.

However, changing the internal reference of the LMP91000 with the DAC confounded the voltage measurements from the TIA, since the TIA is also referenced to the same internal zero as the voltage bias generator. This seemed like a problem other DIY solutions I came across should have mentioned, but I didn’t quite find any other papers describing this problem. After punching myself a little, I thought that maybe it was a bit more obvious to everyone else except me. It can be like that sometimes. Oh well, it was a somewhat easy fix that ended up making my little potentiostat even more capable than I had originally imagined.

I could have made a complete custom potentiostat circuit like a few other examples I stumbled upon, but the integrated aspect of the LMP91000 was a bit too much to pass up. My design needed to be as small as possible since I would eventually like to integrate the device into a wearable. I was using a SAMD21 microcontroller with a built-in DAC, therefore remedying the problem was a bit more convenient than I originally thought since I didn’t need an additional chip in my design.

I am definitely pretty happy with the results. My potentiostat, called KickStat, is about the size of a US quarter dollar with a ton of empty space that could be easily trimmed on my next board revision. I imagine this could be used as a subsystem in any number of larger designs like a glucometer, cellphone, or maybe even a smartwatch.

Check out all the open-source files on my research lab’s GitHub page. I hope my experience will be of assistance to the hacker community. Definitely a fun build and I hope you all get as much kick out of it as I did.

An All-Iron Battery Isn’t Light, But It’s Cheap

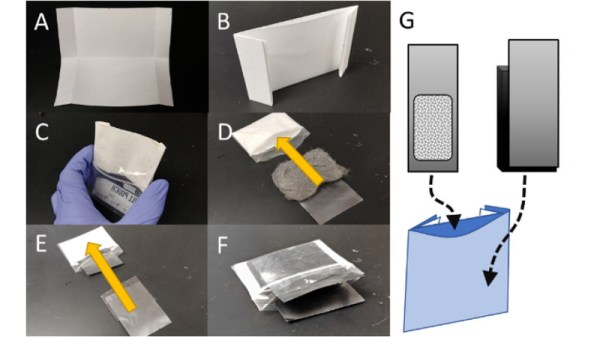
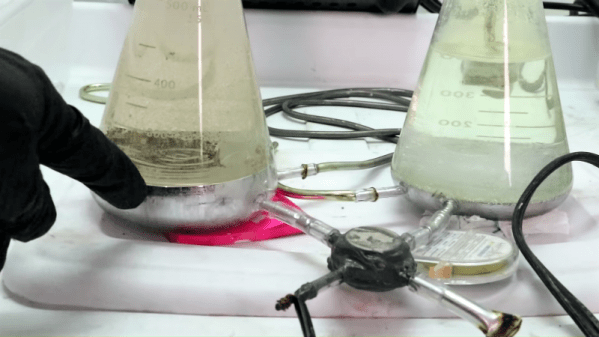
Rechargeable batteries are a technology that has been with us for well over a century, and which is undergoing a huge quantity of research into improved energy density for both mobile and alternative energy projects. But the commonly used chemistries all come with their own hazards, be they chemical contamination, fire risk, or even cost due to finite resources. A HardwareX paper from a team at the University of Idaho attempts to address some of those concerns, with an open-source rechargeable battery featuring electrode chemistry involving iron on both of its sides. This has the promise of a much cheaper construction without the poisonous heavy metal of a lead-acid cell or the expense and fire hazard of a lithium one.

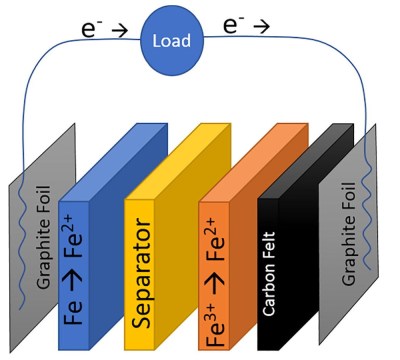
A diagram of the all-iron cell.

The chemistry of this cell is split into two by an ion-exchange membrane, iron (II) chloride is the electrolyte on the anode side where iron is oxidised to iron 2+ ions, and Iron (III) chloride on the cathode where iron is reduced to iron hydroxide. The result is a cell with a low potential of only abut 0.6V, but at a claimed material cost of only $0.10 per kWh Wh of stored energy. The cells will never compete on storage capacity or weight, but this cost makes them attractive for fixed installations.

It’s encouraging to see open-source projects coming through from HardwareX, we noted its launch back in 2016.

Thanks [Julien] for the tip.

Why Is Continuous Glucose Monitoring So Hard?

Everyone starts their day with a routine, and like most people these days, mine starts by checking my phone. But where most people look for the weather update, local traffic, or even check Twitter or Facebook, I use my phone to peer an inch inside my daughter’s abdomen. There, a tiny electrochemical sensor continuously samples the fluid between her cells, measuring the concentration of glucose so that we can control the amount of insulin she’s receiving through her insulin pump.

Type 1 diabetes is a nasty disease, usually sprung on the victim early in life and making every day a series of medical procedures – calculating the correct amount of insulin to use for each morsel of food consumed, dealing with the inevitable high and low blood glucose readings, and pinprick after pinprick to test the blood. Continuous glucose monitoring (CGM) has been a godsend to us and millions of diabetic families, as it gives us the freedom to let our kids be kids and go on sleepovers and have one more slice of pizza without turning it into a major project. Plus, good control of blood glucose means less chance of the dire consequences of diabetes later in life, like blindness, heart disease, and amputations. And I have to say I think it’s pretty neat that I have telemetry on my child; we like to call her our “cyborg kid.”

But for all the benefits of CGM, it’s not without its downsides. It’s wickedly expensive in terms of consumables and electronics, it requires an invasive procedure to place sensors, and even in this age of tiny electronics, it’s still comparatively bulky. It seems like we should be a lot further along with the technology than we are, but as it turns out, CGM is actually pretty hard to do, and there are some pretty solid reasons why the technology seems stuck.

Continue reading “Why Is Continuous Glucose Monitoring So Hard?”

[Cody] Builds A Chlorine Machine

In his continuing bid to have his YouTube channel demonetized, [Cody] has decided to share how he makes chlorine gas in his lab. Because nothing could go wrong with something that uses five pounds of liquid mercury and electricity to make chlorine, hydrogen, and lye.

We’ll be the first to admit that we don’t fully understand how the Chlorine Machine works. The electrochemistry end of it is pretty straightforward – it uses electrolysis to liberate the chlorine from a brine solution. One side of the electrochemical cell generates chlorine, and one side gives off hydrogen as a byproduct. We even get the purpose of the mercury cathode, which captures the sodium metal as an amalgam. What baffles us is how [Cody] is pumping the five pounds of mercury between the two halves of the cell. Moving such a dense liquid would seem challenging, and after toying with more traditional approaches like a peristaltic pump, [Cody] leveraged the conductivity of mercury to pump it using a couple of neodymium magnets. He doesn’t really explain the idea other than describing it as a “rail-gun for mercury,” but it appears to work well enough to gently circulate the mercury. Check out the video below for the build, which was able to produce enough chlorine to dissolve gold and to bleach cloth.

We need to offer the usual warnings about how playing with corrosive, reactive, and toxic materials is probably not for everyone. His past videos, from turning urine into gunpowder to mining platinum from the side of the road, show that [Cody] is clearly very knowledgeable in the ways of chemistry and that he takes to proper precautions. So if you’ve got a jug of mercury and you want to try this out, just be careful.

Continue reading “[Cody] Builds A Chlorine Machine”

Cheap PSoC Enables Electrochemistry Research

You may think electrochemistry sounds like an esoteric field where lab-coated scientists labor away over sophisticated instruments and publish papers that only other electrochemists could love. And you’d be right, but only partially, because electrochemistry touches almost everything in modern life. For proof of that look no further than your nearest pocket, assuming that’s where you keep your smartphone and the electrochemical cell that powers it.

Electrochemistry is the study of the electrical properties of chemical reactions and does indeed need sophisticated instrumentation. That doesn’t mean the instruments have to break the grant budget, though, as [Kyle Lopin] shows with this dead-simple potentiostat built with one chip and one capacitor. A potentiostat controls the voltage on an electrode in an electrochemical cell. Such cells have three electrodes — a working electrode, a reference electrode, and a counter electrode. The flow of electrons between these electrodes and through the solutions under study reveal important properties about the reduction and oxidation states of the reaction. Rather than connect his cell to an expensive potentiostat, [Kyle] used a Cypress programmable system-on-chip development board to do everything. All that’s needed is to plug the PSoC into a USB port for programming, connect the electrodes to GPIO pins, and optionally add a 100 nF capacitor to improve the onboard DAC’s accuracy. The video below covers the whole process, albeit with a barely audible voiceover.

Still not sure about electrochemistry? Check out this 2018 Hackaday Prize entry that uses the electrochemistry of life to bring cell phones back to life.

Continue reading “Cheap PSoC Enables Electrochemistry Research”