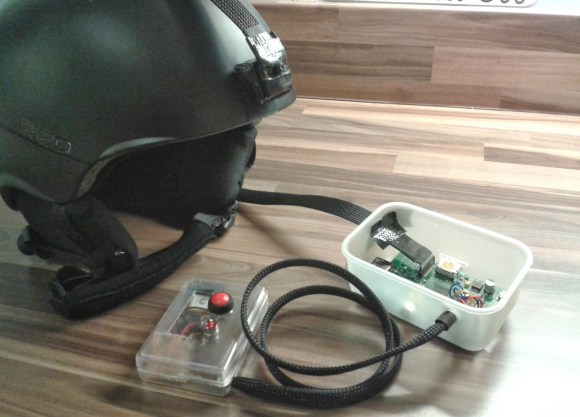
Hacking A Brother Thermal Printer To Use Non-OEM Continuous Rolls

You can get your hands on a Brother thermal label printer for $65-75. But if you don’t want to buy the Brother branded continuous feed paper for it you’re out of luck. Unless you pull off this hack which lets you use any thermal paper you want with a Brother QL-500 printer.

The printer is tied to the OEM paper because of a pattern printed on the back of the roll. It’s basically an encoder strip made up of black rectangles spaced at regular intervals. Surely there are other brands that come with this pattern on them, but if you want to use paper without it the secret is in moving the sensor that reads that strip.

The brilliant solution is to use one of the white feed-gears as an encoder wheel. [CheapSkateVideo] used a magic marker to paint two opposite quarters of the gear black. He then removed the optical sensor and placed it on the side of the case facing the wheel. It needs to be adjusted along the radius of that gear until the timing is just right, but once it is you’re ready to go. The sensor is a safety feature to ensure there is media in the printer. If there’s not you can burn up the print head so keep that in mind. See the explanation in the video after the break.

Continue reading “Hacking A Brother Thermal Printer To Use Non-OEM Continuous Rolls”

Turn Your Wireless Keyboard Into A MAME Controller!

For those of you that have a wireless keyboard laying around, you might be tempted to turn it into something else, like a wireless MAME controller. For those not familiar with it, MAME stands for “Multiple Arcade Machine Emulator” and is generally used to run older arcade games on a computer.

Encoders are available for this purpose, however, intending to save some money, and having an unused wireless keyboard, I decided to try to make one myself.  As far as I know there are no wireless encoders available for this purpose, so that was part of the motivation for trying this.

In this post I go over my mechanical design for the cabinet as well as the electrical process of going from keyboard to MAME controller. I did eventually get the thing working, but if more than a couple buttons were pressed simultaneously, some presses were omitted. The conclusion I eventually came to was that it was better to use an encoder to control everything. Not wireless, but much more reliable. If I absolutely needed a wireless controller in the future, I would think modding an actual wireless controller (or two) in a similar manner would have worked better for my purposes.

oscope_teardown

Rigol Oscilloscope Teardown And Repair

[Hotsolder] encountered a bad encoder in his Rigol Oscilloscope, so he opened it up in order to replace the damaged part. According to him, it was quite an adventure, so he documented the disassembly and component swap for the benefit of anyone else out there that might have to do the same.

The teardown is in the form of a slideshow, which is available on his site. The images are all pretty well annotated, so you should be able to follow along quite easily if you happen to be tearing one apart yourself. There’s not a ton of exotic things to see inside the scope, it pretty much contains what you would expect to see if you cracked one open.

The encoder replacement went off without a hitch, and he even took pictures of the defective one to discuss how it works.

It’s definitely a quick and interesting read if you are simply curious about oscilloscopes, or if you happen to need to dismantle yours.

[Thanks, oakkar7]

Digital Measuring Tape

You’ll never come up short with this measuring tape. That’s because there isn’t actually any tape in the device; it measures distance based on the rotation of a wheel. Roll it across the room and you’ll get an accurate measurement of the distance the little bugger traveled. Like the Etch-a-Sketch from Monday this uses the encoder wheel from a mouse as the input. The IR emitter and sensor from the ubiquitous peripheral find a new home on the PCB that hosts the PIC 16F819. It monitors the rotation, turns it into inches, then spits that number out on a 7 segment display. Handy, and cheap!

Hackaday Links: June 20, 2010

Nixie Voltmeter Clock

[Gmglickman] built a clock out of an old digital voltmeter. The Fluke 8300A came out in 1969 and is featured in their 60 years of innovation slideshow. What makes it a cool clock? The Voltmeter’s display is made up of Nixie tubes.

Easy optical encoder wheel generator

If you need to print out encoder wheels for your project there is an online tool you can use. It has almost any setting you would want to make a rotary encoder wheel.The black wheel can be used with old mouse parts and the checkered wheel with an optical sensor. [Thanks Bluewraith]

New CD without the CD

1-bit Symphony is a newly released album. It come in a CD jewel case but there’s no CD included. That’s because they’ve built a circuit to playback their music via a headphone jack. We didn’t see any info on what microcontroller was used, but we love the cleanliness of the design. This apparently isn’t the first time the artist has released an album like this either.[Thanks Juan]

Making a standard SIM work with the iPad

[Tony Million] used a standard SIM to reduce the monthly cost of using broadband on the iPad. This is the exact opposite of using the iPad SIM in an iPhone and requires that you cut down your standard SIM quite a lot. [Tony] did this because he imported his iPad to the UK from the United States and using AT&T wasn’t an option for him. [Thanks David]

16TB NAS is a thing of beauty

The Black Dwarf is a sixteen terabyte network attached storage device that looks more like a display counter for high-end hard drives. We’d usually think of this as a closet or basement dweller, but an item this gorgeously crafted deserves a place of honor in your home or office. Documenting the entire process was as complex as the build itself. We like seeing the time-lapse version. [Thanks Howard via Engadget]

Hand Made Manipulator Arm

We’re pretty used to seeing CAD used in the design process for most things. It’s a bit of a shocker to come across a project this involve, and this well executed, that didn’t use CAD.

[Anton] spent 100 hours building this manipulator arm by hand. He made the parts by drawing them on styrene and cutting them out with scissors. He has started building version two with AutoCAD but from what we’ve seen in the video after the break, improvements on the original design will be minor. The speed and fluidity of the servos with added magnetic encoders makes for a graceful robotic dance; we’d love to be its chess partner. Continue reading “Hand Made Manipulator Arm”

Digital Tuner Reverse Engineering

hvr-1600-i2c-sniffing

Hackaday alum [Ian Lesnet] tipped us off about some reverse engineering of the HVR-1600, an analog and digital television encoder/tuner. The project was spawned when [Devin] noticed his Hauppauge HVR-1600 didn’t tune channels in Linux quite as well as it did in Windows. He had a hunch this was due to improper initialization settings for either the tuner chip or the demodulator.

To fix this he used two test points on the board to tap into the I2C bus. Using a logic analyzer he captured the command traffic from the bus while running Linux, then while running Windows. By filtering the results with a bit of Perl, and comparing them by using diff, he tracks down and finds the variation in the commands being sent by the two drivers. After a bit of poking around in the Linux source and making the necessary changes, he improved the tuning ability of the Linux package.

[Devin’s] work looks simple enough, and it is. The difficult part of this process is being smart enough to know what you’re looking for, and what you’ve got once you’ve found it.