A Breakout Board For The ESP8266-03

In the last few weeks we have been seeing a lot of ESP8266 based projects. Given this WiFi module is only $3 on Ebay it surely makes sense using it as an Internet of Things (IoT) platform. To facilitate their prototyping stage I designed a breakout board for it.

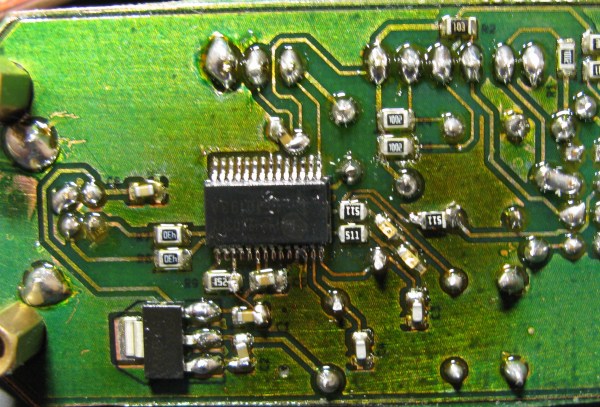
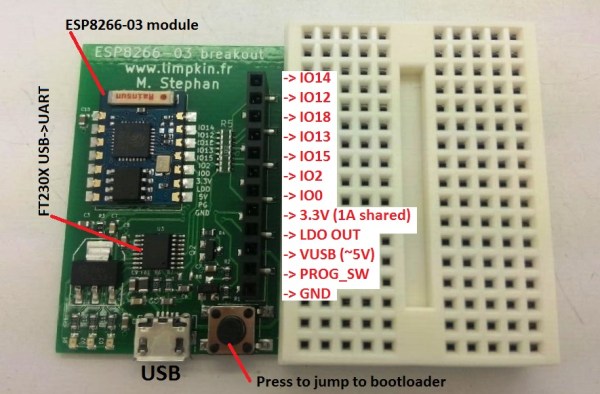
The board shown above includes a 3.3V 1A LDO, a genuine FT230x USB to UART adapter, a button to make the ESP8266 jump into its bootloader mode and a header where you can find all the soldered-on-board module IOs. One resistor can be removed to allow 3.3V current measurement, another can be populated to let the FT230X start the bootloader jumping procedure. All the IOs have 1k current limiting resistors to prevent possible short-circuit mistakes. Finally, the board deliberately doesn’t use any through hole components so you may put double-sided tape on its back to attach it anywhere you want. As usual, all the source files can be download from my website.

Using The ESP8266 As A Web-enabled Sensor

A few months ago, the ESP8266 came onto the scene as a cheap way to add WiFi to just about any project that had a spare UART. Since then, a few people have figured out how to get this neat chip running custom firmware, opening the doors to an Internet of Things based around an ESP8266. [Marc] and [Xavi] just wrote up a quick tutorial on how to turn the ESP8266 into a WiFi sensor platform that will relay the state of a GPIO pin to the Internet.

If you’re going to replicate this project, you won’t be using the stock firmware on the ESP. Instead of the stock firmware, [Marc] and [Xavi] are using the Lua-based firmware that allows for access to a few GPIOs on the device and scripting support to make application development easy. To upload this firmware to the ESP, [Marc] and [Xavi] needed a standard FTDI USB to serial converter, a few AT commands through a terminal program, and a few bits of wire.

The circuit [Marc] and [Xavi] ended up demoing for this tutorial is a simple webpage that’s updated every time a button is pressed. This will be installed in the door of their hackerspace in Barcelona, but already they have a great example of the ESP8266 in use.

Running A Web Server On The ESP8266

We’ve written lot about the ESP8266 lately, but people keep finding more awesome uses for this inexpensive module. [Martin] decided that using the ESP8266 with an external microcontroller was overkill, and decided to implement his project entirely on the module with a built-in web server.

[Martin] started out with the ESP8266 web server firmware developed by [sprite_tm]. This firmware provides a basic web server that supports multiple connections and simple CGI scripts right on the module. The web server firmware opens up a ton of possibilities with CGI scripting. When booting up in AP mode, you can even connect the ESP8266 to another access point right from the your browser.

[Martin] decided to connect a DHT22 temperature/humidity sensor to the module as a proof of concept. He used a DHT22 library written for the ESP8266 to read data from the sensor, and wrote a CGI script to display the data on a web page. [Martin] also added buttons to control a GPIO pin as a proof of concept. He posted his source code and a binary (see the end of his post) so you can try out his application and mod it for your own project.

Programming An Arduino Over WiFi With The ESP8266

A lot of people have used ESP8266 to add inexpensive WiFi connectivity to their projects, but [Oscar] decided to take it one step further and program an Arduino over WiFi with the ESP8266. [Oscar] wrote a server script in Python that communicates with firmware running on the Arduino. The Arduino connects to the server on startup and listens for a “reboot” command.

When the command is received, the processor resets and enters the bootloader. The python script begins streaming a hex file over WiFi to the ESP8226, which relays it to the Arduino’s bootloader. Once the hex file is streamed, the microcontroller seamlessly starts executing the firmware. This method can be used with any AVR running a stk500-compatible bootloader.

[Oscar]’s writeup is in Spanish, but fortunately the comments in his Python and Arduino code are in English. Check out the video (in English) after the break where [Oscar] demonstrates his bootloading setup.

Continue reading “Programming An Arduino Over WiFi With The ESP8266”

Test Your Signal With The WiFi Cup

[CNLohr] wanted to test the WiFi range in his house. One look at his roommate’s cup and an unorthodox idea was born. The WiFi Cup used an ESP8266 to connect to his home network. For output, [CNLohr] also added a WS2812 LED strip to the cup. The ESP8266 was programmed to send UDP packets to [CNLohr’s] laptop. When the laptop responded back, the ESP8266 turned on the LEDs, lighting up the cup. The cup’s response to signal strength was very quick – about a second.

[CNLohr] took the WiFi Cup around the house. He was surprised to detect the connection in corners he didn’t expect; in fact, the signal wasn’t weakening at all! He proceeded to walk outside with it, hoping to see the signal strength decrease. As a testament to his roommate’s robust router, the cup merely flickered. Hoping for a better test, [CNLohr] switched out the router for a cheaper TP-Link with shorter antennas. While the initial ping test showed a slower response time, the cup detected WiFi around the house just fine. It only wavered for a couple of moments when it was placed inside a metal bucket. We have to wonder how thin [CNLohr’s] walls are. WiFi never works that well in our house!

Continue reading “Test Your Signal With The WiFi Cup”

Hackaday Links Column Banner

Hackaday Links: November 9, 2014

After many years of searching, [Dan Wood] finally got his hands on something he’s wanted for the past twenty-two years: an Amiga 4000. No, it’s not the queen bee of Amiga land – that honor would fall to the 68060-equipped 4000T, but [Dan]’s 4000 is decked out. It has a 256MB RAM expansion, Ethernet, USB, and a Picasso IV graphics card that gives it better resolution and color depth than most modern laptops.

[Pistonpedal] has a fully automatic pneumatic can crusher that is far too cool to be wasted on a case of Keystone. A funnel at the top guides the cans in to be crushed one at a time and ejected into a garbage can underneath. Great for recycling.

Coming over from ‘normal’ programming into the world of embedded development? [AndreJ] has the AVR C Macro for you. It’s a great way to get away from all those ~=, |=, and &=s that don’t make any sense at all.

[CNLohr] has a reputation for running Minecraft servers on things that don’t make any sense at all. The latest build is a light up redstone ore block equipped with an ESP8266 WiFi chip.

Oh, the Hackaday overlords and underlings are in Munich for this little shindig we’re doing. If you in town for Electronica come on down. If you have a copy of Neil Young’s Trans, bring it to the party.

A Development Board For The ESP8266

[Necromant] is ready to dip his toes into the world of firmware development for everyone’s favorite WiFi chip, the ESP8266. Before that begins, it would be a good idea to make a nifty little breakout board for this chip. Here it is, a board with a USB to UART converter with board art that’s compatible with a toner transfer process.

Since this is just a board that turns USB into something the ESP8266 can understand, the most reasonable course of action would be to throw an FTDI chip in there and call it a day. We wouldn’t suggest that. Instead, [necromant] is using a Prolific PL2303HX. The RTS/DTR pins on the serial chip aren’t used, but only because the ESP8266 forums haven’t yet decided on how to connect them to the WiFi chip. GPIOs on the Prolific are broken out for some other projects [necromant] has in mind, with a userspace driver to make everything work.

[Necromant] is the creator of Antares, a build system for microcontrollers and a Hackaday Prize entry. He intends to make his build system compatible with this WiFi chip, just as soon as everyone else figures out an easy way to make it work.