Some of our more dedicated readers may remember me as that promising and talented new writer who disappeared after only a couple of months last fall. Or, alternatively, that moronic new writer who had no idea what he was talking about. But, I’m just going to go ahead and assume it was the former in order to protect my ego. In either case, if you remember me at all, you may have wondered why I left. Was it cholera? Was I drafted into a top-secret CIA program? Did I join a circus as a fledgling trapeze artist?
No, it was none of that. That would be absurd. What would make you think I had any trapeze skills at all, much less circus-worthy ones? The truth is a lot more straightforward, but was also a lot scarier (and more exciting) for me — I started a business. The astute readers among you have probably already put the dots together and figured out that I failed. The title was a pretty strong hint, right? This isn’t a story of bootstraps-pulling success, or a heartwarming underdog tale. This is an opportunity for me to talk about the lessons I learned as I failed, and to give the entrepreneurs out there something to consider when they start their businesses. We’ll laugh together, we’ll cry together, and maybe we’ll even learn something together. Ready? Alright, let’s dive right into the heart of it, starting when I was seven years old…
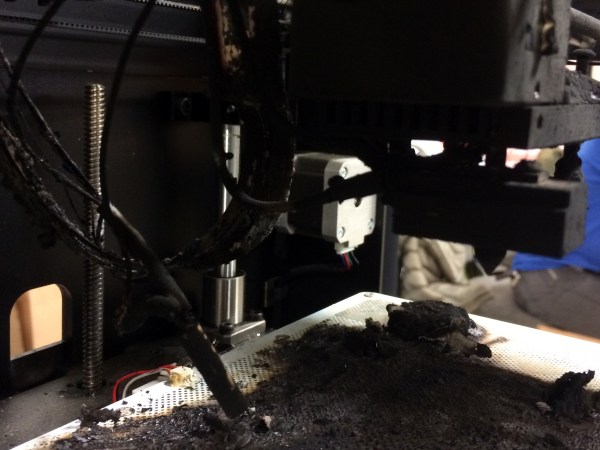
[Jay] out of the River City Labs Hackerspace in Peoria, IL cleared out a jam in his printer. It’s an operation most of us who own a 3D printer have performed. He reassembled the nozzle, and in a moment forgot to tighten down the grub nut that holds the heater cartridge in place. He started a print, saw the first layer go down right, and left the house at 8:30 for work. When he came back from work at 10:30 he didn’t see the print he expected, but was instead greeted by acrid smoke and a burnt out printer.
The approximate start time of the fire can be guessed by the height of the print before failure.
As far as he can figure, some time at around the thirty minute mark the heater cartridge vibrated out of the block. The printer saw a drop in temperature and increased the power to the cartridge. Since the cartridge was now hanging in air and the thermistor that reads the temperature was still attached to the block, the printer kept sending power. Eventually the cartridge, without a place to dump the energy being fed to it, burst into flame. This resulted in the carnage pictured. Luckily the Zortrax is a solidly built full metal printer, so there wasn’t much fuel for the fire, but the damage is total and the fire could easily have spread.
Which brings us to the topics of discussion.
How much can we trust our own work? We all have our home-builds and once you’ve put a lot of work into a printer you want to see it print a lot of things. I regularly leave the house with a print running and have a few other home projects going 24/7. Am I being arrogant? Should I treat my home work with a lesser degree of trust than something built by a larger organization? Or is the chance about the same? Continue reading “Ask Hackaday MRRF Edition: 3D Printers Can Catch Fire”→
One dark and stormy morning, Dr. Richard Noirimetla, private failure investigator, was sitting at his desk nursing his morning cup of joe. It was an addiction, but life, and engineering was hard. Intense eyes sat in a round dark-skinned face. An engineering degree from the prestigious Indian Institute of Technology hung from the wall in his sparse office. Lightning flashed outside of his window, as the rain began to beat even harder against his corner office windows.
His phone rang.
“Hello, Dr. Noirimetla, Private Failure Investigator here.” He said in deep, polite voice. “How may I help you?”
“Ah, I’m Chief of Manufacturing for Galileo Concrete Pillars Inc. We have a bit of a problem here. We used to see a failure rate above 33% for our concrete pillar operation. As part of our lean manufacturing efforts we tried to reduce that number through various improvements. However, we see a failure rate of almost 50% now. We expect foul play… from one of our suppliers. Can you come right away?” a worried man’s voice sounded over the phone.
“I see, that’s very troubling,” Noirimetla rumbled. “I’ll send over the contract detail. There will be an increased fee, but I’m on my way.”
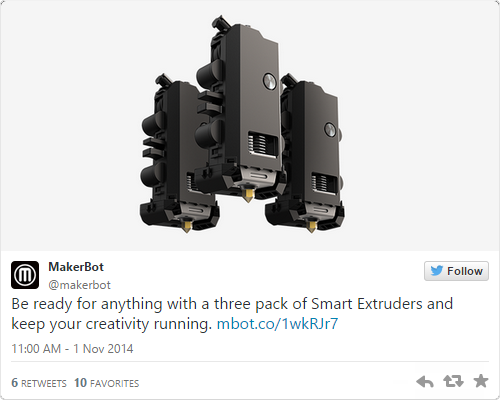
A direct link to Makerbot’s 3-pack of Smart Extruders is very hard to find
It’s been a little over a year since Makerbot introduced their new line of printers, and since then there have been grumblings about the quality of the Smart Extruder that each one of these printers comes with. While there is no 3D printer extruder that will not eventually clog, wear down, or otherwise break, there are reports of the Makerbot Smart Extruder failing in only hundreds or even tens of hours of use. Considering that a single large print can take a dozen or so hours to complete, you can easily see the why the Smart Extruder is so despised and why even the availability of a three-pack of Smart Extruders is a joke in the 3D printing community.
Of course a cheap shot at Makerbot that plays right into your preconceived ideas and prejudices is far too easy. We’re here to solve problems, not just state them, so here’s what we’re working with: to quantify the long-term reliability of 3D printers we need a way to measure the mean time before failure of extruders. This is already a solved problem; it’s just not implemented.
On aircraft and some very expensive engines that power things like buildings and ships, there’s one gauge, tucked away in the control panel, that keeps track of how long the engine has been running. It’s called a hobbs meter, and the idea behind it is extremely simple – when there is power going to the Hobbs meter, it counts out hours on a small clockwork display. The resolution of the display is only tenths of an hour, usually, but that’s good enough for scheduling maintenance and to be mentioned in NTSB accident reports.
Spend enough time with a 3D printer, and you’ll quickly realize the ‘estimated print time’ is merely a ballpark, and with failed prints the ‘total print time for this object’ isn’t exactly a perfect measure of how many hours you’ve been using your extruder. Only by directly measuring how many hours are logged on a hot end or how many kilometers of filament have been sent through an extruder will you ever get an accurate idea of how long an extruder has been running, and how reliable a printer is.
Hobbs meters are available from Mouser, but you’ll be overpaying there. The better option is from a vendor in a different niche; $30 for a meter that can connect directly to the extruder heater. If enough people add this and keep proper logs, there’s a slight chance of improving the state of 3D printers with real data and not the prejudices of people trying to justify their own designs and purchases.
But perhaps that’s too hard; adding a $30 item to a printer’s BOM just for the sake of data is a bit much. Luckily, there’s an even simpler solution that won’t cost a dime. Just measure the time a heater has been on in the firmware, or save the total length of extruded filament in a microcontroller’s EEPROM. Every printer firmware out there, from Marlin to Repetier to Sprinter has in it a way to calculate both the length of time a heater has been on or how much filament has been pushed through a nozzle.
However, this is 3D printing we’re dealing with. An organized community is not a luxury we currently enjoy, and for this to work several things are needed. The first is somewhere to upload failure statistics. This would be a web site, naturally, with the ability to input the printer make, extruder and hot end model, and the time since last clogged nozzle. The website itself is just a database, some JavaScript, a bit of CSS, and some hosting costs; not hard until you consider tens of thousands of operators would have to know about this website and contribute.
Secondly, if we’re not going with mechanical Hobbs meters there would need to be a ‘total time heater on’ or ‘total length of extruded filament’ variable in the various firmwares. There would hopefully be standardized Gcodes or Mcodes to read and reset this variable.
Will this happen? Of course not. Organization isn’t a strong suit of the RepRap project, and any company that implements Hobbs meter functionality will probably lock that up in proprietary obfuscation. However, Makerbot isn’t dumb, and given they’re selling three-packs of extruders, I would bet they have some data on the MTBF of their extruders. A community-based measurement of the most common cause of broken printers is certainly possible, but like all problems it’s one of organization, not technology.
3D Printering is a semi-weekly column that digs deep into all things related to 3D Printing. If you have questions or ideas for future installments please sending us your thoughts.
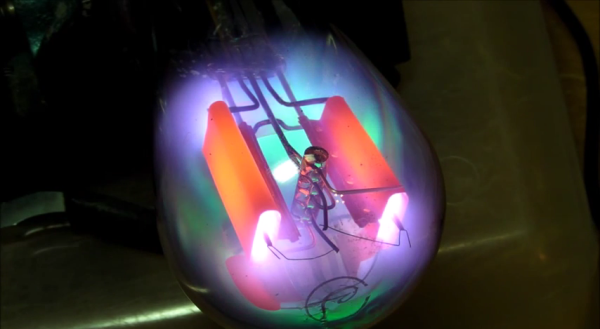
[Eric] has an Atwater Kent 55C AM radio from the early 1900’s. He’s been trying to restore the radio to proper working condition. His most recent pain has been with the rectifier tube. The tube is supposed to have a complete vacuum inside, but that’s not the case here. When the tube is powered up, it glows a beautiful violet color. It may look pretty, but that’s indicative that gas has leaked into the tube. It needed to be replaced.
[Eric] had a tube that would serve as a good replacement, but it’s plug didn’t fit the socket properly. He was going to have to use this old broken tube to make an adapter. Rather than just tearing the old tube apart, he decided to have some fun with it first. He hooked it up to a variac, an ammeter, and a volt meter. Then he slowly increased the voltage to see what would happen. The result was visually stunning.
The tube starts out with the same violet/blue glowing [Eric] experienced previously. As the voltage increases, it gets more and more intense. Eventually we start to see some green colors mixing in with the violets. [Eric’s] reaction to this unexpected result is priceless. As the tube gets increasingly hot, the anode starts glowing an orange-red color. Finally, the filament starts to crackle like a sparkler before the tube just gives up and completely fails.
After the light show, [Eric] moves on to replacing the tube. He begins by tapping on the old tube’s socket with the end of a screwdriver. After much tapping, the glass starts to come lose from the socket. After a bit of wiggling and twisting the tube finally came free from the socket. [Eric] luckily had an unused octal socket that fit perfectly inside of the old socket. All he needed to do to build his adapter was to connect the four pins from the old adapter to the proper pins on the octal socket. Piece of cake.
…Or so [Eric] thought. After testing some new tubes with a tube tester, he realized he had soldered all four pins incorrectly. On top of that, he had super glued the adapter together. He eventually got the two pieces apart. This time he removed all of the unused pins from the octal socket so he wouldn’t get it wrong. Another run on the tube tester confirmed that everything looked good. After plugging the tube into the radio, it worked just as expected
If you need fabrication rather than repair, we’ve got you covered there as well. Check out [Charles Alexanian’s] process for making new vacuum tubes in his garage. Now if you just have too darn many of them around, you can always decorate your pad with ’em.
There’s so much more to be discovered when your projects just don’t want to work. Grinding out the bugs, getting past roadblocks, and discovering gotchas is where real hacking know-how comes from. But most people aren’t motivated to document their failures. We want to change that.
We want to roll out a new weekly feature that showcases failure… well documented failure. But we need YOU to give up the goods. Write about your failed experience on your blog, post it to our project forums with [FAIL] in the title, or you can just write everything in an email and send it to us. Which ever way you choose, you’ll need to tip us off that you’d like to make it to the front page (come on, it’s not bragging since it didn’t even work!). If you already know of well documented project fails send in those links too even if they’re not your projects.
Make sure you include at least one descriptive image — snapshots, diagrams, schematics, screencaps, anything that tells the story is fair game. To show you what we’re after here’s a few of our favorite failed projects:
We’d like to point out that all of these projects are interesting ideas that show off missteps along the way. We will notbe trashing on your skills as a hacker, but instead celebrating the lessons learned and hearlding the sharing of ideas from otherwise doomed projects.
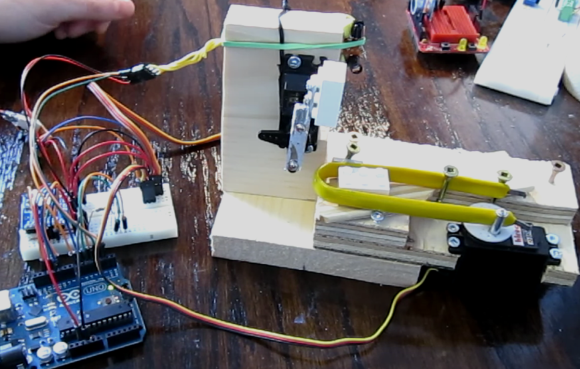
How many times can you put two LEGO pieces together and take them apart again before they wear out? The answer is 37,112. At least that’s the number established by one test case. [Phillipe Cantin] was interested in this peculiar question so he built the test rig above to measure a LEGO’s lifespan.
The hacked together apparatus is pretty ingenious. It uses two servo motors for testing, each driven by the Arduino which is logging the count on an SD card. One of the two white LEGO parts has been screwed onto an arm of the upper servo. That servo presses down onto the mating piece which is sitting inside that yellow band. Look close and you’ll realize the yellow is the handle end of an IC puller. When the post on the lower servo is moved toward one arm of the puller it grips the lower LEGO piece tightly so that the upper servo can pull the two apart. In addition to the assembly and disassembly step there’s a verification step which raises the mated parts so that a reflectance sensor can verify that they’re holding together. [Phillipe] let the rig run for ten days straight before the pieces failed.
Don’t miss his video description of the project after the break.