The Dipole Antenna Isn’t As Simple As It Appears

Dipole antennas are easy, right? Just follow the formula, cut two pieces of wire, attach your feedline, and you’re on the air.  But then again, maybe not. You’re always advised to cut the legs a little long so you can trim to the right length, but why? Shouldn’t the math just be right? And what difference does wire choice make on the antenna’s characteristics? The simple dipole isn’t really that simple at all.

If you’ve got antenna questions, check out [FesZ]’s new video on resonant dipoles, which is a deep dive into some of the mysteries of the humble dipole. In true [FesZ] fashion, he starts with simulations of various dipole configurations ranging from the ideal case — a lossless conductor in free space with as close to zero diameter conductors as the MMANA antenna simulator can support — and gradually build up to more practical designs. Continue reading “The Dipole Antenna Isn’t As Simple As It Appears”

Ferrofluid Drum Synth Dances To The Beat

[Love Hultén]’s work often incorporates reactive sound elements, and his Ferrofluid drum synth is no exception. Sadly there are no real build details but have no fear: we’ve gathered plenty of DIY insights when it comes to ferrofluid-based projects.

Ferrofluid isn’t easy to work with, but there are plenty of DIY resources to make things easier.

First of all, ferrofluid is shockingly expensive stuff. But if you can get your hands on some old VHS tapes and acetone, you can make your own. Second, working with ferrofluid to make reactive elements is harder than it may look. Particularly, making the stuff dance to sound beats isn’t as simple as putting a container of the stuff in front of a speaker coil, but people have discovered a few ways that work more reliably than others.

[Love Hultén]’s drum synth was inspired by this custom Bluetooth speaker with dancing ferrofluid by [Dakd Jung], which drives an electromagnetic coil with frequencies selected from the audio with an MSGEQ7 equalizer. That way, only frequencies that work best for moving the fluid in interesting ways get used for the visualization. The MSGEQ7 spectrum analyzer chip is very useful for music-driven projects, as demonstrated by these sound-reactive LED shades which illustrate the audio element nicely.

The coils that create the electromagnetic field causing ferrofluid to move can take different forms, but two very interesting ones are this 12-layer PCB coil and for more intricate displays, there’s a 12×21 coil array that creates a dot-matrix-like display.

We have one last tip to share about enclosures. Some readers may have noticed that this drum synth project is housed in what looks like a piece of painted lumber. Wood is certainly a versatile material for making custom shapes, and for lettering and labels it turns out that toner transfer works just as well on wood as it does for making custom PCBs.

Continue reading “Ferrofluid Drum Synth Dances To The Beat”

Garage Semiconductor Fab Gets Reactive-Ion Etching Upgrade

It’s a problem that few of us will likely ever face: once you’ve built your first homemade integrated circuit, what do you do next? If you’re [Sam Zeloof], the answer is clear: build better integrated circuits.

At least that’s [Sam]’s plan, which his new reactive-ion etching setup aims to make possible. While his Z1 dual differential amplifier chip was a huge success, the photolithography process he used to create the chip had its limitations. The chemical etching process he used is a bit fussy, and prone to undercutting of the mask if the etchant seeps underneath it. As its name implies, RIE uses a plasma of highly reactive ions to do the etching instead, resulting in finer details and opening the door to using more advanced materials.

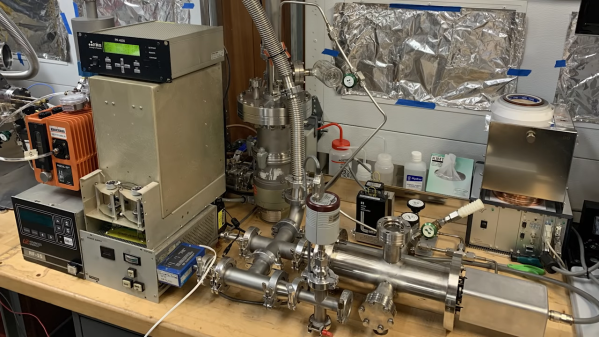
[Sam]’s RIE rig looks like a plumber’s stainless steel nightmare, in the middle of which sits a vacuum chamber for the wafer to be etched. After evacuating the air, a small amount of fluorinated gas — either carbon tetrafluoride or the always entertaining sulfur hexafluoride — is added to the chamber. A high-voltage feedthrough provides the RF energy needed to create a plasma, which knocks fluorine ions out of the process gas. The negatively charged and extremely reactive fluorine ions are attracted to the wafer, where they attack and etch away the surfaces that aren’t protected by a photoresist layer.

It all sounds simple enough, but the video below reveals the complexity. There are a lot of details, like correctly measuring vacuum, avoiding electrocution, keeping the vacuum pump oil from exploding, and dealing with toxic waste products. Hats off to [Sam’s dad] for pitching in to safely pipe the exhaust gases through the garage door. This ties with [Huygens Optics]’s latest endeavor for the “coolest things to do with fluorine” award.

Continue reading “Garage Semiconductor Fab Gets Reactive-Ion Etching Upgrade”

The $50 Ham: Dummy Loads

This is an exciting day for me — we finally get to build some ham radio gear! To me, building gear is the big attraction of amateur radio as a hobby. Sure, it’s cool to buy a radio, even a cheap one, and be able to hit a repeater that you think is unreachable. Or on the other end of the money spectrum, using a Yaesu or Kenwood HF rig with a linear amp and big beam antenna to work someone in Antartica must be pretty cool, too. But neither of those feats require much in the way of electronics knowledge or skill, and at the end of the day, that’s why I got into amateur radio in the first place — to learn more about electronics.

To get my homebrewer’s feet wet, I chose perhaps the simplest of ham radio projects: dummy loads. Every ham eventually needs a dummy load, which is basically a circuit that looks like an antenna to a transmitter but dissipates the energy as heat instead of radiating it an appreciable distance. They allow operators to test gear and make adjustments while staying legal on emission. Al Williams covered the basics of dummy loads a few years back in case you need a little more background.

We’ll be building two dummy loads: a lower-power one specifically for my handy talkies (HTs) will be the subject of this article, while a bigger, oil-filled “cantenna” load for use with higher power transmitters will follow. Neither of my designs is original, of course; borrowing circuits from other hams is expected, after all. But I did put my own twist on each, and you should do the same thing. These builds are covered in depth on my Hackaday.io page, but join me below for the gist on a good one: the L’il Dummy.

Continue reading “The $50 Ham: Dummy Loads”

Bluetooth Speaker With Neopixel Visual Display!

Finding a product that is everything you want isn’t always possible. Making your own that checks off all those boxes can be. [Peter Clough] took the latter route and built a small Bluetooth speaker with an LED visualization display that he calls Magic Box.

A beefy 20W, 4Ohm speaker was screwed to the lid of a wooden box converted to the purpose. [Clough] cut a clear plastic sheet to the dimensions of the box, notching it 2cm from the edge to glue what would become the sound reactive neopixel strip into place — made possible by an electret microphone amplifier. There ended up being plenty of room inside the speaker box to cram an Arduino Pro Mini 3.3V, the RN-52 Bluetooth receiver, and the rest of the components, with an aux cable running out the base of the speaker. As a neat touch, neodymium magnets hold the lid closed.

Continue reading “Bluetooth Speaker With Neopixel Visual Display!”