Hackaday Links Column Banner

Hackaday Links: January 4, 2015

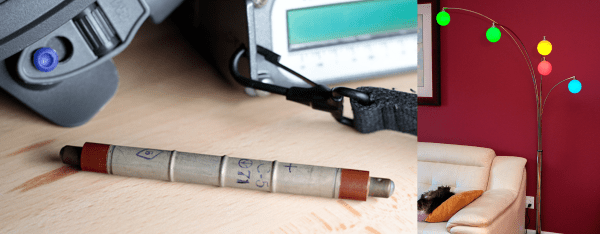
Chips as furniture is now a thing. It started off with a 555 footstool from Evil Mad Scientist and moved on to an EPROM coffee table. Now [msvm] over on the War Thunder forums has constructed a Nixie tube driver table. It’s based on the K155, and as a neat little addition, he’s included a real vintage chip under glass in the table.

Have some tongs, an anvil, and a blowtorch? Make some bottle openers out of framing nails. There’s a lot of variety here in the shapes of the bottle openers.

[Stephen] used a solid state relay he found on eBay to drive some Christmas lights. The SSR failed. That meant it was time to see inside of this relay looked like. The short answer is, ‘a lot of goop and epoxy’, but the traces look big enough to support the current it’s rated for.

Imagine a part of your 3D printer breaks. That’s alright, just print another…. oh, yeah. Well, I guess it’s time to make a bearing bracket out of wood.

The Electronica MK-54 and MK-61 (actually the Электроника МК-54) were incredibly popular Soviet programmable calculators. Now there’s an emulator for them.

[Rue Mohr] found a very cheap TFT display on an Arduino shield. The chip for the display was an SPF5408, a chip that isn’t supported by the most common libraries. He eventually got it to work after emailing the seller, getting some libraries, and renaming and moving a bunch of stuff. If you have one of these displays, [Rue] just saved you a bunch of time.

EPROM Coffee Table

Either in need of a coffee table or suffering a severe lack of upscaled electronics, [Darren] just finished up a great build for his living room. It’s a huge, scaled up version of a UV erasable EPROM with an infinity mirror in place of the fused quartz window.

[Darren]’s coffee table was inspired by an earlier build by the geniuses at Evil Mad Scientist. A few years ago, they built a 555 footstool that was scaled up about 30 times its normal size. Even at footstool scale, the 555 is still relatively tiny.

[Darren] is using a similar construction technique by forming the legs of the EPROM out of laminated plywood. Since this build is significantly larger, building the entire device out of solid, laminated plywood would result in an unwieldy and expensive piece of furniture. Instead, [Darren] constructed the legs and sides out of plywood laminations, covering the ends, top, and bottom with plywood panels. The result is a hollow EPROM/coffee table that’s still structurally sound.

If you’re a bit confused after counting the number of pins on the coffee table, you’re in good company. This is technically a scaled-up version of a 16-pin 0.600″ PDIP, something that a quick googling suggest isn’t historically accurate. Maybe there was an EPROM with a 4-bit wide data bus somewhere in the annals of electronics history, but we’re happy with saying that a completely accurate scaled-up ROM would be far too big for [Darren]’s living room.

Continue reading “EPROM Coffee Table”

kegerator

End Table Kegerator Hides The Tap When You’re Not Looking

What’s better than an ordinary end table? How about an end table that can serve you beer? [Sam] had this exact idea and used his skills to make it a reality. The first step of the build was to acquire an end table that was big enough to hold all of the components for a functional kegerator. This proved to be a bit tricky, but [Sam] got lucky and scored a proper end table from a garage sale for only $5.00.

Next, [Sam] used bathroom sealant to seal up all of the cracks in the end table. This step is important to keep the inside cold. Good insulation will keep the beer colder, while using less electricity. Next, a hole was cut into the top of the table for the draft tower.

The draft tower is mounted to a couple of drawer slides. This allows the tower to raise up and down, keeping it out of sight when you don’t want it. The tower raises and lowers using a simple pulley system. A thin, high strength rope is attached to the tower. The other end is attached to a spool and a small motor. The motor can wind or unwind the spool in order to raise and lower the tower.

The table houses an Arduino, which controls the motor via a homemade H bridge. The Arduino is hooked up to a temperature sensor and a small LCD screen. This way, the users can see how cold their beer will be before they drink it.

To actually keep the beer cold, [Sam] ripped apart a mini fridge. He moved the compressor and condenser coils to the new table. He had to bend the coils to fit, taking care not to kink them. Finally he threw in the small keg, co2 tank and regulator. The final product is a livingroom gem that provides beer on demand.

Demo video (which is going the wrong way) can be found after the break.

Continue reading “End Table Kegerator Hides The Tap When You’re Not Looking”

Beautiful Touch-Sensitive Furniture

lamp

It’s taken over a year, but [tinkering techie] has finally completed his touch sensitive nightstand. At first glance, it looks like any normal piece of furniture. With the addition of an Arduino, some copper clad board, and a few LEDs, he’s turned it into a very elegant, electronic home furnishing.

The nightstand is built out of a few very nice pieces of mahogany. Underneath the top of the nightstand, three Kapton-covered copper clad boards are inset along the front and side edges. These capacitive sensing boards are connected to an Arduino Fio that reads the capacitance of these sensors and turns on a small LED under the drawer or the mains powered lamp.

The electronics are powered by a small USB charger with a battery backup all hidden underneath the top of the nightstand. Inside the drawer, a magnetic reed switch turns on an RGB LED whenever the drawer is opened.

While the nightstand itself is a wonderful piece of woodworking, we need to tip our hat for a remarkably seamless integration of fine furniture and electronics. The electronic furniture modifications we usually see are Ikea cruft, but this wonderful homemade nightstand should last decades or centuries.

Video of [techie] going over his build below

Continue reading “Beautiful Touch-Sensitive Furniture”

Functional NES Controller Coffee Table

For reddit user [the_masked_cabana], button mashing has taken on a whole new meaning.  His gigantic NES controller coffee table makes it hard to punch in the Konami code without breaking a sweat.

Even before discussing the electricals, this is one impressive build.  Each component was cut from multiple layers of MDF and assembled with screws, glue, and putty.  Once they were sanded smooth, he used layers of carefully applied Krylon paint to achieve a plastic sheen that is remarkably faithful to its 5″ counterpart.  For the more precise lettering, custom cut vinyl stickers did the trick.

Of course, looking the part is only half the battle.  Tearing apart an original NES controller, he soldered wires to the button connections and ran them to eight arcade style buttons located under the replica button covers.  A collection of bolts and springs keep everything aligned and produce the right kind of tactile feedback to the user.  A removable cable in the back provides the connection to the console.

If a four foot NES controller isn’t practical enough for you, he also added some storage space in the base and a removable glass cover that converts the controller into a coffee table.  For more details on the build, check out the reddit discussion.  You can also find an eerily similar working NES controller table in this geeky coffee table roundup from five years ago.

Revenge Of The Glueless Stool And A New Folding Chair

glueless stool

[Vincent] is at it again, with the final iteration of his glueless stool and a new project.

As many of you commented on the original post, three legs might not be enough. He might have taken note, as the final design contains not 3, not 4, but five legs. After the break we have a clip of it being used, and it looks quite sturdy!

But is that it? Is [Vincent] done with innovative wood furniture? Nope. Not since his wife came up with a challenge to create a practical, foldable, and especially, not ugly — chair. He began by researching the dry subject of chairs and determined the approximate popliteal height that his chair should provide. Keeping with the theme, he wanted this chair to be cut from a single piece of wood, just like the stool. A few sketches later and he had a basic design ready, still glueless, but unfortunately this time requiring hinges. After a few hiccups in his CNC program, he had a working foldable chair, but our guess is it’s not quite the final design.

Just like last time, all the files are freely available from his Github, so if you happen to have a CNC router, or maybe a laser cutter, you can make your own!

Continue reading “Revenge Of The Glueless Stool And A New Folding Chair”

Many Iterations Of A Plywood Stool That Requires No Glue

cnc-router-stool-design

At his local hackerspace [Vincent Sanders] noticed an interesting problem. The stools that they had were great in most cases, but there was one workbench which was very much the wrong height for them. So began his quest to design and fabricate plywood stools which use no glue for their joints.

The Cambridge Makespace (in the UK) turns out to be a perfect environment for this type of project. They already had a CNC router which can cut the plywood pieces, and there are other members who were willing to help train [Vincent] on the equipment. He found a design on Thingiverse which fit the bill, except for the actual measurements. He needed metric units to match the sheet stock available to him. Once converted he put together a stool that didn’t work at all. The thickness of the plywood just didn’t mesh with the tolerances of the joints. After wandering around to different suppliers in town, digital calipers in hand, he came up with a range of actual thicknesses and adjusted his joint design accordingly.

Of course this wasn’t the last revision. Even with the joints working the seat was still a little rickety. He moved to the next plywood thickness offered, redesigning the files to match. His final stool works like a charm, with five or six of them fitting on one standard sheet of plywood.