Hacklet 30 – Robot Arm Projects

Robot arms – they do everything from moving silicon wafers to welding cars. Many a hacker has dreamt of having their own robot arm to serve them beer help them build projects. This week’s Hacklet features some of the best robot arm projects on Hackaday.io!

robotarm1
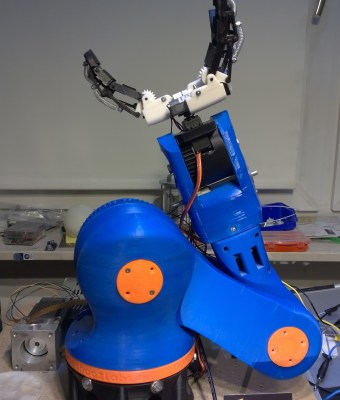
We start with [4ndreas] who is building this incredible 3D Printable Robot Arm. Inspired by large industrial robots, [4ndreas] has given us an entirely 3D printable design. [4ndreas’] 3D design experience really shows here. This arm looks like it just finished work at a local assembly line! The arm is BIG too – printing the parts took him about a week, and used around 1.2kg of ABS filament! [4ndreas] has recently split the project off into two halves: his blue arm is driven by stepper motors, while the orange arm is a DC motor affair. Both of the arms can use his awesome gripper design. Check out the project page for videos of the arm in action!

6dofarm
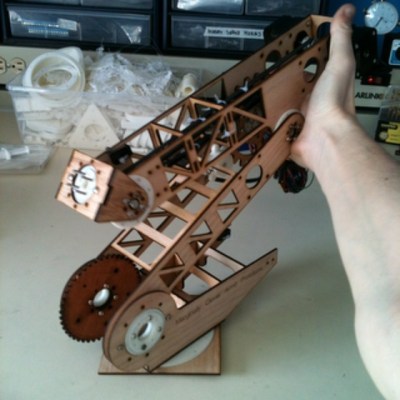
Next up is [Dan Royer] and his 6DOF Robot Arm. [Dan’s] didn’t want to spend upwards of $10,000 on an industrial arm, so he built his own from wood, plastic, and easily obtainable parts. As the name implies, the arm has 6 degrees of freedom. The electronics consist of beefy NEMA 17 stepper motors and a RUMBA controller, which was originally designed for 3D printers. Dan even created some novel encoder mounts. Each joint has an encoder, which will allow the robot to run as a closed loop system. [Dan] originally entered this arm in The Hackaday Prize 2014. While it didn’t get him to space, we’re betting it will be able to get him a soda!

MeArm

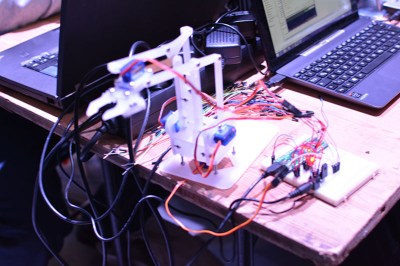
No robot arm Hacklet would be complete without featuring [ben.phenoptix] and the awesome MeArm. MeArm is a pocket-sized robot arm which uses tiny 9 gram servos for locomotion. It’s built from laser cut acrylic and standard hardware. We loved the MeArm so much that we featured it as one of the challenges in our Embedded Hardware Workshop in Munich. More recently, [Ben] and MeArm have had a great run on Kickstarter. Let’s hope those arms are good at stuffing, addressing, and mailing out packages!


owi
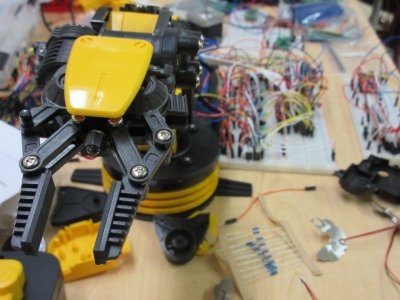
Finally we have [Kenji Larsen] with Reactron material transporter. The material transporter is just a small part of [Kenji’s] larger Reactron project. It started with an OWI-535 robot arm. The OWI is really a toy – a plastic kit which builds an open loop DC motor driven arm. [Kenji] has put some serious time into modifying his particular arm. He experimented with molding his own potentiometers for each joint before settling on a printed circuit board based design. Once the new system was in place, he found that his resistors were good for about 10,000 cycles. Not bad for a modified toy!

There are quite a few robot arm projects we weren’t able to cover in this edition of The Hacklet – you can check them all out on our brand new Robot Arm Projects List!

That’s it for this Hacklet, As always, see you next week. Same hack time, same hack channel, bringing you the best of Hackaday.io!

Hacklet 29 – Altoids Mint Tin Projects

Altoids – they’ve been around since King George III was on the throne. These curiously strong mints have had a storied history, a copy of which is included in every tin. They taste pretty good, but most hackers and makers are more interested in the pocket-sized tin than the mints themselves. It may have been the ham radio operators who first used Altoids tins to hold their sensitive transmitter and receiver circuits. The metal case makes a perfect electromagnetic field shield. It wasn’t long before the tins found their way into thousands of projects. This week’s Hacklet features some of the best projects with Altoids (and other mint) tins on Hackaday.io!

meeting-timerWe start with [Chad Lawson] and the Networking Group Timing Light. [Chad] has a networking meeting where each member has two minutes to introduce themselves. As is the case with most meetings, people tend to be a bit long-winded, running well beyond their allotted two minutes. The timing light contains an RGB LED which changes from green to yellow to red as a speaker’s time ticks away. The timer is reset by simply tilting the mint tin. [Chad] is hoping that the timer will serve as a gentle reminder to keep everyone on track time-wise.


radio2Next up is [Rjpope42] and his AM/FM Transmitter Pair. [Rjpope42] loves vintage tube radios, and wants to send his own signals to his amber glowing projects. Wiring an external audio input to a tube radio is pretty easy, but nothing beats a simple AM transmitter for convenience. Small FM transmitters are commonly available to add an MP3 player input to cars without an AUX audio in, but their AM counterparts have become rare. [Rjpope42] has built AM and FM transmitters, each of which will fit in a Mint Tin case. The AM transmitter can run on 9V or 12V, and even includes a USB power output for charging an MP3 player or phone!

da31k[John Hamann] entered Distance Analyzer 3000 in the Trinket EDC contest. While he didn’t win, it was still a great project, especially since this is [John’s] first serious Arduino project. The idea is to use a rotary encoder with a wheel to measure distances. Think of it like a mini version of a surveyor’s walking wheel. The Pro Trinket counts the pulses from the rotary encoder, then converts this to a distance in feet. We’d love to see [John] continue on the project. An ultrasonic distance sensor would be a great addition for multi-sensor distance reads!


ttotpFinally, we have [colonwq] with TTTOTP, a pro trinket Time based One Time Password (TOTP) generator. [colonwq] used the trinket to implement the well-known time based one time password algorithm. To implement a project like this, you need a stable time source. The ATmega328 isn’t very good at this, so [colonwq] used a Dallas DS1307 clock chip to keep track of things. The actual code is displayed on a 4 digit 7 segment display. When the button is pressed, the first half of the code is displayed. Once the button is released, the second half of the code is displayed for several seconds.


Need more mint? Check out our curiously awesome mint tin project list!

Hackaday.io Update and MeArm Giveaway

Hackaday.io has a few new features, including @username and #projectID. If you mention someone’s username with an @ in front of it, that user will get a notification in their stack. The same goes with mentioning a project ID with a # up front. To celebrate this, we’re giving away a pair of  special edition MeArms. All you have to do is leave a comment using the features on this project log. Huge thanks to [Jasmine] for setting all this up, and to [Ben] for letting us hijack his project for the week!

That’s it for this Hacklet, As always, see you next week. Same hack time, same hack channel, bringing you the best of Hackaday.io!

Hacklet 28 – Programmable Logic Hacks

FPGAs, CPLDs, PALs, and GALs, Oh My! This week’s Hacklet focuses on some of the best Programmable Logic projects on Hackaday.io! Programmable logic devices tend to have a steep learning curve.  Not only is a new hacker learning complex parts, but there are entire new languages to learn – like VHDL or Verilog. Taking the plunge and jumping in to programmable logic is well worth it though. High-speed projects which would be impossible with microcontrollers are suddenly within reach!

fpga-hdmiA great example of this is [Tom McLeod’s] Cheap FPGA-based HDMI Experimenting Board. [Tom’s] goal was to create a board which could output 720p video via HDMI at a reasonable frame rate. He’s using a Xilinx Spartan 6 chip to do it, along with a handful of support components. The images will be stored on an SD card. [Tom] is hoping to do some video with the setup as well, but he has yet to see if the chip will be fast enough to handle video decoding while generating the HDMI data stream. [Tom] has been quiet on this project for a few months – so we’re hoping that either he will see this post and send an update, or that someone will pick up his source files and continue the project!

ardufpgaNext up is our own [technolomaniac] with his Arduino-Compatible FPGA Shield. Starting out with FPGAs can be difficult. [Technolomaniac] has made it a bit easier with this shield. Originally started as a project on .io and now available in The Hackaday Store, the shield features a Xilinx Spartan 6 FPGA. [Technolomaniac] made power and interfacing easy by including regulators and level shifters to keep the sensitive FPGA happy. Not sure where to start? Check out [Mike Szczys’] Spartan-6 FPGA Hello World! [Mike] takes us from installing Xilinx’s free tool chain to getting a “hello world” led blinker running!

lander3Still interested in learning about Programmable Logic, but not sure where to go? Check out [Bruce Land’s] Teaching FPGA parallel computing. Actually, check out everything [Bruce] has done on Hackaday.io – the man is a living legend, and a wealth of information on electronics and embedded systems. Being a professor of engineering at New York’s Cornell University doesn’t hurt either! In Teaching FPGA parallel computing, [Bruce] links to Cornell’s ECE 5760 class, which he instructs. The class uses an Altera/Terasic DE2 FPGA board to demonstrate parallel computing using programmable logic devices. Note that [Bruce] teaches this class using Verilog, so all you seasoned VHDL folks still can learn something new!


chamFinally, we have [Michael A. Morris] with Chameleon. Chameleon is an Arduino compatible FPGA board with a Xilinx Spartan 3A FPGA on-board. [Michael] designed Chameleon for two major purposes:  soft-core processors, and intelligent serial communications interface. On the processor side Chameleon really shines. [Michael] has implemented a 6502 core in his design. This means that it would be right at home as the core of a retrocomputing project. [Michael] is still hard at work on Chameleon, he’s recently gotten fig-FORTH 1.0 running! Nice work [Michael]!

Want more programmable logic goodness? Check out our Programmable Logic List!

That about wraps things up for this episode of The Hacklet! As always, see you next week. Same hack time, same hack channel, bringing you the best of Hackaday.io!

Hacklet 27 – Holiday Hacks

It’s beginning to look a lot like the holidays around here. That means it’s time for holiday hacks here on The Hacklet! This week we’re looking at the coolest festive hacks created by YOU on Hackaday.io!

xmashdrWe start with [charliex] and Cypress PSOC 4 + ESP8266 WS2812 RGB XMAS Lights. The name might be a mouthful, but the goal of the project is a simple one: Awesome Christmas lights! [Charliex] has created WiFi controllable Christmas lights. To do this, he’s utilized ARM core based PSOC4 chips from Cypress. WiFi duty is handled by the popular ESP8266 module, and the lights themselves are WS2812 addressable strips.

[charliex] really outdid himself this time, creating a complete solution from the ground up. He started with a Cypress dev board, but quickly moved to a board of his own design. The PCBs  first were milled at home, then sent out for manufacturing.
Control of the strip is via UDP through a WiFi network. [Charliex] found the strips have plenty of WiFi range to place outside his home.  The last part of the puzzle was control – which [charliex] handled in style by creating his own GUI to handle synchronizing several strips to music played on a central computer.

snowflakeNext up is [nsted] with another LED hack, Glowing Xmas Snowflake Sculpture. [Nsted] was contracted to add some extra LED bling to a sculpture. The problem was that these LEDs would be filling in gaps left in the primary interactive lighting system which ran the entire sculpture. Any time you have to meld two systems, things can get crazy. [Nsted] found this out as he added WS2812B Adafruit NeoPixel strips to the Sensacell modules already designed into the sculpture. Communications happen via RS485, with Arduino Due and Megas handling the processing. Power was a concern with this sculpture, as it was pulling over 100 amps at low voltage. Like many art installations, this was a “work down to the wire” event. Everything came together at the last-minute though, and the project was a success!

musicNext up is [Jeremy Weatherford] with Christmas Orchestra.  [Jeremy] has taken on the task of making the most epic retro electronics orchestra ever created. He’s playing Trans-Siberian Orchestra’s Wizards in Winter on four floppies, three scanners, and an ancient inkjet printer. LED strips on the moving elements add lights to the sound. An Arduino Mega with a RAMPS board controls the show. [Jeremy] had his orchestra professionally recorded both on audio and in video. We’re anxiously awaiting the final video upload so we can rock out to some old hardware!

xmaslightsFinally, we’ve got [crenn6977] with his Solar powered Christmas Light Controller. This was [crenn6977’s] entry in the The Hackaday Prize. While it didn’t take him to space, we’re sure it will bring Santa to his door. Rather than run lots of tiny solar cells for his Sun powered Christmas lights, [crenn6977] is going for a single large panel and wireless control. The nRF24L01+ is handling the wireless connectivity, while a STM32F042 ARM cortex M0 processor is the brains of the operation. Solar power demands efficient design, so [crenn6977] is digging deep into op-amp circuits to keep those LEDs running through the night, and the batteries charging through the day.

It’s just about time for us to settle our brains for a long winter’s nap, so we’ll close this edition of The Hacklet here.  As always, see you next week. Same hack time, same hack channel, bringing you the best of Hackaday.io!

Hacklet 26 – Arduino Projects

Arduino is one of those boards that has become synonymous with hacking and making. Since its introduction in 2005, over 700,000 official Arduino boards have been sold, along with untold millions of compatible and clone boards. Hackers and makers around the world have found the Arduino platform a cheap and simple way to get their projects off the ground. This weeks Hacket focuses on some of the best Arduino based projects we’ve found on Hackday.io!

drawingbot[Niazangels] gets the ball – or ballpoint pen – rolling with Roboartist, a robot which creates line drawings. Roboartist is more than just a plotter though. [Niazangels] created a custom PC program which creates line drawings from images captured by a webcam. The line drawings are converted to coordinates, and sent to an Arduino, which controls all the motors that move the pen. [Niazangels] went with Dynamixel closed loop servo motors rather than the stepper motors we often see in 3D printers.

tape[Peter Edwards] is preserving the past with Tapuino, the $20 C64 Tape Emulator. Plenty of programs for the Commodore 64, 128, and compatibles were only distributed on tape. Those tapes are slowly degrading, though the classic Commodore herdware is still going strong. Tapuino preserves those tapes by using an Arduino nano to play the files from an SD card into the original Datasette interface. [Peter] also plans to add recording functionality to the Tapuino, which will make it the total package for preserving  your data. All that’s missing is that satisfying clunk when pressing the mechanical Play button!

infinity

[Dushyant Ahuja] knows what time it is, thanks to his Infinity Mirror Clock. This clock tells time with the help of some WS2812B RGB LED. [Dushyant] debugged the clock with a regular Arduino, but when it came time to finish the project, he used an ATmega328 to create an Arduino compatible board from scratch. Programming is easy with an on-board Bluetooth module. [Dushyant] plans to add a TFT lcd which will show weather and other information when those power-hungry LEDs are switched off.

alarm2[IngGaro] built an entire home alarm system with his project Arduino anti-theft alarm shield. [IngGaro] needed an alarm system for his home. That’s a lot to ask of a standard ATmega328p powered Arduino Uno. However, the extra I/O lines available on an Arduino Mega2560 were just what the doctor ordered. [IngGaro] performed some amazing point-to-point perfboard wiring to produce a custom shield that looks and works great! The alarm can interface with just about any sensor, and can be controlled via the internet. You can even disarm the system through an RFID keycard.

Want MORE Arduino in your life? Check out our curated Arduino List!

That’s about all the millis()  we have for this weeks Hacklet. As always, see you next week. Same hack time, same hack channel, bringing you the best of Hackaday.io!

Hacklet 25 – ESP8266 WiFi Module Projects

Few devices have hit the hacker/maker word with quite as large a bang as the ESP8266. [Brian] first reported a new $5 WiFi module back in August. Since then there have been an explosion of awesome projects utilizing the low-cost serial to WiFi module that is the ESP8266. This week’s Hacklet is all about some of the great ESP8266 projects we’ve found on Hackaday.io!

retroWe start with [TM] and the ESP8266 Retro Browser. [TM] has a great tutorial on combining the ESP8266 with an Arduino Mega2560. [TM’s] goal was a simple one: create a WiFi “browser” to access Hackaday’s Retro Site.  This is a bit more complex than one would first think, as the Arduino Mega2560 is a 5V board, and the ESP8266 are 3.3V parts. Level shifters to the rescue! [TM] was able to bring up the retro site in a terminal, but found that even “simple” websites like google send enough data back to swap the poor ESP8266!

oilmeterNext up is [Thomas] with the Simple Native ESP8266 Smartmeter. [Thomas] has created a device to measure run time on his oil heating system. He implemented this with some native programming on the ESP8266’s onboard Diamond Standard L106 Controller. When he was done, the ‘8266 had two new AT commands, one to start measurement and one to stop. A bit of web magic with some help from openweathermap.org allows [Thomas] to plot oil burner run time against outside temperature.

native[Matt Callow] is also checking out native programming using the EspressIf sdk with his project ESP8266 Native. ExpressIf made a great choice when they released the SDK for the ESP8266 back in October. [Matt] has logged his work on building and extending the demo apps from EspressIf. [Matt] has seven demo programs which do everything from blinking an LED to connecting to thingspeak via WiFi. While the demos aren’t all working yet, [Matt] is making great progress. The best part is he has all his code linked in from his Github repo. Nice work [Matt!]


8266[Michael O’Toole] is working on ESP8266 Development PCBs. The devboards have headers for the ESP8266, an on-board ATmega328 for Arduino Uno compatibility, and a USB to serial converter to make interfacing easy. [Michael] also provides all the important components you need to keep an ESp8266 happy, such as programming buttons, and a 3.3V regulator. We really like that [Michael] has included a header for a graphical LCD based local console.

Want to see more ESP8266 goodness? Check out our curated ESP8266 list on Hackaday.io!

Hackaday.io Update!

Hackaday.io gets better and better every day. We’ve just pushed out a new revision which includes some great updates. Search is now much improved. Try out a search, and you’ll find you can now search by project, project log, hacker, or any combination of 11 different fields. Our text editor has been revamped as well. Update a project log to give the new look a try!
We know everyone on .io is awesome, but just in case a spammer slips in, we’ve added “report as inappropriate” buttons to projects and comments. Once a few people hit those report buttons, projects or comments get sent to the admins for moderation.

That’s all the time we have for this week’s Hacklet! As always, see you next week. Same hack time, same hack channel, bringing you the best of Hackaday.io!

Hacklet 22 – Retro Console Projects

Everyone loves arcade games, and it didn’t take long for designers to figure out that people would love to take the fun home. The home gaming console market has been around for decades. Through the early days of battery-powered pong style consoles through Atari and the video game crash of the early 80’s, to the late 8 and 16 bit era spearheaded by The Nintendo Entertainment System and The Sega Master System and beyond, consoles have become a staple of the hacker home. This week’s Hacklet features some of the best retro console projects from Hackaday.io!

52001We start with [ThunderSqueak] saving the world with her Atari 5200 Custom Controller Build. For those who don’t know, the Atari 5200 “Super System” was an 8 bit system ahead of its time. The 5200 was also saddled with on of the worst controller designs ever. The buttons would stop responding after a few hours of game play. With 17 buttons, (including a full number pad), that was a pretty major design flaw! [ThunderSqueak] hacked a cheap commercial fighting game stick to make it work with the 5200. 12 individual buttons were wired in a matrix to replace the telephone style keys on the original 5200 controller. Atari’s non-centering analog stick was converted over to a standard 4 switch arcade style stick. [ThunderSqueak] did leave the original pots accessible in the bottom of the enclosure for centering adjustments. Many 5200 games work great with the new setup.


snes[DackR] is bringing back the glory days of Nintendo with Super Famicade, a homebrew 4 SNES arcade system inspired by Nintendo’s Super System. Nintendo’s original Super System played several customized versions of games which were available on the Super Nintendo Entertainment System (SNES). [DackR] is building his own with parts from four SNES consoles. He’s also adding a few features, like a touch screen, video overlay, and enhanced RGB.

He’s going to add custom memory monitoring hardware, which will allow him to check how many lives a player has left and handle coin operation, all without the original Super System Hardware. If you’re curious what the original Super Systems looked like, check out Hackaday’s Tokyo Speedrun video.You might just catch a glimpse of one!

rgb[Bentendo64] is improving on the past with RGB For ‘Murica. European systems have enjoyed the higher quality afforded by separate red, green and blue video lines for decades. North American gamers, however were stuck in the composite or S-Video realm until shortly before the HDTV age. [Bentendo64] had an old hotel CRT based monitor, and decided to hack an RGB input. After opening up the back of the set, he removed the yolk board and added direct inputs to the video amplifiers. We’re not sure if this mod will work with every CRT, but it can’t hurt to try! Just be sure to discharge those high voltage capacitors before wrenching on these old video systems. Even if a set has been unplugged for days, the caps can give a seriously painful (and dangerous) shock!

snes2[Ingo S] is also working to improve the SNES with SNES AmbiPak, a mod which brings ambient lighting and “rumble pack” controller feedback to the vintage Super Nintendo. [Ingo S] used the popular SNES9X emulator to figure out where game data is stored while the SNES is running. His proof of concept was the original F-ZERO SNES game. [Ingo S] found that Every time the player’s car hits the wall, the system would perform a write on address 3E:0C23. All he would need to do is monitor that address on the real hardware, and rumble the controller on a write. The real hardware proved to be a bit harder to work with though. Even these “slow” vintage systems clock their ram at around 3MHz, way too fast for an Arduino to catch a bus access.  [Ingo S] is solving that problem with a Xilinx XC9572 Complex Programmable Logic Device (CPLD). CPLDs can be thought of as little brothers to Field Programmable Gate Arras (FPGAs). Even though they generally have less “room” for logic inside, CPLDs run plenty fast for decoding memory addresses.  With this change, [Ingo S] is back on track to building his SNES rumble pack!

It feels like we just got started – but we’re already out of space for this week’s Hacklet! As always, see you next week. Same hack time, same hack channel, bringing you the best of Hackaday.io!