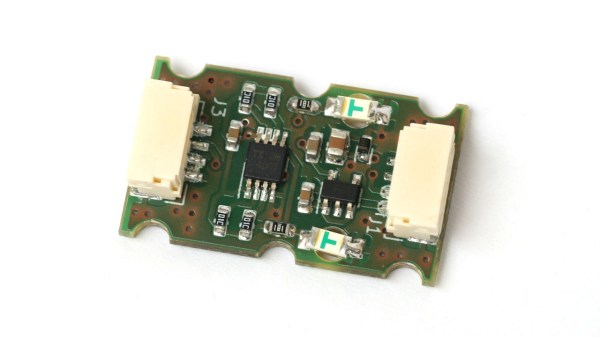
The I2C extender board on a white background, fully assembled, with two connectors and two indicator LEDs

Extenders And Translators For Your I2C Toolkit

If you’ve ever been laying out a network I2C devices inside a project box or throughout your robot’s body, you’ll probably know that I2C is not without its pitfalls. But for many of those pitfalls, there’s a handy chip you can use. [Roman Dvořák] from ThunderFly has experienced it on their drone building journeys, and that’s why they bring us two wonderful open source hardware boards: an I2C bus extender, and an I2C address translator.

The first board, an I2C bus extender, is based around the TCA4307 chip, and not only it lets you extend the bus further than it would normally go, it would also protect you. When the bus capacity is no longer handleable by your devices, or a particular misbehaving device gets the bus stuck, this chip will take care of it and dissipate your troubles. It will even let you know when your bus is wired up correctly, with a handy shine-through LED!

The second board is an I2C address translator. We’ve covered them before, but in short, address translators let you avoid I2C address conflicts while using multiple devices that share the same address. This particular module uses the LTC4317 chip, a common choice for such translation, and the board leaves no feature unimplemented. In the README, there’s quite a few pictures with examples of where this sensor proves mighty useful, too!

It appears that ThunderFly open sources a lot of their designs on GitHub, an effort that we salute. The designs are great to learn from, but if you’re just looking for turn-key hardware, you can get both of these boards from their Tindie store. The cables they use have locking connectors, but as long as the pinout matches, you should be able to solder a JST-SH socket and add these modules to your QWIIC toolkit.

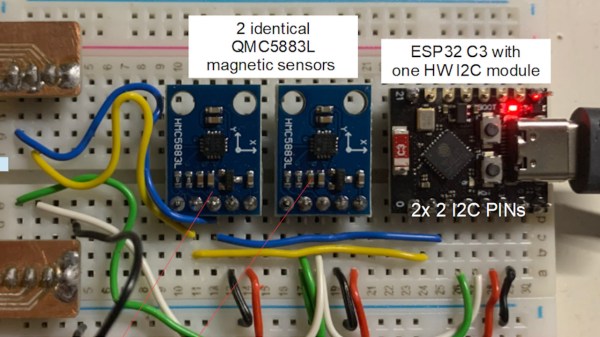
A breadboard showing a tiny ESP32 board and two HMC5883L sensors connected to it on different pins

Avoid I2C Address Conflicts On ESP32 By Pin Muxing

Using hardware I2C on an ESP32? Do you need to connect multiple I2C devices with the same address? Normally, you wouldn’t be able to do that without extra parts, but on the ESP32, [BastelBaus] has found a nice hack — just connect your devices to different pins and slightly abuse the ESP32 GPIO muxing, no extra hardware required!

Initially, they tried separating SDA and SCL completely, and after a bit of tinkering, that’s worked out wonders! For this method, [BastelBaus] provides example Arduino code you could easily integrate into your project, and shows logic analyzer captures that demonstrate there’s barely any overhead. Later, they’ve also found out that you could multiplex only one of the pins, specifically, SDA, having the SCL line be common! As far as we see, this could also work out with split SCL, but do let us know if that doesn’t sound right.

Typically, such a problem is solved with an I2C multiplexer, and we’ve highlighted projects with them before. However, this simple method could also work on chips like the RP2040 or even the Raspberry Pi 4 — just a bit more limited, since the GPIO muxing for I2C has less available ports! Also, if you’re not using a chip with such a comfortable GPIO mux and you must use devices with overlapping addresses, check out the comment section under our I2C ecosystem article – there’s a fair few other methods you can use. And, if this method ever malfunctions for you, there’s a bunch of very straightforward ways you could debug your bus!

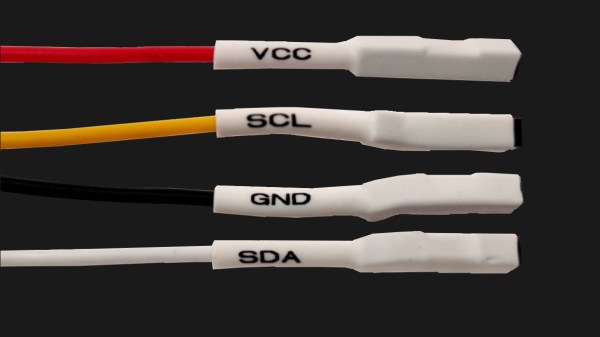
Four jumper wires with white heatshrink on them, labelled VCC, SCL, SDA and GND

The Connector Zoo: I2C Ecosystems

I2C is a wonderful interface. With four wires and only two GPIOs, you can connect a whole lot of sensors and devices – in parallel, at that! You will see I2C used basically everywhere, in every phone, laptop, desktop, and any device with more than a few ICs inside of it – and most microcontrollers have I2C support baked into their hardware. As a result, there’s a myriad of interesting and useful devices you can use I2C with. Occasionally, maker-facing companies create plug-and-play interfaces for the I2C device breakouts they produce, with standardized pinouts and connectors.

Following a standard pinout is way better than inventing your own, and your experience with inconsistent pin header pinouts on generic I2C modules from China will surely reflect that. Wouldn’t it be wonderful if you could just plug a single I2C-carrying connector into an MPU9050, MLX90614 or HMC5883L breakout you bought for a few dollars, as opposed to the usual hurdle of looking at the module’s silkscreen, soldering pin headers onto it and carefully arranging female headers onto the correct pins?

As with any standard, when it comes to I2C-on-a-connector conventions, you would correctly guess that there’s more than one, and they all have their pros and cons. There aren’t quite fifteen, but there’s definitely six-and-a-half! They’re mostly inter-compatible, and making use of them means that you can access some pretty powerful peripherals easily. Let’s start with the two ecosystems that only have minor differences, and that you’ll encounter the most! Continue reading “The Connector Zoo: I2C Ecosystems”

Automatic I2C Address Allocation For Daisy-Chained Sensors

Many readers will be familiar with interfacing I2C peripherals. A serial line joins a string of individual I2C devices, and each of the devices has its own address on that line. In most cases when connecting a single device or multiple different ones there is no problem in ensuring that they have different addresses.

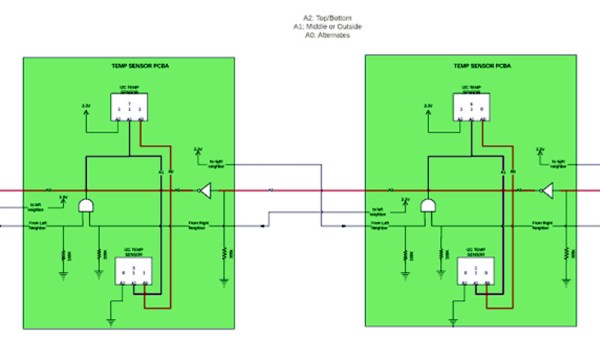
What happens though when multiple identical devices share an I2C bus? This was the problem facing [Sam Evans] at Mindtribe, and his solution is both elegant and simple. The temperature sensors he was using across multiple identical boards have three pins upon which can be set a binary address, and his challenge was to differentiate between them without the manufacturing overhead of a set of DIP switches, jumpers, or individual pull-up resistors. Through a clever combination of sense lines between the boards he was able to create a system in which the address would be set depending upon whether the board had a neighbour on one side, the other, or both. A particularly clever hack allows two side-by-side boards that have two neighbours to alternate their least significant bit, allowing four identical boards each with two sensors to be daisy-chained for a total of eight sensors with automatic address allocation.

We aren’t told what the product was in this case, however it’s irrelevant. This is a hardware hack in its purest sense, one of those which readers will take note of and remember when it is their turn to deal with a well-populated I2C bus. Of course, if this method doesn’t appeal, you can always try an LTC4316.

LTC4316 Is The I2C Babelfish

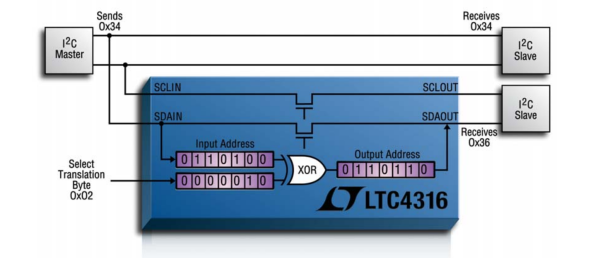
The LTC4316 is something special. It’s an I²C address translator that changes the address of a device that would otherwise conflict with another on the same I²C bus. Not a hack? Not so fast. Exactly how this chip does this trick is clever enough that I couldn’t resist giving it the post it rightfully deserves.

On-the-Fly Translation

What’s so special? This chip translates the address on-the-fly, making it transparent to the I²C protocol. Up until this point, our best bet for resolving address collisions was to put the clashing chip on a separate I²C bus that could be selectively enabled or disabled. In that department, there’s the PCA9543 and PCA9547 demultiplexers which we’ve seen before. Both of these devices essentially act like one-way check valves. To address any devices downstream, we must first address the multiplexer and select the corresponding bus. While these chips resolve our address collision problems, and while there’s technically a way to address a very large number of devices if we’re not time-constrained, the control logic needed to address various bus depths can get clunky for nested demultiplexers.

What’s so classy about the LTC4316 is that is preservers simplicity by keeping all devices on the same bus. It prevents us from having to write a complicated software routine to address various sections of a demultiplexed I²C bus. In a nutshell, by being protocol-transparent, the LTC4316 keeps our I²C master’s control logic simple.

How it Works

I mocked up a quick test setup to have a go at this chip in real life. Continue reading “LTC4316 Is The I2C Babelfish”

Taking The Leap Off Board: An Introduction To I2C Over Long Wires

If you’re reading these pages, odds are good that you’ve worked with I²C devices before. You might even be the proud owner of a couple dozen sensors pre-loaded on breakout boards, ready for breadboarding with their pins exposed. With vendors like Sparkfun and Adafruit popping I²C devices onto cute breakout boards, it’s tempting to finish off a project with the same hookup wires we started it with.

Image result for i2c sensor array
prototyping starts here, but we’re in danger when projects finish with this sort of wiring

It’s also easy to start thinking we could even make those wires longer — long enough to wire down my forearm, my robot chassis, or some other container for remote sensing. (Guilty!) In fact, with all the build logs publishing marvelous sensor “Christmas-trees” sprawling out of a breadboard, it’s easy to forget that I²C signals were never meant to run down any length of cable to begin with!

As I learned quickly at my first job, for industry-grade (and pretty much any other rugged) projects out there, running unprotected SPI or I²C signals down any form of lengthy cable introduces the chance for all sorts of glitches along the way.

I thought I’d take this week to break down that misconception of running I²C over cables, and then give a couple examples on “how to do it right.”

Heads-up: if you’re just diving into I²C, let our very own [Elliot] take you on a crash course. Continue reading “Taking The Leap Off Board: An Introduction To I2C Over Long Wires”

How I²C EEPROM Talks To The Bus

You will probably be familiar with I²C, a serial bus typically used for not-very-fast communication with microcontroller peripherals. It’s likely though that unless you are an I²C wizard you won’t be intimately familiar with the intricacies of its operation, and each new device will bring a lengthy spell of studying data sheets and head-scratching.

If the previous paragraph describes you, read on. [Clint Stevenson] wrote a library for interfacing I²C EEPROMs to Arduino platforms, and when a user found a bug when using it on an ATtiny85, he wrote up his solution. The resulting piece is a clear explanation of how I²C EEPROMs talk to the bus, the various operations you can perform on them, and the overhead each places on the bus. He then goes on to explain EEPROM timing, and how since it takes the device a while to perform each task, the microcontroller must be sure it has completed before moving to the next one.

In the case of [Clint]’s library, the problem turned out to be a minor incompatibility with the Arduino Wire library over handling I²C start conditions. I²C has a clock and a data line, both of which are high when no tasks are being performed. A start condition indicates to the devices on the bus that something is about to happen, and is indicated by the data line going low while the clock line stays high for a while before the clock line starts up and the data line carries the I²C command. He’s posted samples of code on the page linked above, and you can find his library in his GitHub repository.

If you want to know more about I²C, take a look at Hackaday Editor [Elliot Williams’] masterclasses on the subject: What could go wrong, I²C edition, and Embed With Elliot, I²C bus scanning.

Serial EEPROM die picture, By Epop (Own work) [CC0], via Wikimedia Commons.