Automatic Garage Door Opener Works For Your Cat

Using an Arduino or Raspberry Pi to perform a task in the real world is certainly a project we’ve seen here before, and certainly most of these projects help to make up the nebulous “Internet of Things” that’s all the rage these days. Once in a while though, a project comes along that really catches our eye, as is the case with [Jamie’s] meticulously documented automatic garage door opener.

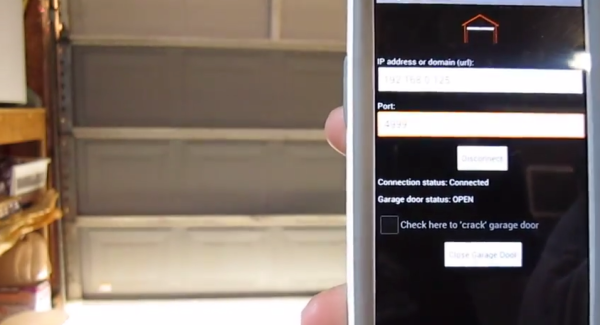
This garage door opener uses an ATMega328 to connect the internet to the garage door. A reed switch is installed which lets the device sense the position of the door, which is relayed back to the internet. [Jamie] wrote an Android app that can open and close the door and give the user the information on the door’s status. One really interesting feature is the ability to “crack” the garage door. This is done by triggering the garage door opener twice with a delay in between. From the video after the break we’d say this is how [Jamie’s] cat gets in and out.

We love seeing projects that are extremely well documented so that anyone who wants to make one can easily figure out how. Internet-connected garage door openers have been featured in other unique ways before too, but we’ve also seen ways to automatically open blinds or chicken coops!

Hack Your Phone: Turn Your Volume Buttons Into GPIO Ports

Internet connected cameras are mighty useful, specially in situations requiring some form of remote monitoring. An always-on camera that is available over an internet connection, is cheap, and uses re-purposed  hardware – that’s what the Gonzo project hopes to achieve. To accommodate these requirements, the Exploratory Engineering program team in Telenor Digital are using off-the-shelf phone hardware running on top of a fork of Firefox OS. You hang the Gonzo where you want to monitor a situation, after which it will function for up to one month before needing a recharge, sending data to a designated public URL over the 2G network.

A big downside with using such hardware is that it is not designed for the task at hand, and offers no expansion ports that may be needed for certain functions. In this particular case, the designers needed a couple of output ports to drive some LED’s. The hardware guys got a bit creative,  and re-mapped the volume buttons of the phone into generic GPIO ports. On the software side, they looked at where the button GPIO’s were referenced, and located how they are mapped to a keymap. They then added a device driver that maps the GPIO ports to be generic ports instead. Modding the hardware needed a little bit more hard work, figuring out which traces connected to the two volume buttons, adding series resistors, and then wiring the LED’s in place. The project itself is still a work in progress, and you can read more about it at the Gonzo website.

If you’re like one of us and have a box full of old phones lying around, take a look at some creative suggestions here for some Arduino controlled robots.

Thanks for the tip [pb] !

Hack Allows ESP-01 To Go To Deep Sleep

The ESP-01 module based on the ESP8266 is all the rage with IoT folks at the moment – and why not. For about 5 bucks, it can’t be beat on price for the features it offers. The one thing that such radios do a lot is suck power. So, it’s no surprise that ways to cut down on the juice that this device consumes is top priority for many people. [Tim] figured out a simple hardware hack to get the ESP-01 to go to deep sleep, effectively reducing its current draw to 78uA – low enough to allow battery powered deployment.

While [Tim] was working on understanding the ESP8266 tool chain (NodeMCU firmware > Lua interpreter > ESPlorer IDE), he realized that some essential pins weren’t accessible on the ESP-01 module. [Tim] built a Dev board on perf board that let him access these pins and also added some frills while at it. We’re guessing he (or someone else) will come up with a proper PCB to make things easier. But the real hack is on the ESP-01 module itself. [Tim] needed to hardwire the ‘post-sleep-reset-pin’ on the MCU to the Reset terminal. That, and also pry off the indicator LED’s with a screw driver! That sounds a bit drastic, and we’d recommend pulling out your soldering iron instead. If you’re one of the unlucky one’s to receive the “magic smoke” releasing ESP8266 modules, then you don’t need the LED anyway.

Making Something Useful With The ESP8266

The ESP8266 is the latest and greatest way to get a project connected to the Internet, but so far we haven’t seen many projects that actually do something with this very cool chip. Yes, there are a few people pinging away with AT commands, and there is a thriving community building interpreters and flashing new code on this chip, but not much in the way of actual projects. [Martin] is the exception. He’s come up with two projects that use the ESP8266.

The first project is one that puts the readings from a DHT22 temperature/humidity sensor up on the Internet. Following the spirit of all the recent development of the ESP8266, [Martin] isn’t using an external microcontroller. Instead, he’s using the SDK to run an HTTP daemon using [Sprite_TM]’s code. This web server provides an interface to turn an LED on and off, and reports the temperature and humidity readings from the DHT22. It’s simple, but it’s easy to see how this tiny chip could become the basis for a smart thermostat.

If lighting up LEDs isn’t enough, [Martin] has another project that includes three solid state relays. This one is a bit more complex with MQTT support, a fancy jQuery interface, and support for network time. [Martin] isn’t quite ready to publish the complete code for this project, but that’s only because there are a few features he’d like to implement before making it public. These include dynamic DNS, scheduling functionality, and support for an I2C status display. Even without these fancy features, it’s still a great project that’s still extremely capable for an Internet of Things thing. You can check out [Martin]’s video demo of this board below.

Continue reading “Making Something Useful With The ESP8266”

Using The ESP8266 As A Web-enabled Sensor

A few months ago, the ESP8266 came onto the scene as a cheap way to add WiFi to just about any project that had a spare UART. Since then, a few people have figured out how to get this neat chip running custom firmware, opening the doors to an Internet of Things based around an ESP8266. [Marc] and [Xavi] just wrote up a quick tutorial on how to turn the ESP8266 into a WiFi sensor platform that will relay the state of a GPIO pin to the Internet.

If you’re going to replicate this project, you won’t be using the stock firmware on the ESP. Instead of the stock firmware, [Marc] and [Xavi] are using the Lua-based firmware that allows for access to a few GPIOs on the device and scripting support to make application development easy. To upload this firmware to the ESP, [Marc] and [Xavi] needed a standard FTDI USB to serial converter, a few AT commands through a terminal program, and a few bits of wire.

The circuit [Marc] and [Xavi] ended up demoing for this tutorial is a simple webpage that’s updated every time a button is pressed. This will be installed in the door of their hackerspace in Barcelona, but already they have a great example of the ESP8266 in use.

The Future Of The Internet Of Things

When buying anything, you’re going to have a choice: good, fast, or cheap. Pick any two. A plumber will fix a drain good and fast, but it won’t be cheap. The skeezy guy you can call will fix a drain fast and cheap, but it won’t be good.

Such it is with radios. You can have long-range (good), high bandwidth (fast), or a low price (cheap). Pick any two. The Internet of Things demands a cheap, long-range radio module, but until now this really hasn’t existed. At Electronica last week, Microchip demoed their IoT solution, the LoRa. This module has a 15km (rural) or ~3km (heavy urban) range, works for a year on two AAA batteries, and is very cheap. Bandwidth? That’s crap, but you’re not streaming videos to your shoe.

Continue reading “The Future Of The Internet Of Things”

Another Internet Of Things Board (But This One Has Lisp)

Using routers as dev boards has been a long and cherished tradition in the circles we frequent, and finally design houses in China are taking notice. There have been a few ‘Internet of Things’ boards in recent months that have taken the SoC found in low-end routers, packaged the on a board with USB, some GPIOs, and a fair bit of memory and called it a dev board. The ZERO Plus is not an exception to this trend, but it does include a very interesting feature when it comes to the development environment: this one uses Lisp as its native language.

The Zero Plus is pretty much what you would expect from a router SoC being transplanted to an Internet of Things board: it uses the Ralink RT5350 SoC, giving it 802.11b/g/n, has 32MB of RAM, 8 or 16 M of Flash, I2C, I2S, SPI, USB, two UARTs, and 14 GPIOs. There is support for a webcam, temperature and humidity sensor, displays, and Arduino via a breakout board that appears to contain a standard, DIP-sized ATMega328,

All of that could be found in dozens of other boards, though. What really sets this one apart is the Lisp development environment. Programming the Zero is exactly as elegant as you would expect, with a ‘toggle a LED according to what time it is’ program looking something like this:

(define LED_On (lambda ()(dev.gpio 11 "out" 1)))
 (define LED_Off (lambda ()(dev.gpio 11 "out" 0)))
 (define CurrentTime? (lambda ()
    (int (time.strftime "%H" (time.localtime (time.time))))))
       (define Night?
          (lambda ()
            (and
            (> ( CurrentTime? ) 16) (< ( CurrentTime? ) 23)
          )
       )
    )
 (if (Night?) (LED_On) (LED_Off)

Dev boards built around somewhat more esoteric programming language isn’t anything new; The Espruino brings Javascript to ARM microcontrollers, and the MicroPython project is an astonishing undertaking and successful Kickstarter that brings the BASIC for the 21st century to the embedded world. Lisp, though… I don’t think anyone expected that. It’s a great way to differentiate your product, though.