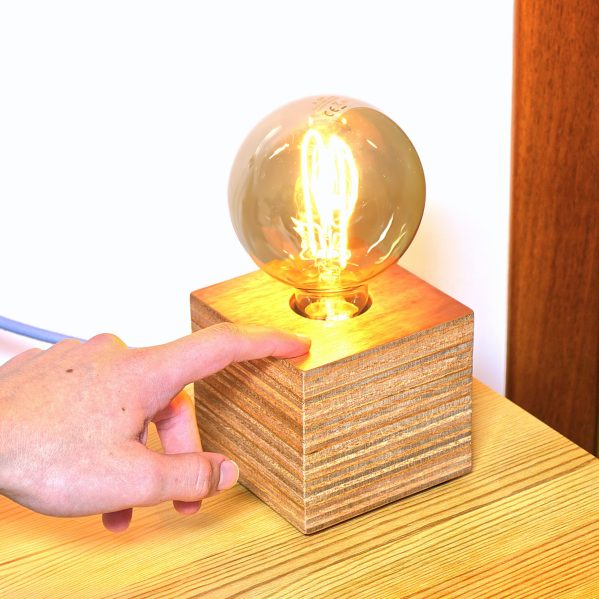
A Glowing Potato Peeler Makes A Nernst Lamp

Over the last couple few decades there has been a great shift in electric lighting, first towards more compact and efficient fluorescent lights, and then towards LED bulbs. The old incandescent bulbs, while giving a pleasant light, were not by any means efficient. Digging into the history books the incandescent bulb as we know it was not the only game in town; while suspending a filament in a vacuum stopped it from being oxidized there was another type of light that used a ceramic element at atmospheric pressure. The Nernst lamp required its filament to be heated before it would conduct electricity, and [Drop Table Adventures] has made one using the blade from a ceramic potato peeler.

The right ceramic is not the problem given the ease of finding ceramic kitchen utensils, but two problems make a practical light difficult. The copper connections themselves become too hot and oxidize, and preheating the ceramic with a blowtorch is difficult while also keeping an even heat. Finally, they do manage a self-sustaining lamp, albeit not the brightest one.

If you think the Nernst lamp sounds familiar, maybe it’s because we covered it as part of our retrotechtacular series.

Continue reading “A Glowing Potato Peeler Makes A Nernst Lamp”

Big 3D-Printed Lamp Tries Some New Features

In lamp design, bulbs are usually given generous clearances because they get hot during use. LED bulbs however give off comparatively little heat, which opens a few new doors. [Mark Rehorst] created this huge 3D printed lamp, made with his custom 3D printer and a hefty 1 mm diameter nozzle, and the resulting device not only looks great, but shows off a few neat design features.

The LED filament bulb doesn’t give off much heat, so a PETG partial shade mounted directly to the bulb works fine.

[Mark] printed a partial shade in PETG that is made to sit directly on the bulb itself. The back of the shade is open, allowing light to spill out from behind while the front of the bulb is shielded, making it easier on the eyes. The result is pretty nifty, as you can see here. It sits in the center of the 600 mm tall lamp, which takes up most of the build volume of his self-made CoreXY-based printer, the UMMD.

The LED filament strands in this style of bulb are pretty neat in their own way, and some of you may remember that when they first became available as separate components, no time was lost in finding out what made them tick.

Lithophane Lamp Has Us Over The Moon

Lithophanes are artistic creations which rely on the varying thickness of a material that is then backlit to reveal an image. While these were often made in porcelain in the past, these days we have the benefit of 3D printing on our side. The principle can be deftly applied to everything from flat planes to spheres, with [Tiffany Lo] demonstrating a great application of the latter with her 3D printed moon lamp.

The basic concept is to take a 2D image of the lunar surface, and then use it to generate a height mapped sphere for 3D printing. When lit from within, the sphere will appear as per the surface of the moon. The sphere geometry was generated with the Lithophane Sphere Maker online tool combined with NASA data of the moon intended for computer graphics purposes. The sphere was then printed on a typical FDM printer before being assembled upon a base with LEDs inside for backlighting.

The result is an attractive moon lamp that both recalls the heavy rock that follows us in a tidally-locked orbit, and yet can be switched off at night to make it easier to sleep. Unfortunately, it’s impractical to turn off the shine from the real moon, and we suspect nobody is working on the problem.

We’ve seen other moon lamps before; they’re a great starting point because the moon’s greyscale tones work well as a lithograph. More advanced techniques are likely necessary for those eager to create lamps of the gas giants; if you’ve done so, be sure to drop us a line.

Lamps Double As Secret Surround Sound Speakers

Combined with today’s massive flat panel displays, a nice surround sound system can provide an extremely immersive environment for watching movies or gaming. But a stumbling block many run into is speaker placement. The front speakers generally just go on either side of the TV, but finding a spot for the rear speakers that’s both visually and acoustically pleasing can be tricky.

Which is why [Peter Waldraff] decided to take a rather unconventional approach and hide his rear surround sound speakers in a pair of functioning table lamps. This not only looks better than leaving the speakers out, but raises them up off the floor and into a better listening position. The whole thing looks very sleek thanks to some clever wiring, to the point that you’d never suspect they were anything other than ordinary lamps.

The trick here is the wooden box located at the apex of the three copper pipes that make up the body of the lamp. [Peter] mounted rows of LEDs to the sides of the box that can be controlled with a switch on the bottom, which provides light in the absence of a traditional light bulb. The unmodified speaker goes inside the box, and connects to the audio wires that were run up one of the pipes.

In the base, the speaker and power wires are bundled together so it appears to be one cable. Since running the power and audio wires together like this could potentially have resulted in an audible hum, [Peter] only ran 12 VDC up through the lamp to the LEDs and used an external “wall wart” transformer. For convenience, he also put a USB charging port in the center of the base.

When speakers or surround sound systems pass our way, it’s usually because some hacker has either madeĀ  a set from scratch, or has added some new and improved capabilities to their existing gear. This project may be a bit low-tech compared to some that have graced these pages, but it’s undoubtedly a clever and unexpected solution to the problem, and that’s a hack in our book.

Continue reading “Lamps Double As Secret Surround Sound Speakers”

Cassette Lamp Is A Throwback To The Pencil-Winding Glory Days

The audio cassette was the first music format that truly championed portability. It was robust, compact, and let people take music on the go to soundtrack their very lives. It was later supplanted by the higher-quality CD and then further digital technologies, but the format remains a nostalgic highlight for many. It also inspired this excellent lamp build from [Fab].

The lamp consists of 8 clear cassettes assembled into a rough cube-like shape on a 3D printed frame. The cassettes are edge-lit from below by a set of WS2812B LEDs, letting them glow in full-color splendour. The real magic of the lamp is the interface, however. A pencil can be inserted to turn the tape reels, just like rewinding a real cassette. However, in this case, they’re attached to a pair of rotary encoders, which are used to vary the color of the LEDs. As a bonus, the entire lamp runs off a Wemos D1, making it possible to update the lamp remotely over the Internet.

It’s a stylish build that would make an excellent conversation piece in any hip maker’s loungeroom. It’s a great nod to the creator of the compact cassette, [Lou Ottens], who passed away earlier this month. Video after the break.

Continue reading “Cassette Lamp Is A Throwback To The Pencil-Winding Glory Days”

Custom Firmware For IKEA’s ORSALA Lamp

These days, home appliances are equally as likely to have soft buttons and rotary encoders as they are to have a simple old clunk/clunk power switch and an analog knob for controls. This is all well and good if the device aligns with your personal philosophy about how such controls should work; otherwise, it’s absolutely maddening. [j-zero] ran into this problem with their ORSALA lamp from IKEA, and set about rectifying the problem with some custom firmware.

The ORSALA lamp uses a rotary encoder for setting both brightness and color temperature, with a button to toggle modes. A long press is required to switch the lamp off. The custom firmware modifies this behaviour, such that the lamp can be switched on and off with a simple button press. Turning the encoder modifies brightness, and turning it to minimum switches the lamp off too. Meanwhile, the less commonly used color temperature setting can be modified by using the button while adjusting the encoder.

The hack was executed by reprogramming the ORSALA’s onboard microcontroller, the STM8S003F3P6, via its SWIM interface. The pads for the interface are easily located on the board, making the hack easy. Other than the inputs, the lamp packs separate TTP932 LED drivers for the warm white and cool white LEDs, making it easy to code a custom firmware to handle all the necessary functions.

It’s a great example of a hacker taking control of their own device and remaking it to suit their needs. Of course, if you want to go for another hacker trope, just stuff a Raspberry Pi in there instead!

The Bright Side Of The Moon Lamp: It’s Any Colour You Like

One of the easiest ways to get into hardware hacking is by piecing together a few modules and shoehorning them into a really cool home. For example, why buy a commercial moon lamp when you can spend 30+ hours printing your own, and a few more hours hacking the guts together?

[Amit_Jain] was inspired by a project that combined a color map and bump map of the moon into a highly-detailed printable model. Displeased with the lack of features like portability and pretty colors, [Amit] took it to the next level by designing a threaded cap that unscrews to show the streamlined guts of an off-the-shelf RGB LED controller.

[Amit] freed the controller board from its plastic box and soldered the LED strip’s wires directly to it. For power, [Amit] taped the board to the battery from an old cell phone and stepped it up to 12 V with a boost converter. We think this looks quite nice and professional, especially with the stand. A brief demo is on the rise after the break.

If you’ve got the room for a much, much larger light-up moon, you should go for it.

Continue reading “The Bright Side Of The Moon Lamp: It’s Any Colour You Like”