pov_business_card

POV Business Card Is Guaranteed To Get You Noticed

Some say that handing out business cards is an antiquated practice due to the ubiquity of smart phones which can be used to trade or record contact information in mere moments. Instructables user [sponges] however, doesn’t agree and is pushing a “business card renaissance” of sorts with his POV business card.

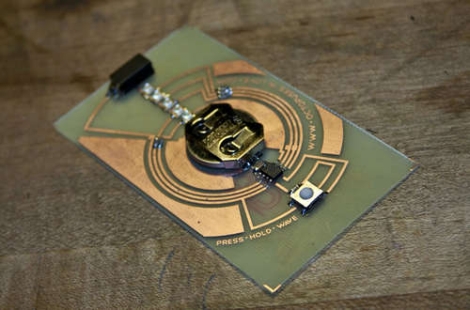
Hand-built in his basement, the cards feature a handful of SMD LEDs that display his name, followed by his phone number when waved back and forth. Constructed to be nearly the same size as a standard business card, his verison uses a PIC to manage the display as well as a tilt sensor to monitor the card’s motion. His walkthrough is quite thorough, and includes tutorials for each of the steps required to build the card. He discusses constructing your own etching tank, converting a laminator for PCB transfer purposes, building a solder reflow oven controller, as well as hacking an aquarium pump for use as a vacuum-powered pick and place.

The end result is a sharp looking business card that ensures you won’t forget meeting him. Keep reading to see a video of the card in action.

Continue reading “POV Business Card Is Guaranteed To Get You Noticed”

Converting A Scanner Into A Touchscreen

[Sprite_TM] was cleaning up his hacking workbench when he came across an all-in-one device that had seen better days. After a bit of consideration he decided to tear down the scanner portion of the device and ended up turning it into a multi-touch display.

The scanner relies on a long PCB with a line CCD sensor. This sensor is read in a similar way that information is passed along a shift register. Tell it to take a reading, and then start a clock signal to pulse out each analog value from the pixels of the sensor. In order to scan color images it uses multicolored LEDs to take different readings under different illumination.

[Sprite_TM] takes advantage of this functionality to turn it into a multitouch sensor. The sensor board itself is mounted below an LCD display along with a shield with a slit in it to help filter out ambient light. Above the screen a series of LEDs shine down on the sensor. When you break the beams with your finger it casts a series of shadows which are picked up by the sensor and processed in software. Watch the clip after the break to see it for yourself. It has no problem detecting and tracking multiple contact points.

Continue reading “Converting A Scanner Into A Touchscreen”

Add A Shutoff Timer To Your Bathroom Fan

Adding this board (translated) to your bathroom fan will turn it into a smart device. It’s designed to automatically shut off the fan after it’s had some time to clear humidity from the room. It replaces the wall switch which normally controls these fans by converting the fan connection to always be connected to mains.  The board draws constant power to keep the ATtiny13 running via a half-wave rectification circuit. A single LED that rises from the center of the PCB lights up to signal that the fan is in operation, but it is also used as a light sensor, similar to the LED communications hack from a couple of days ago. When the lights go on in the bathroom the microcontroller will turn on the exhaust fan via a Triac. It will remain on until the light level in the bathroom drops.

There’s an interesting timing algorithm that delays the fan startup, and varies the amount of time it will stay on in the dark depending on how long the bathroom lights were on. This way, a longer shower (which will build up more humidity) will cause the fan to remain on for the base of five minutes, plus one minute longer for every two minutes the bathroom was in use. Pretty smart, and quite useful if your bathroom sees high traffic from several family members.

Bill Hammack Explains How LED Backlit LCD Monitors Work

We had a basic understanding of how LCD monitors worked, and you may too. But the thing is, [Bill Hammack] doesn’t just explain the basics. Since he’s the Engineer Guy he explains the engineering principles behind how LED backlit LCD screens operate. But he does it in a way that everyone can understand.

After the break we’ve embedded his five-minute video. In it you’ll see him strip down a monitor to the back plate and then build it up piece-by-piece. We enjoyed his discussion of how the diffuser panels work together to even out and distribute the light. Theses are made of several layers and, although we knew they were there from working with salvaged LCD screens, we never knew quite what they were doing. He also covers how each liquid crystal cell works along with polarizing sheets to either block or allow light passage. And he’ll bring it on home by show how thin-film transistors in each subpixel of the screen work to multiplex the display, just like we did with that pumpkin back in October.

Continue reading “Bill Hammack Explains How LED Backlit LCD Monitors Work”

PWM-controlled LED Display Is Truly A Gift From The Heart

led_heart_panel

Instructables user [Simon] admits he addicted to electronics. Lucky for him, his wife of 15 years is pretty cool with, or at least tolerant of his need to fiddle with anything that plugs in. As a gift for their wedding anniversary, he decided it would be neat to combine his love for his wife with his love for electronics. The result is the the RGB LED “Love Heart” you see above. He built an RGB LED circuit controlled by a PIC12F683 microcontroller, which shines into a hand-etched plexi-glass panel.

The LED color is controlled using PWM, as you would expect. What you might not expect however, is the lengths [Simon] would travel to ensure nearly perfect color and brightness matching across the 5 LEDs he used in his project. Since RGB LEDs do not have a uniform output brightness, he used a Lux meter to precisely measure the white balance of each LED. He then plotted the results in Excel before coding the PWM driver. Now that’s devotion! Once the LEDs were settled, he went about constructing the rest of the LED panel.

If you are interested in building one for your sweetheart, [Simon] has you covered – he provides all of the schematics, templates, and source code required to get the job done.

Continue reading to see a video of his heart panel in action.

Continue reading “PWM-controlled LED Display Is Truly A Gift From The Heart”

Electronic Diaper Bag Reminds You To Pack Everything But The Baby

lilypad_diaperbag

[jnorby] knows what it’s like to leave the house with her baby in tow, only to realize that she has left something she needs at home. Instead of relying on a paper checklist, she decided to craft her own diaper bag that alerted her if she had forgotten to pack a particular item.

She built her bag from scratch, wiring small circuits into each of the pockets she created on the inside of the bag. Wires were run to each half of a snap fastener, so that they would complete the circuit when the snaps touch. The LEDs and snaps were then connected to a LilyPad Arduino, which checks the status of the snap circuits, lighting the appropriate LED once the proper item has been packed.

While we like the idea of a bag that uses functional indicators that remind you to pack items, we do think that the use of the Arduino, or any microprocessor for that matter, is massive overkill. We would ditch the LilyPad and snap fasteners for reed switches or perhaps normally closed micro leaf switches that turn the LEDs off once the proper item has been packed, rather than the other way around.

NBA Hangtime Pinball Display

[Ed Zarick] continues work on his NBA Hangtime pinball machine with the completion of the scoreboard and backglass. You should remember this project as we already covered the layer audio he developed for the system. Now he’s proving to be a protoboard master, using point-to-point techniques to build a pair of two and a half digit LED displays for team scores, as well as a shot clock timer and other status indicators.

The lighting board that controls it all is commanded via the i2c protocol, just like the three audio modules. It uses shift registers along with MOSFETs and [Ed] has taken the time to add pin headers and sockets for board interconnects. As is true with the audio system, one Arduino Mega acts as the master on the i2c bus and you’ll notice in the video after the break that the display works in perfect harmony with the sound effects.

We can’t wait to see what he comes up with for the play field!

Continue reading “NBA Hangtime Pinball Display”