Homebrew Radio Telescope Bags Pulsar

When one mulls the possibility of detecting pulsars, to the degree that one does, thoughts turn to large dish antennas and rack upon rack of sensitive receivers, filters, and digital signal processors. But there’s more than one way to catch the regular radio bursts from these celestial beacons, and if you know what you’re doing, a small satellite dish and an RTL-SDR dongle will suffice.

Granted, [Job Geheniau] has had a lot of experience exploring the radio universe. His website has a long list of observations and accomplishments achieved using his “JRT”, or “Job’s Radio Telescope.” The instrument looks like a homebrewer’s dream, with a 1.9-m satellite TV dish and precision azimuth-elevation rotator. Behind the feedhorn are a pair of low-noise amplifiers and bandpass filters to massage the 1,420 MHz signal that’s commonly used for radio astronomy, plus a Nooelec Smart SDR dongle and an Airspy Mini. Everything is run via remote control, as the interference is much lower with the antenna situated at his family’s farm, 50 km distant from his home in The Hague.

As for the pulsar, bloodlessly named PSR B0329+54, it’s a 5-million-year-old neutron star located in the constellation of Camelopardalis, about 3,500 light-years away. It’s a well-characterized pulsar and pulses at a regular 0.71452 seconds, but it’s generally observed with much, much larger antennas. [Job]’s write-up of the observation contains a lot of detail on the methods and software he used, and while the data is far from clear to the casual observer, it sure seems like he bagged it.

We’ve seen quite a few DIY radio astronomy projects before, both large and small, but this one really impresses with what it accomplished.

[via RTL-SDR.com]

Probe The Galaxy On A Shoestring With This DIY Hydrogen-Line Telescope

Foil-lined foam insulation board, scraps of lumber, and a paint-thinner can hardly sound like the tools of a radio astronomer. But when coupled with an SDR, a couple of amplifiers, and a fair amount of trial-and-error tweaking, it’s possible to build your own hydrogen-line radio telescope and use it to image the galaxy.

As the wonderfully named [ArtichokeHeartAttack] explains in the remarkably thorough project documentation, the characteristic 1420.4-MHz signal emitted when the spins of a hydrogen atom’s proton and electron flip relative to each other is a vital tool for exploring the universe. It lets you see not only where the hydrogen is, but which way it’s moving if you analyze the Doppler shift of the signal.

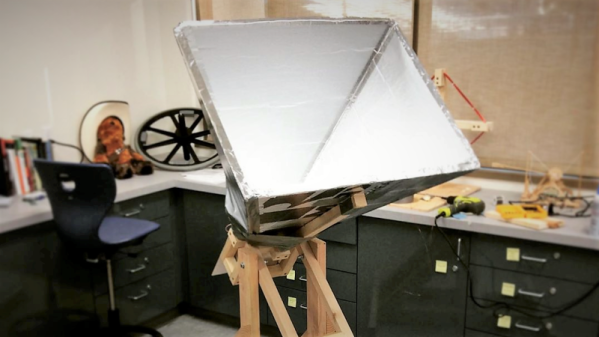
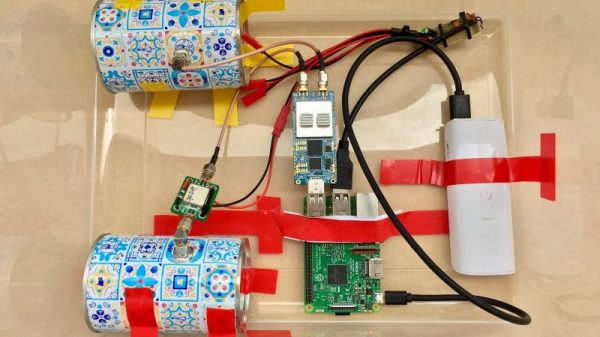
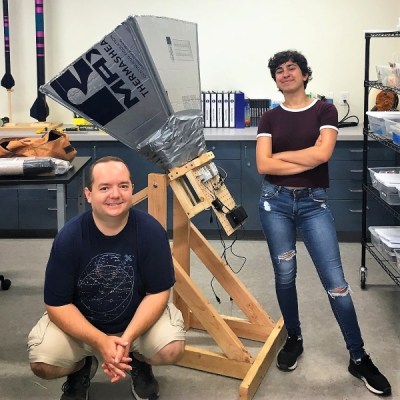
But to do any of this, you need a receiver, and that starts with a horn antenna to collect the weak signal. In collaboration with a former student, high school teacher [ArtichokeHeartAttack] built a pyramidal horn antenna of insulation board and foil tape. This collects RF signals and directs them to the waveguide, built from a rectangular paint thinner can with a quarter-wavelength stub antenna protruding into it. The signal from the antenna is then piped into an inexpensive low-noise amplifier (LNA) specifically designed for the hydrogen line, some preamps, a bandpass filter, and finally into an AirSpy SDR. GNURadio was used to build the spectrometer needed to determine the galactic rotation curve, or the speed of rotation of the Milky Way galaxy relative to distance from its center.

We’ve seen other budget H-line SDR receiver builds before, but this one sets itself apart by the quality of the documentation alone, not to mention the infectious spirit that it captures. Here’s hoping that it finds its way into a STEM lesson plan and shows some students what’s possible on a limited budget.

SDR Is At The Heart Of This Soup-Can Doppler Radar Set

Want to explore the world of radar but feel daunted by the mysteries of radio frequency electronics? Be daunted no more and abstract the RF complexities away with this tutorial on software-defined radar by [Luigi Cruz].

Taking inspiration from our own [Gregory L. Charvat], whose many radar projects have graced our pages before, this plunge into radar is spare on the budgetary side but rich in learning opportunities. The front end of the radar set is almost entirely contained in a LimeSDR Mini, a software-defined radio that can both transmit and receive. The only additional components are a pair of soup can antennas and a cheap LNA for the receive side. The rest of the system runs on GNU Radio Companion running on a Raspberry Pi; the whole thing is powered by a USB battery pack and lives in a plastic tote. [Luigi] has the radar set up for the 2.4-GHz ISM band, and the video below shows it being calibrated with vehicles passing by at known speeds.

True, the LimeSDR isn’t exactly cheap, but it does a lot for the price and lowers a major barrier to getting into the radar field. And [Luigi] did a great job of documenting his work and making his code available, which will help too. Continue reading “SDR Is At The Heart Of This Soup-Can Doppler Radar Set”

Everything You Didn’t Know You Were Missing About Bias Tees

Do you need a bias tee? If you want to put a DC voltage on top of an RF signal, chances are that you do. But what exactly are bias tees, and how do they work?

If that’s your question, [W2AEW] has an answer for you with this informative video on the basics of bias tees. A bias tee allows a DC bias to be laid over an RF signal, and while that sounds like a simple job, theory and practice often deviate in the RF world. The simplest bias tee would have a capacitor in series with the RF input and output to pass AC but block DC from getting out the input, and a DC input with a series inductance to prevent RF from getting into the DC circuit. Practical circuits are slightly more complicated, and [W2AEW] covers all you need to know about how real-world bias tees are engineered. He also gives some use cases for bias tees, from sending DC signals up a feed line to control an antenna tuner or rotator to adding a DC bias to a high-speed serial line.

It’s an interesting circuit, and we learned a lot, which is par for the course with [W2AEW]’s videos. Check out some of his other offerings, like a practical guide to the mysteries of Smith charts, or his visualization of how standing waves work.

Continue reading “Everything You Didn’t Know You Were Missing About Bias Tees”

Fallen Radiosonde Reborn As Active L-band Antenna

If your hobby is chasing radiosondes across vast stretches of open country, and if you get good enough at it, you’ll eventually end up with a collection of the telemetry packages that once went up on weather balloons to record the conditions aloft. Once you’ve torn one or two down though, the novelty must wear off, which is where this radiosonde conversion to an active L-band antenna comes from.

As it happens, we recently discussed the details of radiosondes, so if you need a primer on these devices, check that out. But as Australian ham [Mark (VK5QI)] explains, radiosondes are a suite of weather instruments crammed into a lightweight package with a GPS receiver and a small transmitter. Lofted beneath a weather balloon into the stratosphere, a radiosonde transmits a wealth of data back to the ground before returning on a parachute after the balloon bursts. [Mark] had his eyes on the nice quadrifilar helical antenna used by the Vaisla R92 radiosonde’s GPS receiver, with the aim of repurposing them. He had a lot of components to remove while still retaining the low-noise amplifier (LNA), but in the end managed to get a working antenna with 40 dB gain in the L-band, and with the help of an RTL-SDR dongle he picked up solid signals from Iridium satellites.

Want to score your own radiosonde to play with? First, you have to know how to listen in so you can find them. Or, you know – there’s always eBay.

[via RTL-SDR.com]

Cascade LNAs And Filters For Radioastronomy With An SDR

It may not be the radio station with all the hits and the best afternoon drive show, but 1420.4058 MHz is the most popular frequency in the universe. That’s the electromagnetic spectral line of hydrogen, and it’s the always on the air. But studying the H-line is a non-trivial task unless you know how to cascade low-noise amplifiers and filters to use an SDR for radio astronomy.

Because the universe is mostly made of hydrogen, H-line emissions are abundant, and their distribution can tell us a lot about the structure of galaxies. The 21-cm emission line is so characteristic and so prevalent that we used it as a unit of measurement on the plaques aboard the Pioneer probes as well as in the instructions for playing back the Voyager recordings. But listening in on 21-cm here on Earth requires a special setup, which [Adam (9A4QV)] describes in a detailed paper on the subject (PDF). [Adam] analyzes multiple configurations of LNAs and filters, both of which he sells, to determine the optimum front-end for 21-cm work. His analysis is a good primer on LNAs and explains why the front-end gear needs to be as close to the antenna as possible. Using his LNAs and filters and an SDR dongle, a reasonable 21-cm rig can be had for about $200 or so, less the antenna. He promises a follow-up paper on homebrew 21-cm antennas; we’ll be looking forward to that.

Not keen on the music of the spheres and prefer to listen to our own spacecraft instead? Then read up on the Deep Space Network and how you can snoop in.

Portable Classroom Upgrade: Smaller, Cheaper, Faster

[Eric] at MkMe Lab has a dream: to build a cheap, portable system that provides the electronic infrastructure needed to educate kids anywhere in the world. He’s been working on the system for quite a while, and has recently managed to shrink the suitcase-sized system down to a cheaper, smaller form-factor.

The last time we discussed [Eric]’s EduCase project was as part of his Hackaday Prize 2016 entry. There was a lot of skepticism from our readers on the goals of the project, but whatever you think of [Eric]’s motivation, the fact remains that the build is pretty cool. The previous version of the EduCase relied on a Ku-band downlink to receive content from Outernet, and as such needed to stuff a large antenna into the box. That dictated a case in the carry-on luggage size range. The current EduCase is a much slimmed-down affair that relies on an L-band link from the Inmarsat satellites, with a much smaller patch antenna. A low-noise amp and SDR receiver complete the downlink, and a Raspberry Pi provides the UI. [Eric]’s build is just a prototype at this point, but we’re looking forward to seeing everything stuffed into that small Pelican case.

Yes, Outernet is curated content, and so it’s not at all the same experience as the web. But for the right use case, this little package might just do the job. And with a BOM that rings up at $100, the price is right for experimenting.

Continue reading “Portable Classroom Upgrade: Smaller, Cheaper, Faster”