Tame Your Flexible Filaments With This Belt-Drive Extruder

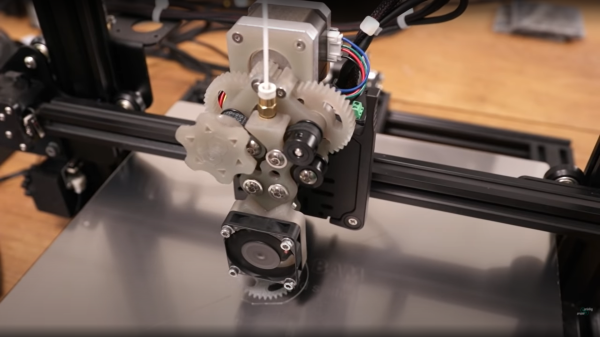
[Proper Printing] clearly enjoys pushing the boundaries of 3D printed materials, and sometimes this requires building custom 3D printers or at least the business end of them. Flexible filaments can be a bit of a pain to deal with, simply because most extruders are designed to push the filament into the hot end with a simple hobbed bolt (or pinch roller setup) and only work reliably due the rigidity of the plastic itself. Once you go flexible, the rigidity is reduced and the filament often deflects sideways and the extruder jams. The longer the filament path leading to the hotend, the harder it gets.  The dual belt drive extruder (they’re calling it ‘proper extruder’) grips the filament on two sides with a pair of supported belts, guiding it into the hotend without allowing it to deflect sideways. The extruder body and gears were resin printed (but, we checked — the design is suitable for FDM printing as well) proving that resin printing on modern printers, does indeed maintain adequate dimensional accuracy allowing the building of mechanisms, despite the naysayers! Continue reading “Tame Your Flexible Filaments With This Belt-Drive Extruder”

Geothermal System Is A Real Gold Mine

What do you get when Pacific Northwest National Laboratories takes over what was once the largest and deepest gold mine in North America? The answer might be enough energy to power 10,000,000 homes. The enhanced geothermal systems project includes the lab and several partners from academia and industry and aims to test sending fluids down boreholes so the Earth can heat them up. Hot fluids, of course, can easily create electricity.

At 4,100 feet underground, the old mine is not very convenient to get to. However, modern technology means that the equipment is largely automated so workers can carry out experiments from home using a computer or even a phone. The system itself is 7 feet long by 7 feet wide and 30 feet long. It was assembled above ground, tested, and then split into 4×4 sections for transportation deep below the surface.

Continue reading “Geothermal System Is A Real Gold Mine”

Build A Prop For A TV Premiere? Stranger Things Have Happened

Some guys get all the breaks. [Guy Dupont] had the honor of building a working, interactive wall-mount landline phone for the red carpet premiere of a certain TV show. The phone was to be an Easter egg inside an 80s-style pizzeria set. About every two minutes the phone would ring, and anyone brave enough to answer would be greeted with either a fake pizza order, an old answering machine message, or a clip from The Show That Cannot Be Mentioned.

Lots of room inside those old housings.

So the phone doesn’t work-work, but the nostalgia is strong — picking up the receiver when the phone isn’t ringing results in a dial tone, and button pushing leads to the busy signal. Those old pleasant-but-stern operator recordings would have been cool, but there was only so much time. (Your call cannot be completed as dialed. Please check the number and try again.)

[Guy] used a SparkFun RP2040 to handle input from the DTMF keypad and play the tones, the dial and busy signals, and the various recordings into the ear of the receiver.

Instead of messing around with the high voltage needed to drive the original ringer and bell, [Guy] used a small speaker to play the ringing sound. Everything runs on eight AAs tucked under the keypad, which is stepped down to 5 V.

This project was built under fairly dramatic duress, which makes it that much more exciting to watch the build video after the break. With just five days to get the phone working and in the mail, [Guy] holed up on the floor of his office, his messy mid-move refuge from a house plagued by COVID. Unfortunately, the whole pizzeria thing fell through, so [Guy]’s phone will not get to have its moment on the red carpet. But at least it’s on the site that’s black and white and read all over.

[Guy] is no stranger to the old tech/new spec game. Remember that time he shoehorned Spotify into an iPod Classic?

Continue reading “Build A Prop For A TV Premiere? Stranger Things Have Happened”

A Nicely Accurate PCB Drill Press You Can Build Yourself

Making PCBs isn’t always just about getting nice copper traces on a lovely fiberglass board. There’s often lots of drilling to be done! This PCB drill press from [w_k_fay] should help you do just that with the finesse and accuracy of a pro.

The design isn’t particularly fancy or pretty, but just simply focuses on doing a simple job well. There’s a basic DC motor, sitting on a linear rail so that it has minimal deflection in the X and Y axes as it moves up and down. Special care was taken to ensure the linear rail was mounted perfectly perpendicular to the base to ensure the drill doesn’t wander or splay off target.

A collet chuck is used to center the bit as well as possible for a good price. The build also includes a bright LED in order to give you the best possible view of your work. Power is via a variable bench supply which allows for variable speed as necessary. There’s a foot pedal to activate the drill which allows both hands to be used for positioning the work for added ease of use.

The total build came in at under $50 spend by the time [w_k_fay] was done. Alternatively, you could use this 3D printed design to build your own as well. If you’ve been whipping up your own useful tools for the home shop, though, don’t hesitate to drop us a line!

Hackaday Prize 2022: Upcycling Acrylic Scraps

Living and working in a remote rain forest may sound idyllic to those currently stuck in bland suburbia, and to be sure it does have plenty of perks. One of the downsides, though, is getting new materials and equipment to that remote location. For that reason, [Digital Naturalism Laboratories], also known as [Dinalab], has to reuse or recycle as much as they can, including their scraps of acrylic leftover from their laser cutter.

The process might seem straightforward, but getting it to actually work and not burn the acrylic took more than a few tries. Acrylic isn’t as thermoplastic as other plastics so it is much harder to work with, and it took some refining of the process. But once the details were ironed out, essentially the acrylic scraps are gently heated between two steel plates (they use a sandwich press) and then squeezed with a jack until they stick back together in one cohesive sheet. The key to this process is to heat it and press it for a long time, typically a half hour or more.

With this process finally sorted, [Dinalab] can make much more use of their available resources thanks to recycling a material that most of us would end up tossing out. It also helps to keep waste out of the landfill that would otherwise exist in the environment indefinitely. And, if this seems familiar to you, it’s because this same lab has already perfected methods to recycle other types of plastic as well.

Continue reading “Hackaday Prize 2022: Upcycling Acrylic Scraps”

SWO: An ARM Printf By Any Other Name

I’ll confess. Although printf-style debugging has a bad rep, I find myself turning to it on occasion. Sure, printf is expensive and brings in a lot of code, but if you have the space and time to use it while debugging you can always remove it before you are finished. However, what if you don’t have an output device or you are using it for something else? If you are using most modern ARM chips, you have another option — a dedicated output channel that is used for several things, including debugging output. I decided I wanted to try that on the Blackpill running mbed, and found out it isn’t as easy as you might think. But it is possible, and when you are done reading, you’ll be able to do it, too.

I’m writing this using the STM32-specific ST-LINK hardware. If you use other JTAG devices like the BlackMagic probe, you probably already have this set up for you.

What You Get

I’ll start backward with the end result, then talk about the software, so you’ll be good and motivated by the time you get to the hardware requirements. Spoiler alert: your existing hardware might need a quick hack to make it work, although you can buy something off the shelf if you prefer.

Here is a very simple test program:


SWO_Channel debugport;  // requires #include "SWO.h"
int main() 
  {
  unsigned count=0;
  debugport.printf("\r\nHello World from SWO\r\n");
  debugport.printf("CPU SystemCoreClock is %d Hz\r\n", SystemCoreClock);

  while (1) 
    {
    led = !led; // flip LED if output is true
    ThisThread::sleep_for(rate); // sleepy time
    if (count % 10) debugport.putc('*'); else debugport.printf("%d\r\n",count); 
    count++;
    }
}

Continue reading “SWO: An ARM Printf By Any Other Name”

Golf Club Shooter Is Your Ballistic Friend On The Green

Golf is a sport that has always enjoyed a good gadget or eight. Whether it’s something to measure the wind, or the latest putter guaranteed to save your game, golf enthusiasts have always flocked to such toys. [Nick O’Hara] has something that might just be a little too exciting for the golf set, though, in the form of his golf club launcher.

The golf club launcher essentially takes the role of a normal golf bag, with a rotating magazine containing all the necessary clubs for a day out on the green. The magazine is rotated into position on request, and the required club is launched out towards the player thanks to a pneumatic cylinder fired at 120 psi. A compressor in the base keeps the system charged with air for repeated launches.

The launcher even has a voice assistant built in. Telling the caddy the distance to the hole, and variables like wind and elevation, allows the device to select the right club for the conditions before blasting it towards the player.

It’s a device that easily puts a smile on the face every time it launches a club. We’ve seen some other great golf hacks before, too. Video after the break.

Continue reading “Golf Club Shooter Is Your Ballistic Friend On The Green”