Magnets Turn Flexible PCB Into Electric Grasshopper

Just because something doesn’t seem to have an apparent purpose, that doesn’t mean we shouldn’t try making it anyway. As flexible PCBs become cheaper and easier to order from low-scale fab houses, we’re seeing hobbyists experiment with new uses for them such as [Carl Bugeja]’s jumping circuit.

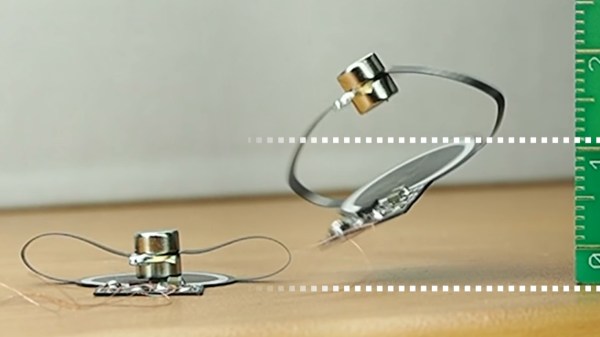
The circuit is based a coil printed on the flexible PCB itself acting as an electromagnet, but unlike other designs which use the same trick, in this one the coil is made to be the static side of an actuator. Attached to the circuit with folding arms is a stack of two permanent magnets, which work as the moving part. Since the magnets make up most of the mass of the circuit, as they’re pushed down and sprung back up, it causes the whole thing to leap around just under one centimeter off the table like a little electric grasshopper.

This is far from [Carl]’s first appearance here on Hackaday, and he’s been clearly busy exploring new uses for flexible PCBs with their properties as electromagnets, from making POV displays with them to small robots that move around through vibration. We’re excited to see what else he can come up with, and you can see this one in action after the break.

Continue reading “Magnets Turn Flexible PCB Into Electric Grasshopper”

Generate Power As You Ride With A Bicycle Planar Alternator

For most riders, bicycle lighting consists of an array of LED lamps and flashing gizmos, usually powered by lithium-ion batteries, or coin cells for the smaller ones. Some people though prefer to dispense with batteries and generate their own power, and that’s what [Thomas D] has done by fitting his bike with an alternator. But this is no off the shelf unit that rubs the tire or sits in a wheel hub. Instead, he’s built his own planar alternator that attaches to the spokes.

The design is inspired by those used in some wind generators, a central disk holding a set of planar coils sits between two rotating disks holding magnets. The stator holding the coils is made from laser-cut acrylic, and the rotors holding the magnets are sheet steel. One rotor is attached to the rear wheel spokes of the bicycle in close proximity to the stator which is attached to the rear frame. The second rotor sits on the other side of the stator while attached to the first rotor by its edge.

The coils are wired as two parallel groups in series in a ring with a single-phase output that feeds a rectifier and DC to DC converter. It would be interesting to see the effect of the same alternator with different winding arrangements or multiple phases.

This is the first time we’ve seen one of these on a bicycle, but this type of alternator has appeared here in more than one wind generator.

Continue reading “Generate Power As You Ride With A Bicycle Planar Alternator”

Magnets Make Prototyping E-Textiles A Snap

How do you prototype e-textiles? Any way you can that doesn’t drive you insane or waste precious conductive thread. We can’t imagine an easier way to breadboard wearables than this appropriately-named ThreadBoard.

If you’ve never played around with e-textiles, they can be quite fiddly to prototype. Of course, copper wires are floppy too, but at least they will take a shape if you bend them. Conductive thread just wants lay there, limp and unfurled, mocking your frazzled state with its frizzed ends. The magic of ThreadBoard is in the field of magnetic tie points that snap the threads into place wherever you drape them.

The board itself is made of stiff felt, and the holes can be laser-cut or punched to fit your disc magnets. These attractive tie-points are held in place with duct tape on the back side of the felt, though classic double-stick tape would work, too. We would love to see somebody make a much bigger board with power and ground rails, or even make a wearable ThreadBoard on a shirt.

Even though [chrishillcs] is demonstrating with a micro:bit, any big-holed board should work, and he plans to expand in the future. For now, bury the needle and power past the break to watch [chris] build a circuit and light an LED faster than you can say neodymium.

The fiddly fun of e-textiles doesn’t end with prototyping — implementing the final product is arguably much harder. If you need absolutely parallel lines without a lot of hassle, put a cording foot on your sewing machine.

Continue reading “Magnets Make Prototyping E-Textiles A Snap”

Sequence Your Beats With The Magic Of Magnets

Typically, when we think of a music sequencer, we envisage LEDs and boards covered in buttons. Of course, there are naturally other ways to build such a device. MesoTune takes a different tack entirely, relying on magnets and rotating mechanisms to get the job done.

MesoTune acts as a MIDI controller, and is designed to be hooked up to a computer or other MIDI synthesizer device. The heart of MesoTune is a set of eight magnet wheels, rotating together on a common shaft. The rotational speed of the shaft, dictated by the requested tempo in beats per minute, is controlled by an Arduino. Each magnet wheel has 16 slots into which the user can place a spherical magnet. Every time a magnet on the wheel passes a hall sensor, it sends a MIDI message to the attached computer which is then responsible for using this to synthesize the relevant sound.

There are other useful features, too. Each of the eight magnet wheels, or channels, gets its own fader, which can be used to control volume or other parameters. There’s also a handy tempo display, and a 16-button touchpad for triggering other events. These additions make it more practical to use in a compositional context, where it’s nice to have extra controls to make changes on the fly.

Made out of 3D printed parts and readily available off the shelf components, it’s a fun alternative sequencer design that we’re sure many makers could whip up in just a weekend. We’d love to see other remixes of the design – if you’ve got one, hit us up at the tipline. We’ve seen other great sequencer builds before, too. Video after the break.

A Nifty Tool For Separating Magnets

Neodymium magnets are fun to play with, largely thanks to their incredibly strong magnetic field. This also gives them plenty of applications where other magnets won’t cut the mustard. This very strength is also a drawback, making them difficult to work with and posing a danger to squishy human bodies. To help ease the task, [RandomCitizen4] developed a handy magnet separator tool.

The tool is similar in design to a pair of scissors, with two blades that are slid together when the handles are squeezed. The design is subtly different, however, with plastic blades that slide in between the gaps of a pair of magnets stuck together, pushing them apart. With just three parts to be 3D printed, a handful of fasteners and a rubber band, the tool is easy to build, too.

As someone who has spent significant time sliding magnets apart on the edge of a desk, wearing away the skin on my hands in the process, this tool would certainly come in handy. It might also be useful if you find yourself experimenting with magswitches or similar. Video after the break.

Continue reading “A Nifty Tool For Separating Magnets”

Magnetic Circuits Are More Attractive Than Breadboarding

Let’s face it, breadboarding can be frustrating, even for advanced electronics wizards. If you have an older board, you could be dealing with loose tie points left from large component legs, and power rails of questionable continuity. Conversely, it can be hard to jam just-made jumper wires into new boards without crumpling the copper. And no matter what the condition of the board is, once you’ve plugged in more than a few components, the circuit becomes hard to follow, much less troubleshoot when things go pear-shaped.

In the last twenty years or so, we’ve seen systems like Snap Circuits and Little Bits emerge that simplify the circuit building process by making the connections more intuitive and LEGO-like than even those 160-in-1 kits where you shove component legs between the coils of tight little springs. You will pay handsomely for this connective convenience. But why should you? Just make your own circuit blocks with cardboard, magnets, and copper tape. It should only cost about 10¢ each, as long as you source your magnets cheaply.

[rgco] gives the lowdown on building a minimal set of 23 component and connector blocks using 100 magnets. He’s got 11 example circuits to get you started, and some example videos of more advanced circuits that got tacked up after the break.

This method of making the circuit look more like the schematic may be the best way for the visually-inclined to learn electronics. But the best way to learn electronics depends on where you’re coming from.

Continue reading “Magnetic Circuits Are More Attractive Than Breadboarding”

Vertical Train Hauls Up The Wall

Trains are great for hauling massive amounts of cargo from point A to point B, and occasionally, point C on weekends. But they’re not really known for climbing hills well, and anything vertical is right out. Regardless, [Can Altineller] knows what he wants and set to work, creating the 3D Printed Wall Train.

The first step was to get the train to stick to a vertical surface. This was achieved with the use of neodymium magnets in the train, which are attracted to laser-cut steel plates beneath the plastic tracks. The train itself consists of a custom 3D printed locomotive, outfitted with a motor and step-down gears that drive all four wheels. Said wheels are of a conical shape, and covered with rubber to provide enough grip to overcome gravity. The project is a progression from [Cal]’s earlier four-motor build.

The final result is a charming wall display, with the four-wheel drive train merrily tugging its carriages around the circular course ad infinitum. It’s a fun build, and we’d love to see similar techniques applied to a bigger layout. If this whets your appetite for model railroading, consider building your own turntable, or implementing some fancy sensors. Video after the break.

Continue reading “Vertical Train Hauls Up The Wall”